The eIntranet application guide
This section describes the procedure for logging into the application and making changes passwords and settings of other security elements and, on the one hand, they are here individual modules of the application, their functions and procedures are described in detail for their use. The application user will find the setting procedure here individual modules, obtaining access rights, etc.
Access to the application
Basic information regarding access to the application, password settings, etc to log out of the application are listed in the following section.
Login to the application
Access data for logging into the application will be received by the application user from application manager. After entering the web address, which will be in the form https://COMPANYNAME.eIntranet.net/, to the Internet browser (the most suitable variant of the Internet browser for problem-free using all the functions of the application is Chrome) a table will appear, in which the user enters his e-mail address and access password which received from the application administrator.


Changing the password
The user changes the password after logging in to the application by clicking on his password name in the upper right corner of the screen. The "Change" button will then appear passwords':
After clicking the "Change password" button, a table will appear in which you the user enters a new password.

Login with two-step verification using Google Authenticator
To enable the option of two-step verification, it is necessary to proceed as follows:

-
 Install on your phone
the Google Authenticator application - the application is available for free for
Both Android and iPhone in the Play Store and the Apple Store. Application after adding
account generates a code (so-called Token) for logging in without the need
data and mobile connection immediately, so it is faster and
usable at any time unlike SMS.
Install on your phone
the Google Authenticator application - the application is available for free for
Both Android and iPhone in the Play Store and the Apple Store. Application after adding
account generates a code (so-called Token) for logging in without the need
data and mobile connection immediately, so it is faster and
usable at any time unlike SMS. -
If you have never used the application, it will welcome you on your phone after the first launch, an initial information window with the option to log in to your Google account - at the bottom left you can START and/or SKIP - and you will be taken to the view for adding a new account:
-
We recommend scanning the barcode (the application will ask you for permission access to the camera - set ENABLE) to prevent errors in the description - see the settings for two-factor authentication and scan the code with your mobile camera:

-
 You will then see a new in your application
added account with generated code, code is always valid for 30
seconds, then a new one is generated:
You will then see a new in your application
added account with generated code, code is always valid for 30
seconds, then a new one is generated: -
You will then enter this code when logging in:

Quick overview
After logging into the application, the so-called Quick appears on the initial page an overview in which you can see the most important and up-to-date information from individual modules that are used within the company.
If the user wants to see a quick overview while working with the application, it is necessary to click on the eIntranet logo in the upper left corner:

 Quick calendar
For easier and more efficient work in the application, it is possible to keep in the upper one menu show quick calendar which allows quick view current date and week number.
Quick move to used modules
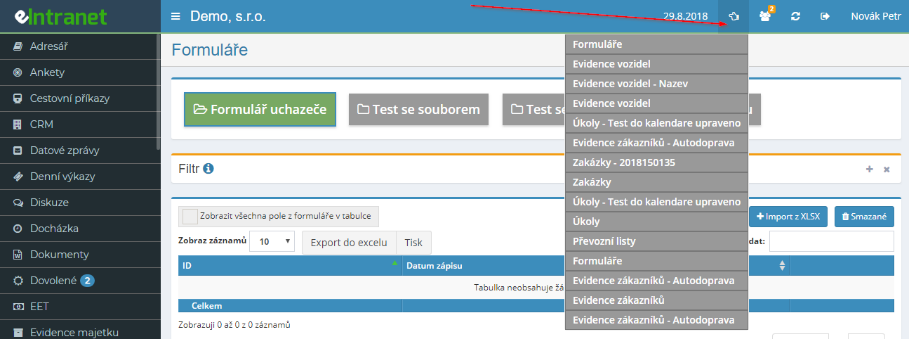
For quick return to the module in which the user after logging in to application worked, it is possible to use the hand icon in the upper right corner. After clicking on this icon expands the recently used menu of modules, thanks to which it is possible to get to the required module faster – just click on the desired module.
The menu shows the user's last 15 records (per list records is not affected by the user's logout from the application:
Sign out of the app
The user logs out of the application by clicking the button
 located on the blue bar
in the upper right corner of the screen.
located on the blue bar
in the upper right corner of the screen.
Practical types for working in the application
Search
There are 2 basic search options across modules within the app:
- "Search" quick box - found above the overview table recorded data (requests, travel orders, property items, etc.):


If it is more user-friendly for the user to search term remained searched until the user deletes it himself, for example this set here:
- Filter – search in individual modules according to specific criteria (as a rule, search using 1 type of criteria is possible) – activates by clicking the + icon:

 If the inscription "Filter" is lit in red, it means
that the search is still active and the button needs to be clicked
"Cancel" to deactivate the filter:
If the inscription "Filter" is lit in red, it means
that the search is still active and the button needs to be clicked
"Cancel" to deactivate the filter:

Changing the password
If the user needs to change the password, the easiest way is this:
User can't see pasted data even though they should
 If users stop showing up
data it should be able to access, it's a good idea to try using this first
button:
If users stop showing up
data it should be able to access, it's a good idea to try using this first
button:
 Edit signature in emails sent
from the app
Edit signature in emails sent
from the app
Signature in emails sent from the app - e.g. when sending of orders, offers, requests - can be edited here:
News in the app
 Users are about what's new in the app
continuous information on the home page of the application:
Users are about what's new in the app
continuous information on the home page of the application:
The option to display news can be turned off by unchecking it options in Settings, Basic Settings tab:

Directory module
The directory module is used to clearly store contact information as about own employees, as well as about suppliers, customers, business partners or other external collaborators.
The module allows fast full-text search or descending or ascending column sorting, which makes it easier to find a specific contact. Contacts entered in the directory module can be exported from Excel or sent to mobile via the SMS gateway (included in the price of using the service).
Directory module settings
Access to the module is specified by a directory with specific access rights app admin users in the Settings section, Address Book tab.
Directory module access rights
Within the directory module, users can obtain a directory from the application administrator the following rights: does not have access - read - read and write - read, write, delete and restore from recycle bin.
Breakdown of the directory module
In the directory module, columns are set up with individual contact details – Company, Surname, First name, E-mail, Address, Telephone, Mobile, Position, Type contact, Note.
Sorting data in the directory module
 Within individual columns it is possible to si
choose ascending/descending data sorting by clicking on the u arrow
specific column.
Within individual columns it is possible to si
choose ascending/descending data sorting by clicking on the u arrow
specific column.

Adding or editing contacts in the directory module
To add a contact to the address book, click the button
 in the upper right corner. Subsequently,
expands a table in which individual contact details must be filled in,
such as first name, last name, phone, email, company and more:
in the upper right corner. Subsequently,
expands a table in which individual contact details must be filled in,
such as first name, last name, phone, email, company and more:
Searching for contacts in the directory module
There are two ways to search for a contact. The first option is to enter of the required information (company name, person's surname, etc.) into the Search field in the upper right corner of the screen.
The second option is to use a filter and search for the exact data criteria:

Editing and deleting contacts in the directory module
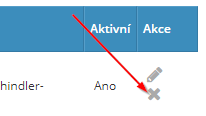
If you have been assigned rights to edit and delete contacts, just in the column The action of clicking on the pencil icon (if necessary to edit the contact) or cross (to delete the contact) and perform the necessary action.
Downloading and printing contacts from the directory module
Individual contacts from the address book can also be sent via SMS
to a mobile phone. Just click on the icon
phone which is placed in the column
Action.
which is placed in the column
Action.
All contacts can also be retrieved in an Excel spreadsheet. Just click on the "Export to Excel" button and the table will be downloaded to your selected place on your computer. Export to Excel is only functional if you have application running in the Chrome web browser.
The "Print" button is used to print the contact table.
Finding deleted contacts in the address book module
If the user is enabled with read, write, delete, and
restore from recycle bin, can track back deleted if needed
contacts by clicking the "Deleted" icon in the upper right corner.
Subsequently, a table will expand with an overview of the contacts deleted so far. If
you need to return the already deleted contact back to the address book, you need to click
to the "Restore" button  .
.
Poll module
The survey module allows easy creation of company surveys, questionnaires and evaluation and obtaining information about opinions, attitudes or knowledge not only users of the corporate intranet. The created poll can be accessed on the one hand to selected intranet users and on the other hand to external users (via generated link).
Poll results are generated automatically and the poll administrator can view them to display in clear statistics. Within the module it is possible get answers to both open and closed types of questions.
Poll module settings
Grants access to the poll module with specific access rights application administrator users in the Settings section, Polls tab.
Poll module access rights
As part of the poll module, users can get from the app admin the following rights: no access to survey management - display results of all polls – create new polls and display poll results.
Who can participate in individual polls is set by the poll administrator at creating a specific poll.
Creating a new poll
A new poll is created by a user who has been assigned rights to do so in the section Administration of polls.

This section contains the button  ; after
clicking this button expands the table into which the survey manager
enter the information for the survey being created:
; after
clicking this button expands the table into which the survey manager
enter the information for the survey being created:
-
name of the poll
-
title text size
-
title text color
-
image on the background of the survey name
-
date when the poll will be active (from – to)
-
to whom it will be accessible - e.g. to all eIntranet users from your company, to selected users from your company, access via a unique link (a link will be generated to be forwarded to the person to fill in - e.g. customers, potential applicants, etc.)
-
whether the survey will be anonymous or whether it will be possible to view the answers of individual users
-
logo – allows you to upload an image of the company logo or your own logo polls (only 1 image)
-
introductory text that will be displayed to users when viewing the poll (for example, informing about the focus of the survey)
-
text at the end of the survey (e.g. thank you for your time).
 Insert questions
The poll administrator inserts a new question by clicking the "Edit" button questions' located in the initial view of the poll overview in the section Manage polls. After clicking the "Add another question" button, which located in the upper right corner of the screen, a table will appear in which the user defines a new question - completes its wording and selects a type response, or display condition.
Possible answer types are:
-
text response – allows any type of text response (incl numbers)
-
choosing 1 of the given options - chooses from the offered answer variants respondent 1 option
-
choosing several answers from the given options - from the offered options the respondent can choose 1 or more answers
-
selection of one image from those entered - the respondent marks one option image
-
rating 1-5 stars (more is better) - enables rating
-
sorting by importance
The display condition allows you to set the conditions under which the question is displayed will display. The default setting is that the question is always displayed. Further is a possible display to follow up on the answer from the previous question - eg if the respondent answers yes to the previous question, they will be shown this question; if they answer no, the question will not appear.

Sorting of questions
The order of created questions can be variably edited, using arrows next to the question number. Click on the arrow the question always shifts by 1 place:
Editing or deleting a question
To edit or delete a question, you need to go to the Actions column, which is located there at the end of the line for each question in the question overview, click on the icon pencil (if you need to edit the question) or cross (to delete questions) and perform the necessary action.
Poll preview
A preview of the created survey with the option to fill in the answers for each one
questions can be viewed by the poll administrator by clicking on the button
 , which is located at the end of line u
of each poll in the Manage Polls section.
, which is located at the end of line u
of each poll in the Manage Polls section.
After displaying the survey, it is necessary if the user does not want to include practice fees responses to poll results, delete responses using the icon cross, which is found next to each poll in the Poll Results section.
Edit or delete poll
Editing the survey (or initial information about the survey; if it needs to be edited questions in the survey, you need to use the "Edit questions" button - see above) is possible with the help of the pencil icon located at the end of the u line each poll in the polls overview in the Manage Polls section. To delete the survey the cross icon is used, which is located there.
Poll results
The poll administrator can view the poll results in the Poll Results section.

In this section, the survey administrator can see how many respondents answered within the box
his polls, and can view the answers to individual questions –
by clicking on the columns icon  - here it is
it is possible to display the answers of individual respondents (if there is no survey
anonymous) - by clicking on the eye icon - or delete answers from the survey -
by clicking on the cross icon.
- here it is
it is possible to display the answers of individual respondents (if there is no survey
anonymous) - by clicking on the eye icon - or delete answers from the survey -
by clicking on the cross icon.
The survey results can also be downloaded in Excel:

The Excel file then displays users who have already completed the survey filled out, and below that the users who were prompted to fill it out polls, but have not yet done so:

My polls
In the My polls section, the user can see the polls he has taken assigned and to be attended.

Bank statements module
The bank statements module allows you to match payments with invoices received/issued in the eIntranet application, thus facilitating review corporate payments.
Recording of statements is possible automatically (in the case of Fio Banka or Raiffeisenbank) or manual import is possible. Automatic recording of statements from another type of bank is possible on the basis of a paid programming modification fill in.
When a payment is matched with an invoice issued or received, that payment is flagged as settled, or it is possible to mark the settlement of the payment manually.
Statements can be imported for multiple accounts.
Bank statements module settings
Access to the bank statements module with specific access rights entered by the application manager user in the Settings section, Banking tab statements.
In the Bank connection section, he can then have the relevant bank connected accounts for automatic download of statements (Fio Banka, Raiffeisenbank):

Access rights to the bank statements module
Within the bank statements module, users can from the application administrator get the following rights: does not have access - view selected - view all - view selected + edit - view all + edit.
Downloading statements
 Statements can be uploaded from the bank to the module
automatically - in the case of Fio Banka or Raiffeisenbank or manually.
Statements can be uploaded from the bank to the module
automatically - in the case of Fio Banka or Raiffeisenbank or manually.
For automatic download of statements, it is necessary in the settings of the Banking module listings enter data for downloading. Payments made are then automatically made they stretch about 3 times a day.
For manual import, it is necessary to use the button Actions - Import XML CBA format:
View payments
Uploaded statement payments can be displayed all at once or only from the selected account. You can view only pending payments or all:

Received payments are displayed in green, issued in red. After pairing accepted payments with an invoice issued, the amounts for this invoice will be displayed in green:

And in the detail of the invoice, the date of its payment is written:

A payment issued to be matched with an invoice received must have given invoice in the Approved section, to be paid in the Invoices received module:

After the payment is deducted, the date of payment of the invoice is automatically entered on the invoice (Reimbursement Date item) and the invoice is moved to the Handled folder.
Payments that cannot be matched automatically can be marked manually as handled.
Details of individual payments
After displaying the payment detail (eye icon), pairing can be done manually with the invoice issued or received or write a note:

Export and print to Excel
Uploaded items from bank statements (all/pending only) from individual accounts (or all, depending on the type of display) is can either be printed by clicking the "Print" button, or download to an Excel spreadsheet - by clicking the button "Export to Excel". Export to Excel is only functional if you have the application running in the Chrome web browser.
Travel orders module v2
Employee work trips are often a significant help in fulfillment of work tasks imposed by the employer. Travel module orders significantly facilitates the management and provability of the necessary ones actions connected with the implementation of work trips.
The procedure for entering and processing a travel order is derived from of printed travel order forms so that it is secured the relevance and procedural correctness of the records of work trips, and at the same time reflects individual company rules.
As part of an electronic travel order maintained in the eIntranet application all the conditions of a specific business trip are clearly and accurately stated employees so that they can be approved by the dispatching manager employee (relevant manager authorized to do so). This part is is decisive and subsequently corresponds to the work trip invoice. It goes especially about the time and place of starting and ending the journey (beginning and end work trips), place of performance of work tasks (transitional workplace), mode of transport, accommodation and more, as needed and at your discretion employer.
All approvals are done within the travel orders module in electronic form, which significantly speeds up the entire approval process. At the same time, if necessary, the possibility of obtaining a printed version is preserved approved travel order.
Within the module, it is possible to submit an application both for domestic and i foreign work trip.
 Travel orders V2 replaces the original
Travel Orders module - There are more in the new version of this module
reflected possible individual user requirements for possible reports
data and allows them to submit travel orders for employees as well
working outside the Czech Republic (e.g. if the user has set the state of performance of work to SK,
can submit a travel order according to SK rules).
Travel orders V2 replaces the original
Travel Orders module - There are more in the new version of this module
reflected possible individual user requirements for possible reports
data and allows them to submit travel orders for employees as well
working outside the Czech Republic (e.g. if the user has set the state of performance of work to SK,
can submit a travel order according to SK rules).
Travel orders module settings v2
Access the travel orders module with specific access rights entered by the application manager user in the Settings section, Travel tab commands.
In the module settings, under General settings, the administrator checks individual items to be included in the form and individual process steps (to whom it is sent for approval, etc.):
In the Reimbursement Settings section, reimbursement amounts are defined by state, respectively according to the place of employment (e.g. if a CZ card is established, the amount of compensation valid according to Czech legislation is entered, inclusive foreign trips). Using the "Add state" button, a card is created of the given state and below it, the module administrator fills in the relevant amounts:

 Within the CZ card (so it refers to
employees in the Czech Republic) travel allowances will be set as for
domestic and foreign business trips:
Within the CZ card (so it refers to
employees in the Czech Republic) travel allowances will be set as for
domestic and foreign business trips:
It is important to check the validity date of the travel reimbursements, if necessary, to do so copying and setting for the next period:

Access rights to the travel orders module
Within the travel command module, users can from the application administrator get the following rights: does not have access - read/write your - read/write own and read/write subordinates - read/enter all – read/enter/delete/restore and change states for everything.
In addition, default values for individual users and the default can be specified approvers (can be loaded automatically from the employee hierarchy).
 Starting a travel command
The user creates a domestic or foreign travel order by clicking on button "Create travel order"/"Create travel order foreign".
A table will then appear in which the user fills in the required data.
Domestic travel order:
Foreign travel order:

After saving this table, a travel command will appear with its option signature of the submitter of the travel order.
Work trip approval
As part of the approval of the travel order, the submitter of the travel order may command and other relevant users to send a travel command:
-
For road approval
-
To be approved for reimbursement
But it always depends on how the travel orders approval process is set in module settings.
Work trip billing
In the individual lines, the user then fills in the costs of the business trip - it is calculated according to the conditions specified in the settings of the travel orders module (length of trip, number of meals, compensation amount):

 Travel command states
It is possible within the process to set up and use the module path approvals assign the following CP statuses:
In the initial overview of travel orders, there are created travel orders commands filtered according to these statuses (it is possible to display e.g all travel orders pending travel/reimbursement approval or which are processed):

Signatures of travel orders
As part of the electronic approval of travel orders, they are recorded and the signatures of the relevant employees – employees sent on the trip, supervisors and accountants.
After clicking the button, the date and time of the employee's signature is recorded:

Search for deleted travel orders
If necessary, a user who has the rights set to do so can
find deleted travel orders by clicking on the "Deleted" button.
By clicking on the icon  can be deleted
have travel orders restored.
can be deleted
have travel orders restored.
Export and print to Excel
Individual travel orders can either be printed by clicking on the "Print" button, or download to an Excel spreadsheet - by clicking on "Export to Excel" button. Export to Excel is functional only if you have the application running in the Chrome web browser.
CRM module
 The CRM module is aimed at supporting a
maintaining relationships with customers, business partners, clients and others
cooperating entities.
The CRM module is aimed at supporting a
maintaining relationships with customers, business partners, clients and others
cooperating entities.
It is a simple and clear solution that enables the recording of all important information regarding all business partners and supporting mutual communication with them.
The basic data that the company will register within the module are preset, but there is an option for modification or addition individual criteria.
Within the module, preset options for: business type can be modified (e.g. supplier, investor, competitor, media, customer), state companies (e.g. current, not interested, former, potential), industry companies (e.g. IT, retail, industry, services, telecommunications, wholesale, education, healthcare), contacts – positions (assistant, economist, HR, executive, marketing, buyer, sales representative, director, accountant), addresses – type (e.g. headquarters, offices, shop, warehouse, production plant), record type (e.g. e-mail, fax, offer, note, meeting, contract, phone call).
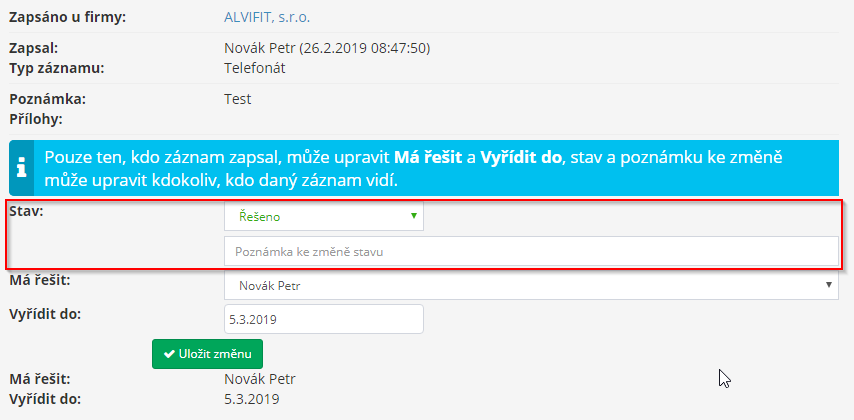
There are record states hard-defined in the module, and scheduled – solved - solved - cancelled. If the record status is Scheduled or Resolved, this record becomes a task that can be assigned another user to solve (the selected user is automatically informed informed via e-mail message).
Several search methods are possible within the module, from quick search up to filtering company contacts (company name, sector, number of employees, etc.), respectively of inserted records by contact type (phone call, meeting, offer...).
The CRM module also offers the display of various types of reports and statistics relating to embedded records. The user has the opportunity to see clearly list of upcoming or unresolved tasks. Especially for management companies are also important inventories of all records that have been made, display the number of records for the last 30 days or a statistic with a title "Employee Activity in the Last 30 Days".
CRM module settings
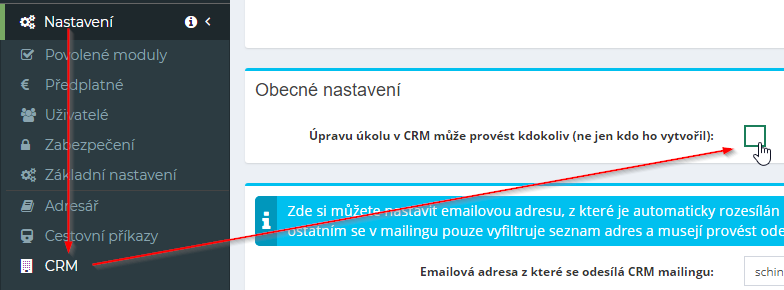
Access to the CRM module with specific access rights specifies app admin users in the Settings section, CRM tab.
In the General Settings/Optional Fields section, the application administrator also sets necessary data that the company will register (all variants registered records can be supplemented with your own data options):
-
Type of companies – e.g. supplier, investor, competitor, media, customer
-
Status of companies – e.g. current, no interest, former, potential
-
Company sector – e.g. IT, retail, industry, services, telecommunications, wholesale, education, healthcare
-
Contacts - positions - e.g. assistant, economist, HR, manager, marketing, buyer, sales representative, director, accountant
-
Contacts - addressing - dear lady, dear sir
-
Addresses – type – e.g. head office, offices, shop, warehouse, production race
-
Record type – e.g. e-mail, fax, offer, note, meeting, contract, phone call
-
 Record states - these items are
hard-defined and can only be modified by programmatic modification to
order – planned – resolved – resolved – cancelled
Record states - these items are
hard-defined and can only be modified by programmatic modification to
order – planned – resolved – resolved – cancelled
The following options can also be set:
In addition, the application administrator can define a custom field in this tab, which the company wants to define for the specified companies, branches and contacts:

Access rights to the CRM module
Within the CRM module, users can obtain from the application administrator following rights: no access - can read all - can read own, write to his - can read everything, write everything - can read everything, write all, delete, restore, import companies from XLSX.

Furthermore, users can add these extra rights (square check-box):
-
Export companies/contacts to xlsx
-
Editing records
-
Deleting records
Current section

This section shows reports and statistics about the records in the CDM module.
The number of records for the last 30 days is displayed here, where possible set different display criteria:

Next, upcoming or unsolved tasks are displayed here:

A list of all records that were in the module can also be clearly seen here CRM held:

Especially for company management, there is a statistic called "Activity of employees in the last 30 days':

Companies section

In this section, the user sees a complete overview of companies and their basic ones data entered in the CRM system.
In the overview of companies, it is possible to easily add a record by clicking on "+" icon. The eye icon is used to preview the record, the icon is used to delete the record cross.
After clicking on the detail (preview) of the company - the eye icon - all will be displayed data registered for the given company (branches, contacts, records). These data it can be edited in the preview view, or a new one can be added branch, contact or record.

The user adds a new company by clicking the "Add company" button. Subsequently, a table will be expanded in which the user fills in the necessary data, possibly, some data will be filled in automatically after loading the ID number:

It is also possible to import companies from Excel in this section - it is always possible import 100 companies at once.

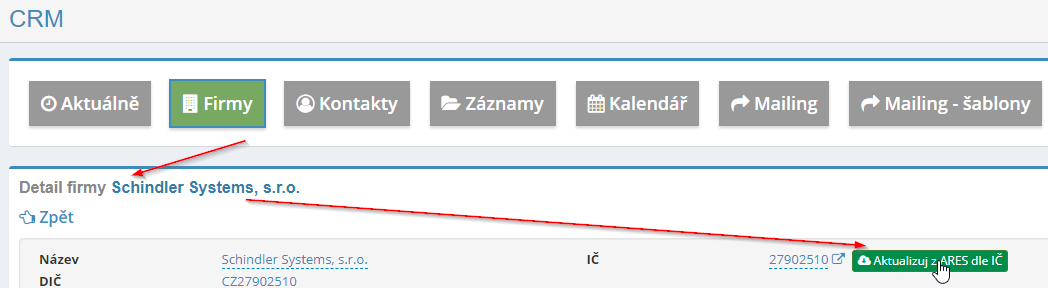
If you need to update data from ARES for an already established company, it works this button for that:
If you need to enter a record or a task for several companies at once, it is it is possible to use the function of checking multiple companies at once. After labeling of the selected entries, you need to click on the "Add to marked" button entry/task'.
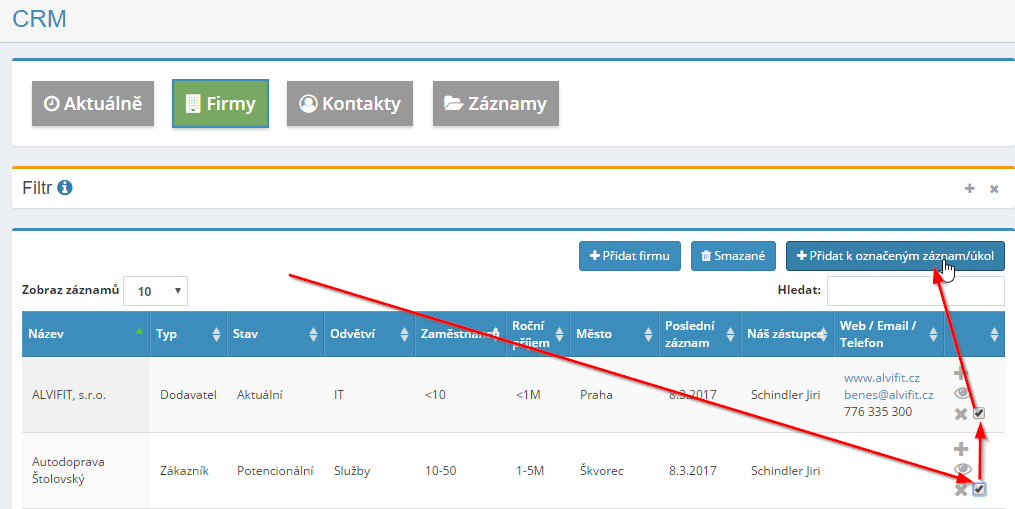
 Next, a table will expand in which
the user enters the necessary record.
Next, a table will expand in which
the user enters the necessary record.
If necessary, it is possible to turn on/off the display of selected columns, by clicking the "Show columns" button, or by clicking on the name of the respective column to be displayed or not:

Furthermore, it is possible to change the order of the displayed columns as needed, namely by dragging the name of the selected column to the desired position:

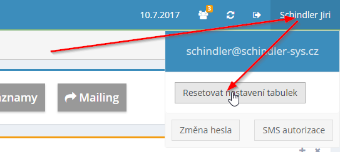
The new settings can then be reset to the original display, namely using the button to reset the table display settings:
Within the company detail, it is possible to link to the Projects, Worksheets module and HelpDesk – already created relevant projects/statements of work can be viewed and tickets or enter a new project/statement of work/ticket:

This connection is also possible at branch level.
In the Companies section, it is also possible to perform bulk import of companies - potential customers - from a national database of companies. Thanks it is possible to prepare a list of companies for this import in the CRM module addressing. They import only basic data – company name and public available addresses (not contacts - e-mails, telephones).
After clicking on the Import button, the option "Import companies from nationwide DB companies" and subsequently it is possible according to various criteria (district, date of establishment, form, number of employees, field of business) even more closely specify the companies you are interested in importing.
A maximum of 100 records can be imported at once.


Contacts section

 This section displays contacts from
of all companies and branches. It is possible to use them to quickly find who is calling,
holiday wishes, announcements to executives, etc.
This section displays contacts from
of all companies and branches. It is possible to use them to quickly find who is calling,
holiday wishes, announcements to executives, etc.
A new contact is added by the user by clicking the "Add Contact" button. Subsequently, a table will be expanded in which the user fills in the necessary data to the new contact (position, address, first name, last name, e-mail, phone atd).
Records section
In the records section, records of all companies, branches and contacts are displayed. It is suitable for an overall overview of unprocessed records or filtering work of individual users.
A new record is added by the user by clicking the "Add record" button. Subsequently, a table is expanded in which the user fills in the necessary information information on the new record (see the table in the Companies section - "Adding a record k“).
You can, if necessary, enter an entry within 1 hour of its entry delete, not later.
If you enter a status other than resolved (planned or solved), the entry becomes a task that you can enter to solve to another user:

If the user has a higher type of access rights set - at least Can read all, write all - then can record if necessary - only status or note - even the user who did not write the selected record can edit it.
If the user is to have the right to edit the record in any way (even if did not create), he needs to have higher access rights and check this option in module settings:
 In the module settings it is possible to enable
so that when a record (status) is edited, the creation date also changes
record - this allows you to get a better overview of the current activity/records
users.
In the module settings it is possible to enable
so that when a record (status) is edited, the creation date also changes
record - this allows you to get a better overview of the current activity/records
users.
Recorded records for a certain period can also be filtered and exported to Excel:

Mailing section
In this section it is possible to send information via e-mail clients who are included in the database and which you can filter according to need.
First, you need to search for the entered e-mail addresses, according to: companies - branches - contacts

In the next step, it is possible to specify more detailed requirements regarding clients, to whom the information is to be sent.

A list of found relevant contacts will then appear.

In the last step, you need to write the text of the email message, attach attachments and then click the "Send" button. Suddenly you can send a maximum of 50 emails.
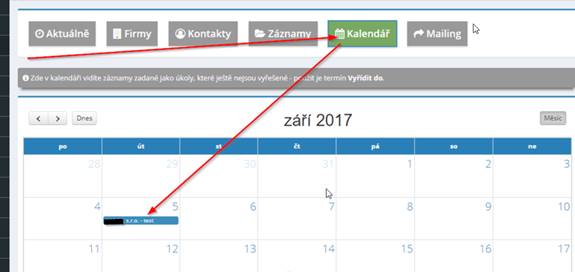
Calendar section
This section enables a clear display of records entered as tasks in the calendar (the user sees what tasks he has to complete in the context of the month). It is also possible to view the details of the task after hovering over the record and clicking on it on the record to open the entire task record and view the details.
Search in the CRM module
The necessary data entered in the individual sections of the module is possible quickly search, by entering the data you are looking for in the "Search" window, which is located on the right side of the screen.

It is also possible to search in the CRM module using the Filter. You can search according to various parameters, e.g. by company name, contact type, status, industry etc.

If the filter is active, the name "Filter" will be displayed in red:

To turn off the filter, use the "Cancel" button.

In the Records section, it is also possible to use the "Records Filter", where it is possible to click on the data according to individual record types.

Data message module
The data box is an electronic storage that serves to deliver electronic documents between public authorities and natural or legal persons. By law, they must have a data box established by all state authorities and registered legal entities in the commercial register. For others, it is the establishment of a data box optional.
The data message module allows you to work with data messages via data boxes of the ISDS system. Within the module, it is not only possible to download a send data messages, but also transmit them electronically to those responsible workers to deal with. The module allows working with multiple data boxes suddenly.
It is possible to have as many active data registered within a module mailboxes, how many users are subscribed - i.e. if it is within your 10 users registered for the eIntranet, it is possible to have 10 active mailboxes. Alternatively, the number of users can be paid extra to make it possible have the relevant number of data boxes active.
Within the module it is also possible to receive and send postal data messages, which represent an electronic equivalent of registered mail.
Advanced search is enabled in all data reports, and not only that according to basic criteria such as the name of the sender or recipient and the date delivery, but also in the content of delivered or sent documents.
The data message module allows for unlimited archiving of delivered messages of data messages (in classic data mailboxes, the message storage time fixed for 90 days, after which it is necessary to subscribe to a special service, the so-called data vault).
If the module is not used for more than 60 days, the application will automatically notify the user who has been assigned the rights to download the content data box (to prevent loss of data stored in the data box after 90 days).
The data message delivered can be handled by a responsible employee who has from Application administrator assigned rights, process directly (and mark it as processed) or forward it in electronic form to another relevant to the worker for the solution (the assignment of a new message for the solution is given worker automatically informed via e-mail message).
Data message module settings
Grants access to the data message module with specific access rights app admin users in the Settings section, Data Messages tab.
Access rights to the data message module
Within the data message module, users can obtain from the application administrator the following rights: no access - can read messages assigned to the solution - can read all - can read and create messages to send - can read, download and view as an authorized person - can read, download and send messages ("+send").
For access rights, it is possible to limit whether the user should have the given right for all data boxes or only for specified data boxes:

Connecting a data box
The data box from which the data messages will subsequently be downloaded, will be added by the app manager in the Settings section, Data Messages tab. Here it is when you click the "Add connection" button, it expands the table in which it is need to fill in the username and password to connect to the data box.


In the specific databox settings, enter:
-
automatic download of messages (and sending a copy of the message to e-mail)
-
exceptions to the automatic download of data messages
-
automatic marking of messages in MojeDatovaSranka as read at download to eIntranet (there will no longer be messages in MojeDatovaSranka highlighted in bold)
-
automatic processing of invalids (see eDisableds module)
-
access for an Authorized Person (see chapter viewing as an Authorized Person person)
It is possible to download (and thus attach) more within a data message module data boxes.
Delete data box
The data box can be deleted by clicking on the cross u icon respective data boxes in Settings, Data messages tab:
Breakdown of the data message module
The data report module contains the following sections:
-
Delivered – contains all delivered data messages
-
Resolved - contains data messages that are pending
-
Resolved – contains data messages that have already been resolved
-
To be sent - Contains data messages that are ready for authorized users to submit (they were created by a user who does not have the right to send messages)
-
Sent – contains sent data messages
-
New message – allows you to create a new data message and send it or including it in the "To be sent" folder

Received data messages
To view received data messages, you need to select a data message the mailbox from which the data messages are to be downloaded and click on "Download received and sent messages" button.

Subsequently, the received messages are downloaded to the Received and sent data section messages will appear in the Sent section.
If the data message contains an invoice, it is possible if it is in the frame account enabled invoice module received, move straight to the invoice module received:

Data message detail
The detail of the data message is displayed after clicking on the selected delivered one data message. Subsequently, a table will appear in which you can see the closer ones information about the data message – eg the sender, when the message was delivered (i.e. when it was sent by the sender), when it was delivered (i.e. when you recipient downloaded the message) etc.

To the downloaded data message, it is possible, after clicking on the button "Add note" to add more detailed operational information.
The delivered data message can then be marked either as handled (by clicking the "Mark as resolved" button) or submit for resolution to the relevant person (by clicking on the button "Forward to the solution to the user" - then a table will expand with the option to select the user who has to solve the message and to which a message will be automatically sent to forward a new one data messages to solve).
Solved, processed and sent data messages
The Resolved section contains data messages that have been forwarded to the relevant staff member for resolution. It's possible to keep it in the Done section view data messages that have already been resolved. Data messages that have been sent can be viewed in the Sent section.
For sent data messages, in the Inbox (.zfo file), first downloads the information about the delivery of the message and subsequently to the file automatically it also fetches information about the delivery of the message, i.e. that the message was on the page addressee opened).
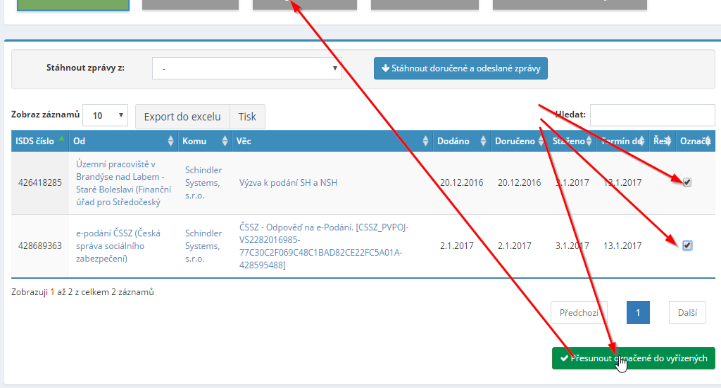
You can also process data messages in bulk within the module. You mark with messages that are already handled and have them moved to a folder Done. A change of status is also automatically recorded in the notes for the given message (so you know in retrospect who made the change).
In this way, you can easily keep order in the messages that need to be addressed and which are already resolved.
Rules for the automatic processing of data messages
Conditions are set in the settings of the data report module in the Rules section when the message is received and the action taken subsequently.
Rules are triggered and tested only on messages in the Inbox. Before using the rules, we recommend testing them thoroughly – see the "Try the Rules" section.

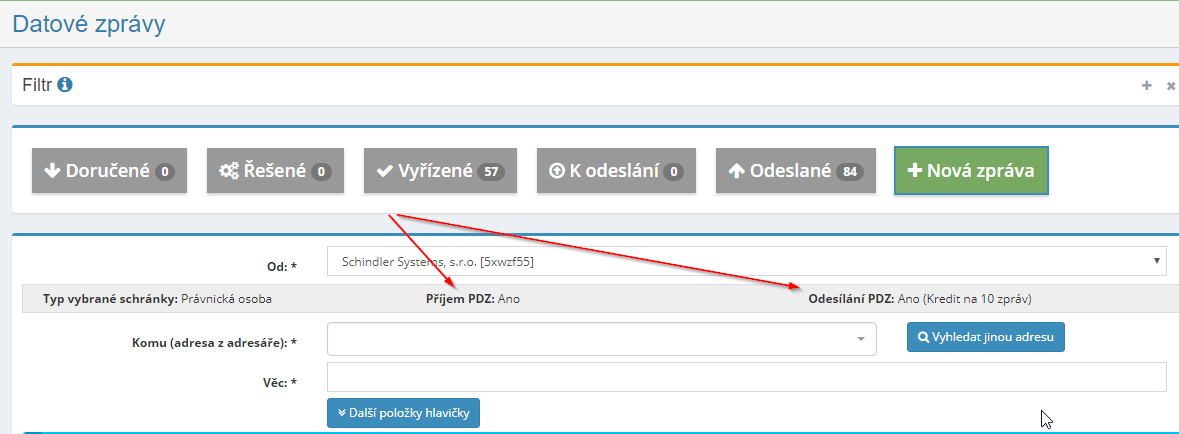
New data message
A new data report can be prepared in the "New Report" section. Here the sender selects the name of the mailbox from which he wants to send the message, completes the address to whom the message should be delivered (can choose from the address book or with the help of the "Find another address" button, add a new addressee) a matter to which the data message relates and attach attachments.
It is also possible to enter the numbers of the proceedings and file marks of the senders i recipients.
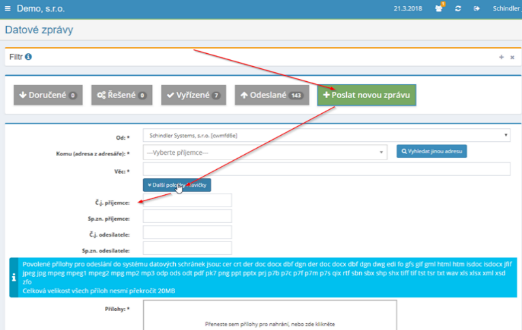
The maximum size of all files that the sender wants to send is not allowed exceed 20 MB. In total, a maximum of 10 can be sent at once files.
The message is sent after clicking the "Send" button.
However, it is also possible to create a message and just prepare it for sending - after to create a new message, you must click the "Prepare" button to send":

You will then be offered the option to send a notification about the created message users who have the right to send the message. It finds the message to send authorized user in the "To send" section, where after clicking on it in detail message and click the "Send" button to send.
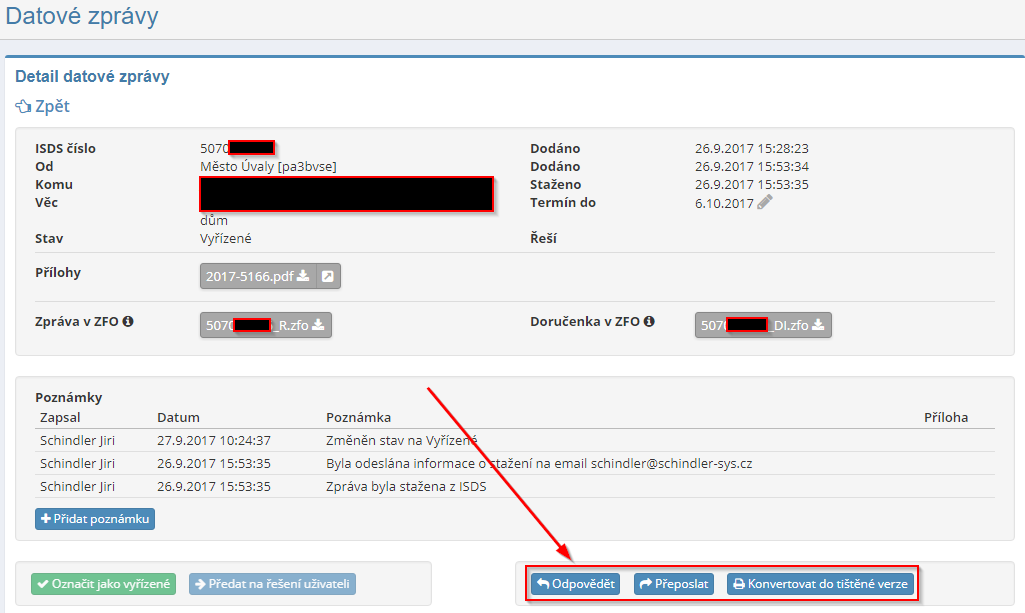
Reply to received data message, forwarding, printed version
When viewing the details of a data message, it is possible to view a received data message reply, forward or view information for the option converting the report into a printed version.
Option to forward a sent data message "to note"
If necessary, the sent data message can be notified
to selected eIntranet users; this option must be enabled
in module settings:
Subsequently, when sending the DZ, the "for note" option appears:

The user to whom the data message was sent will receive this information by e-mail, in which he subsequently confirms that he "takes the information on awareness", which is entered in the note for the given DZ.


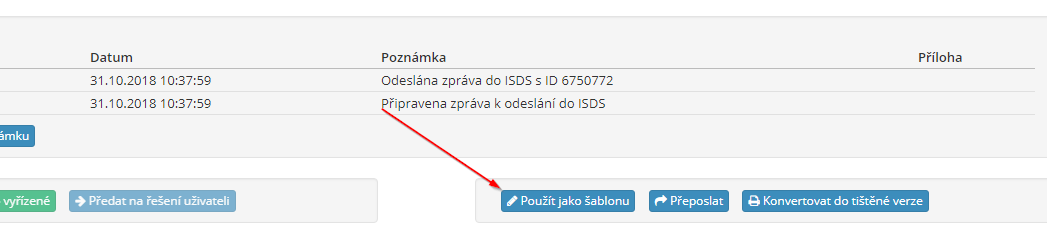
Option to use a data message as a template
If necessary, the received data message can be used as a template - the data from the previous entry is copied:
Ability to send data messages to multiple recipients at once
More data messaging can be enabled in the module settings recipients at once:

When sending a data message, it is then possible to enter multiple recipients:

Labels of received data messages
In the data message module settings, it is possible to define message labels for better orientation in received data messages:

You then just select the relevant tag for the received data message:

Import old data messages
It is also possible to import old data messages into the data message module ZFO format that you have saved or exported from another SW. It enables the recording of all data messages in one place:

Search in data messages
A quick search is possible by typing a search term into the box on the right side of the screen.
 In all sections it is then possible
set a filter for displaying selected data messages.
In all sections it is then possible
set a filter for displaying selected data messages.
The user can turn on the filtering option by clicking the + icon in the right part screens.

Subsequently, a table will be expanded in which it is possible to set the required ones criteria for filtering – e.g. by recipient, sender, date delivery or content of the document.

If the filter is active, the name "Filter" will be displayed in red:
The button is used to turn off the filter
"Cancel".
Option to view as an Authorized Person
Using the "Authorized person" function, it is possible to have an overview displayed of delivered data messages without marking as delivered – thus it is possible to gain time to deal with data messages.
By logging in to data mailboxes or downloading data messages as usual messages will be marked as delivered and your processing time will begin – for example, for the confirmation of the inspection report, this deadline is only 5 business days from delivery which can be difficult to manage if Is your accountant currently on holiday...
For the exact procedure of establishing an Authorized Person in the data mailbox system please contact us at info@eintranet.net.

Postal data messages
It is possible to receive and send postage within the data message module data messages:
Postal data messages are the electronic equivalent of registered mail, used for business communication of databox users and represent proven method of communication and delivery.
The reception and sending of postal data messages must be activated as part of the official databox at www.mojedatovaschranka.cz:

Extract from OR and TR from CzechPoint
Thanks to the connection of the eIntranet application with CzechPoint, it is possible to obtain an electronically signed extract from the commercial register or from the register penalties for legal entities.
To get a statement, you must select the sender of the data message (if you have multiple data boxes), select a template (excerpt from OR or RT) and send. The electronically signed statement will arrive in your mailbox.

Daily reports module
This module allows the creation of simple reports for different types overviews, their filling and registration. Within the module it is possible to e.g. create a report for a daily report on the use of the machine, on the progress of the work shift and any requirements towards the employer, or purchase, or about other events and activities.
The application administrator creates individual types of reports in the module settings according to needs of the business and assign read/fill/edit rights to users statements. Subsequently, users fill in the assigned reports.
After completing the daily report, the relevant persons will receive an e-mail information that the daily report has been completed. In case users do not fill in the daily reports on time, it is possible to set the sending of notifications via sms or e-mail that it is necessary to fill in the report.
You can search by name in the completed daily reports employee, report type or date (year, month, day). Overview of created daily reports can be exported to Excel or printed.
Settings of the daily reports module
Enters access to the daily reports module with specific access rights application administrator users in the Settings section, Daily Reports tab.
Next, in the settings of the application manager module, he chooses how to set up notifications in case the user does not have the daily reports completed, and who will notified by e-mail that the daily report has been completed:

Access rights to the daily reports module
Within the module, users can get daily reports from the application administrator the following rights: does not have access - write and read only own - write and read your for selected users - write your and read all - write and read all - write, read, delete and restore everything.
Adding a new report type
In the settings section, the application manager specifies the types of daily reports by clicking on the "Add type" button:

Subsequently, which users can add to the created daily report to be filled in and what fields will be filled in the report:

Editing and deleting a daily report type
The pencil icon is used to edit the created type of daily report, for deletion the report type is designated by the cross icon:

Entering the statement
A new daily report is written by a user with assigned rights after clicking on "Write report" button. Subsequently, a table will be expanded in which the user selects the type of statement he wants to fill out and the relevant fields to fill:

Daily report search
Completed daily reports can be filtered by employees, by calendar year, month, day and type of statement:

Export to Excel and print
An overview of completed daily reports can either be printed out, by clicking the "Print" button, or download to an Excel spreadsheet - by clicking the "Export to Excel" button. Export to Excel is functional, only if you have the app running in the Chrome web browser.
Discussion module
The discussion module serves as a quick communication tool between the group users of the eIntranet application (company intranet). Enables sharing opinions, topics, knowledge on various, not only corporate, topics. He can facilitate the search for solutions to work problems, especially if solvers of the problem (users of the application) are located in different places.
Users with assigned rights can create discussions, assign to them users, or delete outdated discussions. As part of the discussion, it is possible view only the latest posts, or all posts in discussion. Attachments are possible for individual discussion posts.
Within the module it is possible to create simple discussions (i.e. with one by user) or group discussions (with multiple users at the same time).
Discussion module settings
Enters access to the attendance module with specific access rights app admin users in the Settings section, Discussion tab.
Access rights to the discussion module
In the discussion module, users can get from the app admin the following rights: does not have access - write and read (in discussions where it is assigned) – write/read (in discussions where it is assigned) and create discussions (and assign people to them) and delete discussions created by him - write, read, create discussions (and assign people to them), and delete all.


Creating a new discussion
A user starts a simple discussion by clicking on another user's name, that he sees, on the right in the Simple Discussion section:
 Starts a new group discussion
the user who has the rights assigned to it, when the button is clicked
"The New Mass".
Starts a new group discussion
the user who has the rights assigned to it, when the button is clicked
"The New Mass".
Subsequently, the user fills in the necessary information for the discussion:
-
Discussion title
-
A graphic icon that will accompany the discussion
-
Users who will be included in the discussion

Adding a post to the discussion
The user writes a new post to the discussion in the text field; when can attach an attachment if needed.

Editing or deleting a group discussion
If necessary, a user with relevant access rights can edit (add or remove users) or delete the created discussion:

Delivery notes module
The delivery notes module is used to create and electronically record deliveries leaves. In the settings of the Delivery Notes module, it must first be defined a group of delivery notes and subsequently the data displayed on the delivery note – e.g. name, contact details, logo etc.
The module is connected to the order module (selection from registered orders) a with the CRM module (selection from registered customers). In the overview view other subsequent, related documents are then visible - offers, requests, orders received and issued, invoices received and issued.
The created packing slip can be emailed directly from the app or print. It is also possible to search for created delivery notes according to different criteria.
Delivery notes module settings
Access to the delivery notes module is given to the user by the application administrator in the section Settings, Delivery notes tab. First you need to in the module settings create a specific delivery note group and assign users to it relevant access rights.
Access rights to the delivery notes module
Within the delivery notes module, users can obtain from the application administrator for a specific group of delivery notes the following rights: no access – sees delivery notes – sees and can create new ones and edit their own – sees and can edit and create everything - sees, edits, creates and can delete all.
Creation of delivery note
A new delivery note is created by the user after clicking the "Create" button delivery note". He will then be shown a table in which he will fill in everything delivery note information:

Attachments can also be attached - either as a public part of the order or as internal.
Delivery note detail
Clicking on the eye icon in the delivery note overview table will show it up detail of the created delivery note. Individuals are then entered here delivery note items (it is also possible to add them from stock economy) and set discounts for the given customer:

An invoice issued by a can also be created in the detail of the given order view other documents related to the created delivery note:

Print and send the delivery note
The created delivery note can be generated for printing or for sending by e-mail and printing. When the EAN check-box is ticked, the EAN is also generated on the delivery note code, which facilitates removal from the warehouse, or storage at the customer.

Search in the delivery notes module
For a quick search, use the "Search" field at the top right. Further it is possible use the search filter, in which it is possible to search according to various criteria:

Delivery notes can also be displayed by individual years or whether already were invoiced:

Attendance module
The attendance module is used to clearly record the attendance of all employees. It allows recording of different types in a simple and effective way event within the attendance of a specific employee - standard work time, work trip, doctor, illness, treatment of a family member, etc.
Attendance management within the eIntranet application makes it easy for supervisors to review employees' working hours and helps create payroll documents, incl business trips and entitlements to food stamps/meal allowances. They are also registered in the system worked night or weekend shifts or work on a holiday.
Thanks to attendance records, it is also possible to have a continuous overview of overtime/undertime of individual employees - the system enables their settlement with pay. It is also possible to enter the employee's hourly rate and thus obtaining a more comprehensive basis for the payroll accountant.
In the application, it is possible to fill in the automatic working hours that will be employees to pre-fill, and employees only fill in changes if they will happen.
Attendance can be conducted either by filling in the standard form or by the use of a chip assigned to each employee which is used at of input on the reading device – chips and reading devices are additional service, are not part of the system operation price (for more detailed information, see hereafter – attendance module-chips). If interested in this feature please write to info@eintranet.net.
The attendance module is linked to the leave module - if it will be vacation approved by the user within the vacation module, its date se then it automatically writes to the calendar as part of the attendance module. For correct calculation of holidays or other types of leave (sick day, paid or unpaid leave, etc.) it is always necessary to have an approval for the given leave request.
Furthermore, the module is connected to the E-Neschopenka module (use is also required data message module), which enables automatic write/terminate incapacity for work to the employee's attendance.

Attendance module settings
Enters access to the attendance module with specific access rights app admin users in the Settings section, Attendance tab.
In the module settings, in the General settings section, the administrator can choose e.g.
-
the number of retroactively editable days
-
counting overtime
-
recalculation of standby hours
-
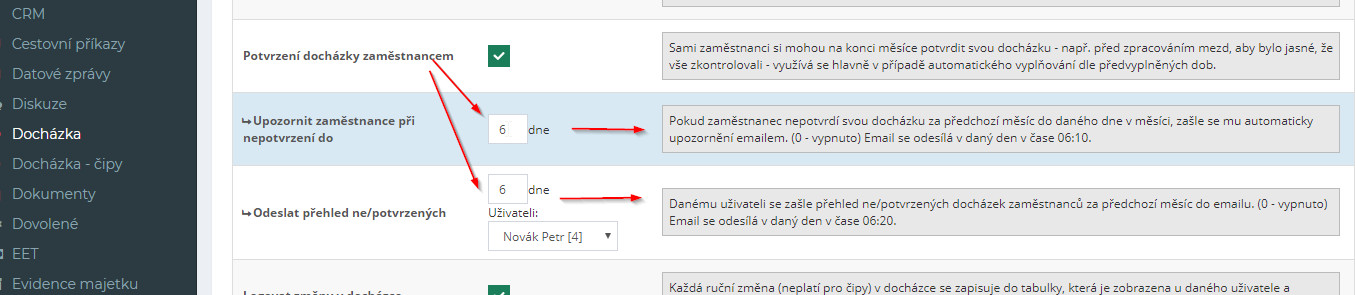
confirmation of attendance by the employee
-
automatic deduction of lunch break (for all/selected users)
-
log changes in attendance
-
loading attendance from eNeschopenek
-
do not prefill the time when manually recording attendance
-
calculate entitlement to food stamps
-
premiums
-
attendance export adjustments
-
setting PAMICA exports etc.
In the Used Types section, the user with administrative rights then defines, which attendance types will be used within attendance (as needed company) – e.g. working day/time, holiday, paid or unpaid leave, illness, OCR, etc. It then defines the individual attendance types as well their color differentiation:

Furthermore, there is a RestAPI section that allows automatic export/import and updating attendance records and the Import section for the option to import data.
The Rights History section records the last settings changes access rights.
Access rights to the attendance module
Within the Attendance module, users can obtain from the application administrator the following rights: does not have access - read - write/read own - write/read to selected users - write/read to all.
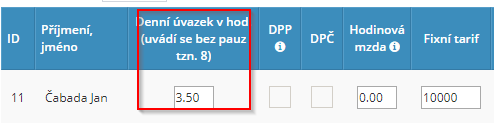
In the Settings section, the administrator of the application also enters the amount of employment of a particular employee and the employee's start date.
It is also possible to add the employee's hourly wage (optional field) - this data is then exported to an Excel attendance report.

Entry of attendance
 He can attend for a certain working day
the user, if he has the rights assigned to it, enter it by clicking on the icon
pencils for each calendar day.
He can attend for a certain working day
the user, if he has the rights assigned to it, enter it by clicking on the icon
pencils for each calendar day.
 The user who has the rights assigned
"Write/read my" can edit attendance 7 days back. Users with
with a higher authorization, they can edit attendance indefinitely.
The user who has the rights assigned
"Write/read my" can edit attendance 7 days back. Users with
with a higher authorization, they can edit attendance indefinitely.
Within a given calendar day, the user can top up different types by "event" - standard working day/time, work trip, doctor, illness, treatment of a family member, sick day, etc.
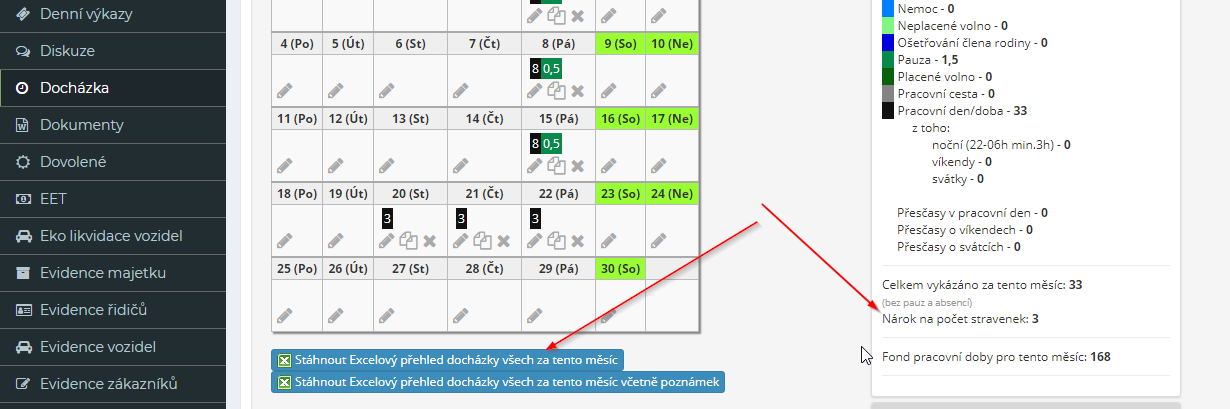
A table is then displayed in the right corner of the screen, in which it is clear to see what type of event or hour time, is in the given calendar months relevant for a specific employee.
The overview also shows how much time was worked as a night or shift weekend shift or on a holiday.
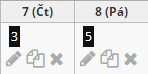
Recorded attendance can be edited - pencil icon, copied - 2 sheets icon on top of each other, copy including written notes - icon of 2 sheets on top of each other with dot and delete - cross icon.
Prefilling working hours
Prefilling of working hours can be done by the application administrator in the section Settings, Attendance module. Here can the name of each employee in in the Prefilled working hours column, set the number of hours it has the employee to work as standard.
The pre-filled set working hours are then uploaded to the specified one employees on a given calendar day always after midnight of the given day.

It is also possible to set automatic pre-filling of different working hours for individual working days:
 is in the attendance module settings
for example click on the "Set" button in the "Prefilled" column
working hours" for the name of the selected user:
is in the attendance module settings
for example click on the "Set" button in the "Prefilled" column
working hours" for the name of the selected user:

-
subsequently set working hours on individual working days - the same working hours (or part of them) are set at once - e.g. if the employee works on Monday and Friday from 8 a.m. to 12 p.m. and has a break from 12-12.30 p.m., settings for these days are made at once
-
at the same time, must be filled in for the correct calculation of the working time pool daily working hours in hours - converted to one working day
-
holiday is then calculated taking into account whether the employee is to be employed the given day at work or not - for each working day (regardless per number of hours) 1 day of vacation is counted - or it is possible to set, to each in case of irregular working hours of the employee holidays whether holidays for a given day were calculated automatically according to the number of hours, which on that day the employee was supposed to work:
-
for employees whose vacation is to be counted as a number hours they were supposed to work on a given day, and they have non-standard hours working hours, it is necessary to untick in Settings -> Attendance:

- if it is an employee who works even on a holiday, it is necessary set him in the pre-filled working hours (or, conversely, cancel pro of the one who has it there by mistake and does not work) in Prefilled working hours field Prefill days: to weekdays or to All days

- then in attendance for the given day in the event of a holiday or vacation automatically fills in the number of hours the employee should have on a given day actually work.
-
at the end of the month the employee approves the number of hours worked hours per month:
-
in Settings, Attendance module, you need to turn on Attendance Confirmation by an employee:

- subsequently, the employee will be shown under his attendance sheet button to approve the attendance for the given month - this can only be done the employee in question:

- after approval, you can see when the employee approved the attendance:

- if attendance has not yet been approved, it is displayed as follows:

Automatic entry of vacation and sick leave
Vacation is entered automatically in the employee's attendance record if the user submits requests for leave, or are approved by him under the vacation module. After the leave application is approved, the automatically writes this data into attendance.
It is also possible to use manual entry of leave directly into attendance (without use holiday module), but in this case the holiday within the module vacation is not registered.
In the same way, incapacity for work of employees (users eIntranet) to write in the attendance overview automatically, it is necessary to have activated eNeschopenka module (procedure for processing eNeschopenka - see description of this module).
Night shifts
In the event that they are used in the company for attending the night shift, attendance is automatically divided into 2 when entered into the attendance module days.
For example – an employee writes that he worked from 9:00 p.m. to 5:00 a.m.:
The system automatically breaks down within two days as:
Calculation of entitlement to food stamps
In the module settings, it is possible to enter the conditions for obtaining meal vouchers:
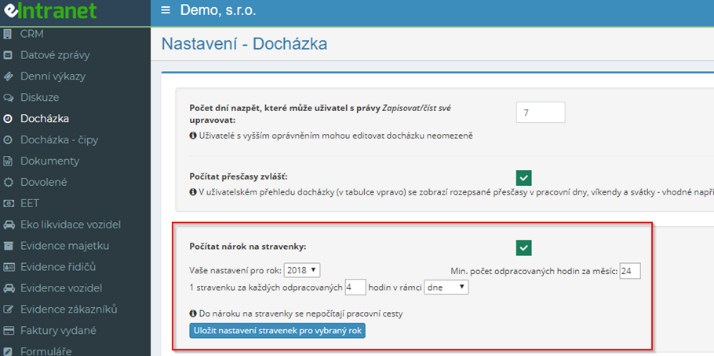
Then, in attendance and also in export, according to the specified parameters, the entitlement to meal vouchers:
Extra days off
In the Settings section, the Free days tab - additionally, it is possible if necessary define the days of additional leave that the company wants to provide to employees:

In employee attendance, this day will then be automatically marked as holiday.
Export attendance
Under the user attendance table, it is possible to export the recorded attendance according to need; possible export types:
-
 A summary of everyone's attendance for this one
month – a comprehensive overview of the attendance of all users for processing
salary
A summary of everyone's attendance for this one
month – a comprehensive overview of the attendance of all users for processing
salary -
Overview of everyone's attendance for this month including notes, Overview of attendance selected user for this month including notes – contains extra information from the "Notes" column - if it is used during registration attendance
-
Worksheet of the employee in PDF - used for overview and archiving attendance that was reported and approved by the supervisor in the given month (the button for this export in that month is available if it was attendance for the given month already approved)
-
Work sheet of the employee and Work sheets of all incl. note for labor inspectorate - serves in case of need for submission labor inspectorate
-
PAMICA export of all and Summary of attendance of all for this month for PAMICA control - see more in the subsection "Export of attendance for the program PAMICA
-
Premium All/Subordinates 2022 - Provides an overview of proposed premium users (see subsection Premiums)
Users with "Read" or "Write and read own" rights are shown only exports with his data (i.e. attendance overview of the selected user, Employee Worksheet PDF and Employee Worksheet - For Labour Inspectorate). To view additional reports, you must have a higher level user right.
Overtime tracking
As part of the attendance module, the app automatically tracks workers' overtime and enables their eventual settlement.

Premium
The ability to write premiums in attendance must be enabled first in the attendance module settings - in the General settings section:

Premiums are then entered using this button (they can only enter them users with the highest rights in attendance):


Using this function, it is possible to simply enter the premiums of individual employees. If their approval by the principal is to take place as part of the registration of premiums approver, you need to use a separate module Attendance - premium.
Track change history
In the module settings, it is possible to allow any to be written changes made to a specific user's attendance:

If this option is enabled, it is then possible to easily find out who, when and how he edited the user's attendance.
Approval of attendance
A user who has been assigned the rights to do so can approve the completed attendance to other employees. Possibility to approve the attendance of the chosen one employee is located at the bottom of the module's home page.
If the user approves attendance on a specific date, the attendance as selected the period is locked and cannot be changed retroactively.
An overview of the attendance approved so far can be found under the approval option attendance.

It is then possible to set the sending of a reminder in the settings of the attendance module to users with unconfirmed attendance (it is set for unconfirmed until on a certain day of the month).
At the same time, it is possible to send it to a selected user (e.g. from the HR team). overview of non-/confirmed attendances on the selected date:
If the user has the highest type of rights in the attendance module settings, they can then display an overview of the approved and unapproved attendances for the given month:

An overview of approved attendances can then be printed:

Attendance approvers can also be defined according to the note for the given one attendance day. Must be entered in the general settings of the attendance module name of the note (e.g. building A, building B, etc.) and its approver:

The regular user then has a predefined list when filling out attendance notes from which to choose the relevant option:

Subsequently, attendance for the given day is approved by the user who has approval right for the given type of note (only 1 note per day can be approved – if there are more notes, or more approvers, attendance after approval by the first approver will lock).
Option to unlock approved attendance
The user who approved the attendance can still lock the attendance on the given day delete. Later, it can remove the attendance lock for additional adjustments only user with admin rights:

Subsequently, attendance needs to be approved again, or to lock.
Export attendance for the PAMICA program
In the settings of the attendance module, it is first necessary to fill in the work number ratio from the PAMICA program for each user and at the same time it is necessary supplement daily hours, or center:

You can make further settings as needed for PAMICA export in the settings Attendance module – General settings section:

It is also possible to define your own in the module settings, section Used types PAMICA codes:

The user with the highest rights in attendance can then export for PAMICU download here:

Attendance module - chips
The attendance module - chips directly connects to the attendance module and facilitates it exploitation. Employee attendance is possible automatically thanks to this module write to the attendance module using the attendance terminal and chip in the form of a smart card/sticker/tag. When ordering attendance terminal, it is necessary to choose in which form the chips are to be delivered.
You can find a video showing how chip attendance recording works here: https://www.youtube.com/watch?v=2SoLTvtqFlE
Chips and readers are an additional service and not included eIntranet application operation prices. If interested in this feature please write to info@eintranet.net.
The price of the chip for one employee is approx. 90-100 CZK without VAT. Price of reading devices is around 11 thousand CZK without VAT (the price includes his setting and sending).
How the attendance module works - chips
Attendance is recorded using RFID chips. With the attendance terminal it is supplied with the so-called administrator card, thanks to which the application administrator chips the chosen variant of the chip for all other employees.
 The employee then uses the assigned chip
when entering/leaving work on a reading device.
The employee then uses the assigned chip
when entering/leaving work on a reading device.
When the chip is applied to the attendance terminal, a table appears in which the employee confirms arrival/departure.
In Settings, tab Attendance-chips, it is possible to enable other than basic ones buttons on the chip reader - reasons for the employee's absence:

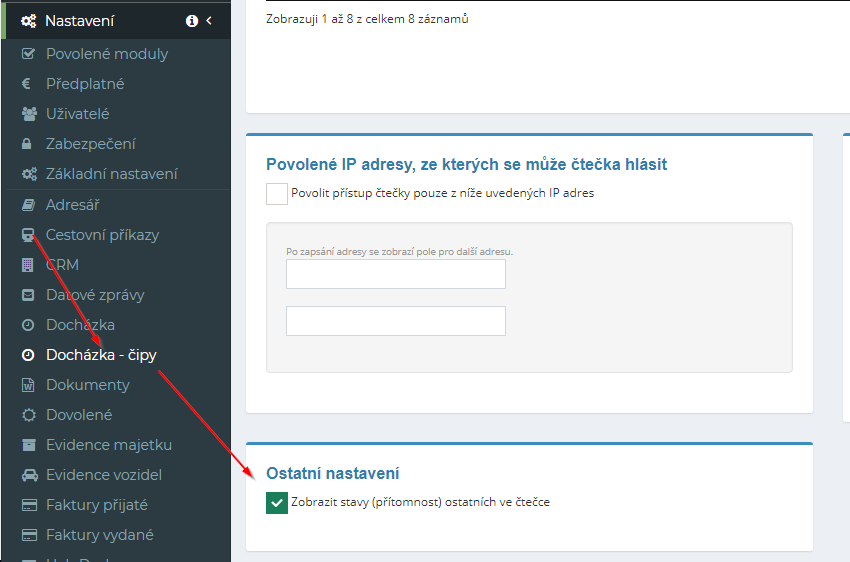
In case of misuse, i.e. loading of chips by someone other than the employer enabled reader, it is also possible in Settings tab Attendance-chips enter the allowed IP addresses from which the reader can report:

The option to show statuses can also be checked if needed of others (presence/absence) at the workplace; this option is needed enable in module settings:
When registering attendance at the terminal, a photo is automatically taken, to make it clear who made the entry under the name of the given employee. This the option can be deactivated here:

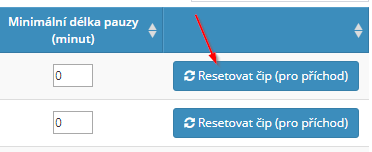
Chip reset
If necessary, the chip can be reset - for example, if an employee he remained in the state of being present even though he left and forgot/couldn't unbeep:
Benefits of recording attendance using chips
Use of chips and reading devices for recording time worked brings the following benefits to employees:
-
Automatic recording of time worked in the attendance system
-
Easy to use – recording is done by putting the chip to the reader device
-
Security
-
Reliability
-
Accuracy
Presence/absence at the workplace
You can then see who is/isn't in a quick overview on the home page of the application present at the workplace and, if applicable, for what reason:

Present workers are marked in green, absent workers in red.
Option to write selected types of attendance manually
It is possible to remove selected types of attendance from the attendance record using chips, to allow the employee to enter them manually - for example in the case of a permit manual entry of the business trip, the employee can leave in the morning straight to business trip and enter it in attendance manually, without having to do it yourself workplace departure on a business trip to chip:

Attendance module - premium
The Attendance - Premiums module is used to propose and approve premiums for employees (eIntranet users) for individual calendar months. The manager writes the bonus proposal for the given month in the table in the module that it sends to the lead approver for approval.
The main approver can modify or approve the proposal at the proposed amount. After the approval of premiums is notified to the user with the right of accountant and manager approver.
Users to whom the lead approver should propose premiums are possible fetch from employee hierarchy.
If there is no need to approve employee bonuses and only them are sufficient write, it is possible to use the Premium button directly in the Attendance module.
Attendance module settings - premium
Attendance module access - premium with specific access rights enters the application manager user in the Settings section, Attendance tab - premiums.
In the General Settings section, the administrator further defines:
-
whether the basic salary will be displayed in the overview
-
whether the user will be informed by e-mail about the amount of the approved premium chief approver
-
whether and in what form superiors will be informed about the approval of bonuses chief approver
-
whether accountants should be informed by e-mail about the approval of premiums by the principal approver
-
whether the main approver should be informed about the approval of premium proposals individual superiors
Access rights to the attendance module - premium
Within the Attendance - Premium module, users can from the app admin get the following rights: no access - reading own - superior (giving rewards to selected employees) – senior supervisor (final approval of rewards, sees all) and add-on right accountant (view of all without possibility of change).
Entry of premiums
A user with superior rights writes this in the Attendance - Premium module bonus proposals table for your subordinates:

He can save the written proposals either as a draft (i.e. there will be more on the proposal work) or, if it is a final draft, clicks “Save and lock selected month”. Submitted proposals will appear in green in the table:

If the option to be master is checked in the module settings the approver informed and approval of individual premium proposals superiors, an email is sent to the lead approver with information about approval of the proposal.

The main approver can then directly approve the given proposal with a button in the email or be redirected to edit the table.
Approval/modification of proposed premiums
The main supervisor can then keep the suggested amount, or it edit:

Again, he can only save a draft (Save as draft) or send the final draft (Save and lock selected month).
After all users' premiums are approved, an info e-mail is sent automatically accountant (must be enabled in module settings).
Unlock approved bonuses for the given month
If additional modifications are needed, a user with master rights can approver table with approved premiums still unlock for additional modifications:

A note is written about this fact in History for the better traceability of the modifications made.
Annual overview of approved premiums
By selecting the "Whole year" view, it is possible to view the approved premiums for individual months (only users whose display does the given user have access rights). The table clearly shows i sums of premiums for individual users and for individual months:

Export to Excel and print
You can either print out the overview of completed approved premiums, namely by clicking the "Print" button, or download to an Excel spreadsheet - by clicking the "Export to Excel" button. Export to Excel is functional, only if you have the app running in the Chrome web browser.
The list of users with approved premiums is displayed by relevant access rights – e.g. the main approver sees premiums of all, the supervisor only displays the premiums of his subordinates and the regular the user sees only his premiums.
Documents module
The documents module provides space for keeping everything organized important documents such as contracts, internal regulations, forms, standards, instructions, etc.
This module can be used for document archiving, because everyone document, you can see who inserted the document, when it happened and by how much version in question (including the option to view previous versions).
The module allows you to create types (folders) and subtypes (subfolders) of documents, to which it is then possible to set permissions for individual workers, and thus creating access to specific folders only for authorized users. The number of levels nor the amount of documents stored during creation multi-level document sorting structures are not limited.
It is possible easily in all folders and subfolders with saved documents search and sort them. It is possible to define when inserting documents keywords (tags) by which the document can then be searched.
Documents module settings
Access to the module documents with specific access rights app admin users in the Settings section, Documents tab. As part of the module settings, documents are assigned rights by the application administrator to individual folders and subfolders created in the module, not to the module itself as a whole. The module allows the creation of a multi-level folder hierarchy with different types of access rights.
Access rights to the documents module
Within the Documents module, users can obtain pro specific type of document the following rights: read - read and write - read, write, move, delete and restore - read, write, move, delete, restore and create or delete subfolders. A certain type rights for a specific folder or subfolder can be set by the application administrator collectively for all users or only for selected employees.
When setting access rights within individual subfolders, you can use the option to copy rights from the parent folder:
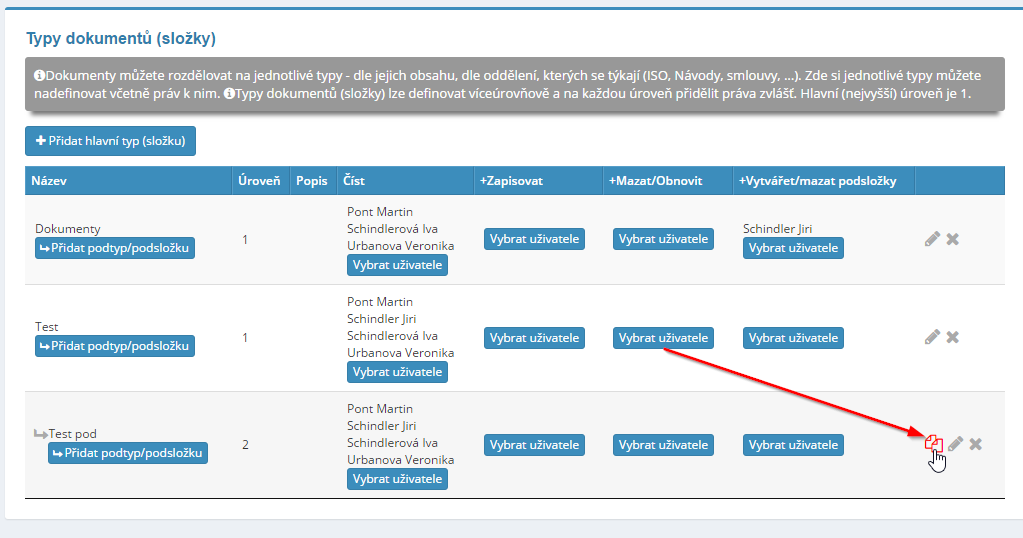
Adding a document type
Only the application administrator can add a document type (folder) in the section Settings, Documents tab. Here, on the one hand, after clicking on the button "Add type" the administrator enters the name of the new type of document (contracts, standards, directives etc.), possibly supplementing its more detailed specification, and on the one hand supplementing the rights for users of the new document type.
Adding a document subtype
Only the application administrator can add a subtype (subfolder) of a document, namely in the Settings section, Documents tab. Here, on the one hand, after clicking on "Add Subtype/Subfolder" button within the parent document type (folders) the administrator enters the name of the new document subtype (e.g. contract 2016, orders of the economic department etc.), possibly supplemented by his closer specification, and on the one hand, it will supplement the rights for users of the new type of document.
Editing and deleting document type and subtype
A document type or subtype can only be edited or deleted by the application administrator, and it in the Settings section, Documents tab. The pencil icon is used for editing, the cross icon is used to delete the document type - both icons are present always at the end of the line in the initial display of documents in the selected folder (type or subtype).
Creating a multi-level structure
According to the above description, the application administrator can according to the needs of the company create different folder structure with different types of access rights for individual users.

Bulk unpacking and collapsing of folders and subfolders
 Unpacking all if necessary
folders at once, it is possible to use the option to expand/collapse all:
Unpacking all if necessary
folders at once, it is possible to use the option to expand/collapse all:

Adding a document
A user with appropriate access rights clicks to add a new document on the "Add Document" button on the right side of the screen. Subsequently, a table appears in which the user enters the name of the document, its description, defines the keywords and appends the attachment:
In the settings of the documents module, it is possible to specify that the document is not saved, if its name is not filled in or its attachment is not entered (or both):

Inform about the insertion of a new document in the news
It is possible to automatically create a news about the insertion of a new document in the News module. First, the documents module is required in the settings allow to be offered the option to create after inserting a new document news:

 Next, the documents module will appear
option to create a new document when inserting a new document:
Next, the documents module will appear
option to create a new document when inserting a new document:
Moving documents between folders
If necessary, a user with relevant user rights can move documents between individual folders by clicking on arrow icon.

Editing documents
If the user wants to work with the selected document, he marks it with buttons "I will work" - but it is important, after the work is finished with the document to terminate this option.
In the settings of the documents module, it is advisable to check the option thanks to which modifications to the given document will be prevented if someone is working on it:

Mass transfer of documents
To transfer documents in bulk, you must first check the checkbox u documents to be moved and then click the button "Move Marked":

A table will then appear in which you must specify the folder where they should be move marked documents:

Bulk download of documents
If you need to download documents in bulk, you need to flag them first necessary documents and then download them:

If a pop-up blocking window appears, you must enable them.
Editing and deleting a document
Only the authorized user can edit or delete documents has rights assigned by the application administrator by clicking on the name document or on the pencil icon next to the attachment name.
In the case of editing a document, a new version of the document is created, or Yippee it is possible to choose whether a new version of the document should always be created (i.e. when changing the name of the document, its description or attachments) or just in case file changes (attachments):

Files stored in the documents module can be edited directly in the module documents (there is no need to save the document to disk, edit it and again upload):
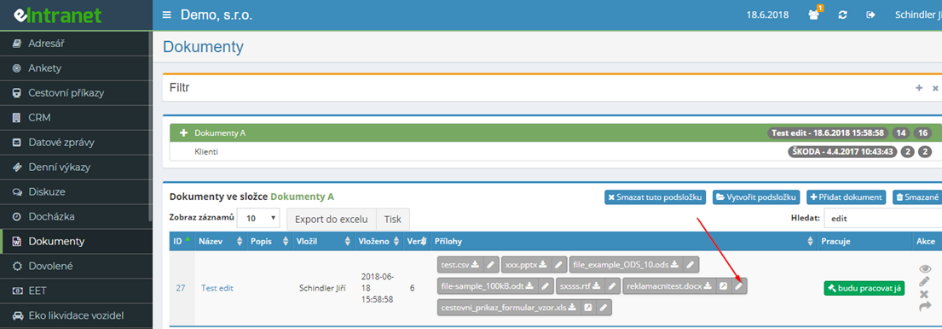
The following files can be edited (the user must have installed Microsoft Office):
-
Word (.doc, .docx, .odt, .rtf)
-
Excel (.xls,. xlsx., .csv, .ods)
-
PowerPoint (.ppt, .pptx)
To prevent work on 1 document by 2 users at the same time, it is good to use "I will work" button - if the user wants to work on the document and clicks on this button, other users will be shown that on the given someone is working on the document. After finishing work on the document, click on that same button frees the document for others to work on.

If necessary, a user who has the rights set to do so can
find deleted documents by clicking the Deleted button.
By clicking on the icon can be deleted
have the documents restored.
Deleted documents can be permanently removed from the Deleted folder - it can can only be done by a user with admin rights in the Documents module - and that in the module settings using the "Empty Recycle Bin" button in the Settings section general parameters. The button shows the number of documents that removes Each version has a separate number (e.g. if 1 document has 4 version, 4 documents will be included in the total number of documents to be deleted).
Search in documents
A quick search is possible by typing a search term into the box on the right side of the screen.
Furthermore, it is possible to use the search function inside all inserted documents to the documents module - using the Filter section. This function allows search in more than sixty file types (such as: .doc, .docx, .xls, .xlsx, .ppt, .pptx, .pdf, .txt, .csv), including pdf and ocr over scanned documents.
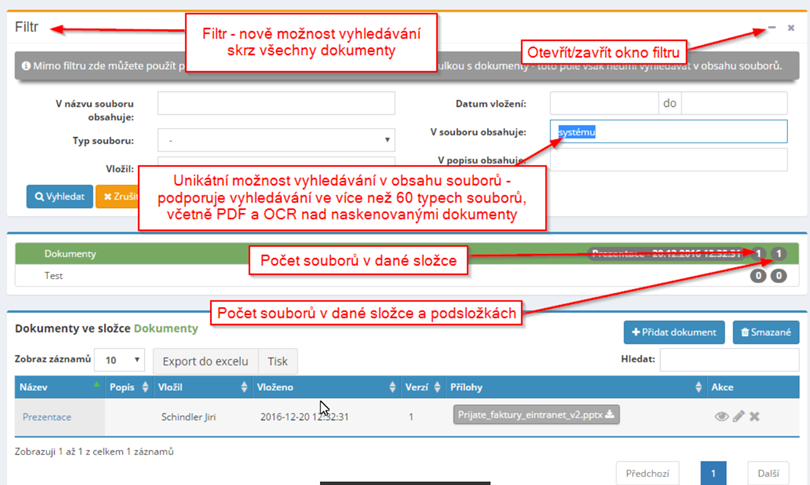
When searching for a document, you must choose whether to search for the document in the current subfolder or in all folders:

If the filter is active, the name "Filter" will be displayed in red:
The button is used to turn off the filter
"Cancel" :
Generating a public link to a file stored in the Documents module
First, it is necessary to set the permissions of who can generate the link:
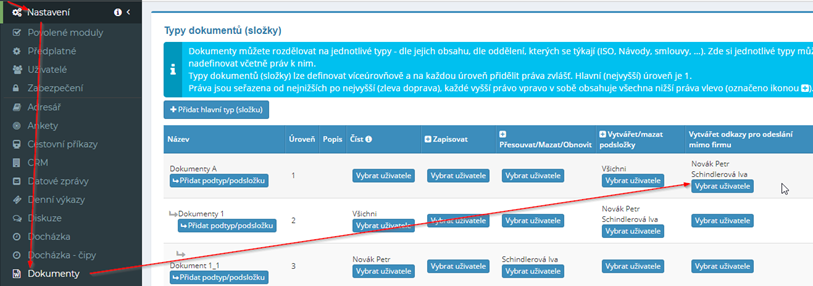
Then a link is created directly in the documents module:

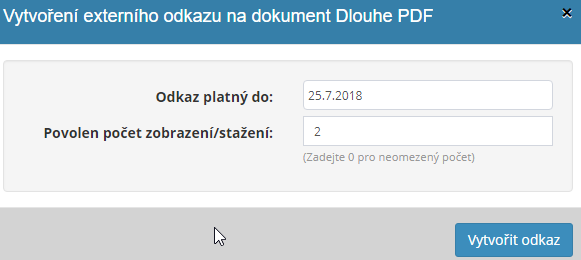
The generated link can then be distributed as needed:


The page you send the link to will then look like this:
Internal links
An internal link to the document can be generated if needed - po typing that link will open the documents folder and that document will will turn green:

 Delete document versions
If necessary, the application administrator (must be enabled in settings module) delete document versions as needed:
Daily export of documents
Daily export of documents is only accessible to users with the extra tariff; everything is defined in the module settings.

Export and print overview of documents
An overview of the inserted documents can either be printed by clicking on the "Print" button, or download to an Excel spreadsheet - by clicking on "Export to Excel" button. Export to Excel is only functional if you have the application running in the Chrome web browser.
Vacation module
The leave module both facilitates and streamlines the approval process employees' holidays (everything is done electronically) and on the one hand clearly records the taking of leave (thanks to the possibility of displaying monthly or annual overviews).
The settings can approve or reject vacations for individual employees users (mostly their superiors); they can see the overall overview for example, company owners or personnel or economic employees department.
The overall overview of holidays can be seen in the clear calendar and it is possible download, for example for processing payroll documents, in an Excel spreadsheet for individual months.
Within the leave module, it is possible to apply for different types of leave - leave, sick day, doctor, paid or unpaid leave.
To ensure the correct reporting of holidays of any type in the module attendance it is necessary to have an approved application for each leave and any changes in leave can be edited in the application under the leave module.
Vacation module settings
Enters access to the vacation module with specific access rights app admin users in the Settings section, the Allowed tab.
In the module settings you need to choose:
-
whether rejected/cancelled holidays will be displayed
-
 whether they should automatically match ½
on the day of work leave (in the case of a request for half a day of leave)
whether they should automatically match ½
on the day of work leave (in the case of a request for half a day of leave) -
what will be the default type of leave
-
who can see the users remaining vacation
-
whether it is possible to use the vacation in the minus
-
whether to display the Enrollment field in the leave request representative user
-
whether users will request leave in hours or days (in the case of a request for leave on days, it must be taken into account that that if other than full-time, ½ day is required for applications allowed to edit the submitted application manually; if users request for leave in hours, does not have the maximum length of service to be able to request ½ day leave effect)
-
whether the request is for leave in the hours of the first and last day show choice of "1/2 day or full day" or "number of hours"
Furthermore, the application manager defines what type of leave (holiday) they can take eIntranet users request:

It is also possible to set whether rejected and canceled should also be displayed leave, which type of leave will be the default when filling out the application (none/holiday/sick day/paid time off/home office) and whether display the remaining leave according to the users whose leave can be left the given user to approve or according to the users whose leave he can see the given user (it is set according to the relevant rights in the module):
In the module settings, you must also enter the number of vacation days allocated for a given calendar year to individual employees.
Access rights to the vacation module
Within the leave module, users can obtain from the application administrator the following rights: does not have access - request leave - see leave of users - request and approve leave to users - request and approve holidays to all.
It is also possible to assign the right of extension (square check-box) - see user holidays - see all unapproved holidays - download monthly overview of holidays.
When assigning the right to "see all unapproved holidays" it is necessary to have in the module settings, the option "display rejected/cancelled leave'.
Entering a leave request
The request for a new holiday is entered by the employee after clicking on the button "Requests" in the top left menu. It will then expand on the page the option of selecting the name of the employee and clicking on the button "Request o leave for user" the option to enter a leave will appear.

In the table, the employee then chooses the type of leave and fills in the drawing date vacation, or place of residence during the vacation. In the module settings during holidays, it is possible to enable the display of the "Representation" field:

Subsequently, it is automatically sent to users and approvers of holidays e-mail message about entering a new leave request.
Approval of leave
Only the user authorized to do so by the administrator can approve vacations application assigned rights. If a new request for vacation, an e-mail message informing about new requests.
In the request section, the approver then clicks the button "Approve/Reject" approves/rejects the proposed vacation; about this one the leave applicant is then automatically informed of the fact via email message.
In case of refusal of leave, the person who refused the leave can supplement it and justification for the refusal of leave:
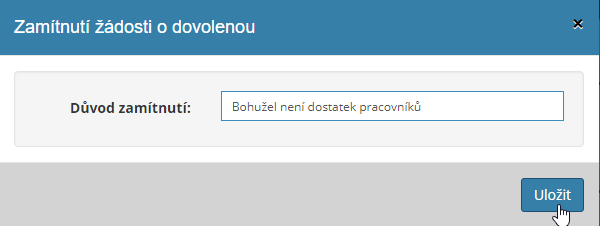
Then this information is in the email sent to the applicant:
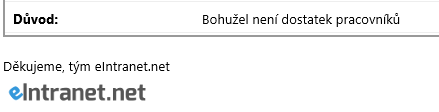
In the holiday module settings, it is then possible to specify that the information about sent the employee's approved vacations to other users as well applications (to colleagues from the company) as needed:
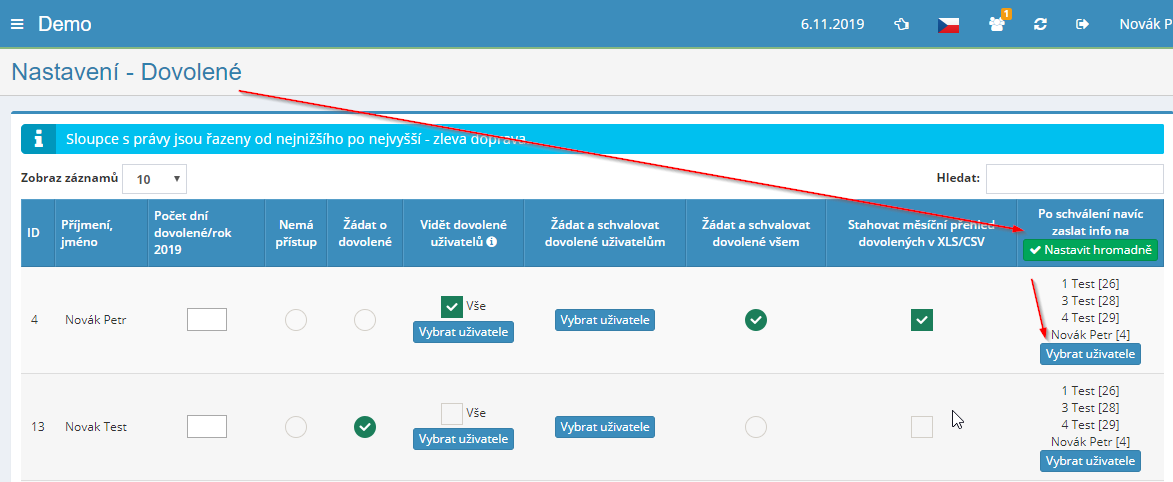
A user who has the right to approve vacation can also see in the informational wheel in the left menu of the leave module, the number of requests for which there is his approval is required (refers to requests for approval or requests to cancel vacation):

Holiday overviews
Within the vacation module, it is possible if the user is assigned to it rights, to have a monthly and annual vacation overview displayed, and how for an individual employee, as well as for all employees or just for subordinates of the given employee. It is also possible to have an overview displayed remaining employee leave. Buttons for displaying individual types reports are located in the menu at the top.

Export and printing of the vacation overview
It is possible to print out the individual holiday overviews, namely by clicking the "Print" button, or download to an Excel spreadsheet. Further it is possible to download the export of holidays for the selected month for import into IS Premier.

Export to Excel is only functional if you have the application running in the Chrome web browser.
Transfer of leave from last year
At the beginning of a new calendar year, it is necessary in Settings, tab Allowed to set the current number of vacation days for individual employees for the new calendar year.
In the event that the employee's leave from last year is also transferred, it is perhaps add this leave manually - it is not done automatically.
Modul eNeschopenka
The eNeschopenka module allows you to automatically process eNeschopenka employees (eIntranet users).
To receive eNeschopenek in the application, the data module must be activated news. With the use of the attendance module, it is then possible to record automatically employees' incapacity for work in the attendance record.
A clear display is then possible within the eNeschopenka module current and past incapacity of employees, searching them and downloading the original disability information from CSSZ in pdf format.
eNeschopenka module settings
Access to the eNeschopenka module with specific access rights is entered application manager users in the Settings section, eNeschopenka tab.
Access rights to the eNeschopenka module
As part of the eNeschopenka module, users can receive applications from the administrator the following types of rights: no access - display of own - display of all – display all and manual exit – display all, manual exit a delete.
Settings for handling eDisabilities
 eIncompetents are processed through
data messages – it is therefore necessary to enable the data message module first
in the eIntranet and set up their download.
eIncompetents are processed through
data messages – it is therefore necessary to enable the data message module first
in the eIntranet and set up their download.
For that databox, check the databox edit box the possibility to process eDisabilities – you tell the system to do this he used the mailbox to detect eNeschopenek (maybe you already have one):
Activate the sending of notifications about eDisabilities to the data center at the CSSS mailboxes – set via the CSSZ eportal (maybe you already have one)
Enable the eNeschopenka module under the Enabled modules section and In Settings -> eDisability, set permissions for individual user:

 Users must have installed
correct name, surname and date of birth - set in Settings ->
Users (pairing of incompetents is based on these parameters –
if they were entered incorrectly, pairing would not work):
Users must have installed
correct name, surname and date of birth - set in Settings ->
Users (pairing of incompetents is based on these parameters –
if they were entered incorrectly, pairing would not work):
In the attendance module settings, enable absence recording z eNeschopenka module

From now on you can for newly downloaded data messages in the notes to see if the system correctly matched the sick leave, acc eNeschopenka and entered data, with the relevant user in Your eIntranet (first name, last name, date of birth) and entered work inability:

Both start/end work are automatically processed in the application incapacity, as well as possible changes in eIncapacity - e.g. change of date (from data messages "changeDpnInfo").
Reports of termination of incapacity are often delayed by doctors, therefore, the application is able to evaluate registered incapacity, or her termination up to 5 days retroactively.
So if there is information about the end of the user's incapacity, the application will verify in the user's attendance 5 days back, whether incapacity was registered relevant - if the registered disability is not relevant, the application automatically deletes it (even from approved attendance).
However, the working hours for a given day must always be entered manually
Overview of accepted eNeschopenka
An overview of accepted eNeschopenek is displayed on the module's front page, respectively the main information about each is clearly displayed eFor disabled people:

Asset registration module
The property registration module enables a simple and clear way register acquired property in the company. It is visible for each property item the total number of units as well as the number of currently available units. Property is possible to place, i.e. assign to the person who will be responsible for it and which him (in the case of consumable or overhead material or other own type of property) can consume.
Registered property can be marked with QR codes. It is also possible for the registered generate and print the transfer when assigning assets protocol.
For a thorough control of asset consumption, it is possible to enter an e-mail the address to which, in the event of a change in the number of registered units property, will send information about the implementation of this change.
It is possible to enter and record essential data for each item of property related to the management of this property, such as its registration number, type property, details of its purchase, etc.
A record is kept of every adjustment made to the registered property. It is possible to continuously add relevant ones to individual property items operational information (property loan, complaints, etc.).
The module allows setting different rights for different types of users (from the possibility of just previewing the record to the possibility of editing, adding, deleting and restoring individual property items).
 Thanks to this mod you will have perfect
an overview of the movement of property, its consumption and the persons responsible for it
protection.
Thanks to this mod you will have perfect
an overview of the movement of property, its consumption and the persons responsible for it
protection.
Asset registration module settings
Access to the asset registration module with specific access rights entered by the application manager user in the Settings section, Logging tab property.
Within the general setting of the module, it is possible individually according to the specific ones company needs to use the following options:
Access rights to the asset registration module
Within the asset registration module, users can from the application administrator get the following types of rights: without access to property records - see property entrusted to him - he sees the property entrusted to him and can consume his own (consumable and overhead material) - sees the property entrusted to him and can consume/shift yours (any type of property) - sees everything and owns it entrusted property can consume /reassign (any type) - sees everything and can consume (any type of property) – edit/add all a add inventory/audit lists – edit/add/delete/renew (incl. inventory and revision lists).
A certain type of rights can be set by the application administrator en masse for everyone users or only for selected employees.
The following options are then available as a superstructure right (square check-box). –see the transfer requests of their subordinates –see all requests for transfer - confirmation of the employee's departure to e-mail - everyone can see it disposal requests - see transfer requests (economist) - transfer requests (executive) – receive info e-mail about completed movements (transfers/retirements).
Property types
Within this module it is possible to classify assets according to the following types (depends on the needs of a specific company):
-
Long-term tangible assets – e.g. cars
-
Long-term intangible assets – eg buildings
-
Small property – e.g. laptop, mobile phone, data projector
-
Consumables – e.g. office supplies
-
Overhead material – e.g. screws, string
-
Medicines
-
Other types of assets as needed by the company
Additional asset types are defined by the corporate intranet administrator in the section Settings, Property Records tab. Here he is after clicking the button "Add asset type" expands the table in which to fill in the new type property for records, or the e-mail address to which, in the case changes in the number of units, will send information about this change.

Consumables and overheads can be written off by users who have set rights "sees the property entrusted to him and can consume his" or "sees all and can consume".
If the user is to be authorized to write off long-term tangible or intangible property or small property, or other personal property property type, then they must have "modify/add all" rights or "edit/add/delete/restore".
Records of property information according to the company's needs
It is possible to define optional fields in the module settings that allow registration of information for registered property according to company needs. Register the following types of data are possible – whole number, decimal number, yes/no (checkbox), date, list - selection (selectbox), text (1 line).

Adding property
The new property is entered for the record by the user who has the rights assigned to it, by clicking the "Add Property" button located in the Property section on the right side of the screen:

Subsequently, a table will be expanded, in which the application will automatically pre-fill property registration number, and the authorized user fills in other data.
The following must be added as mandatory information:
-
type of property (long-term tangible or intangible property, small property or consumables or overhead materials, or others),
-
quantity and type of MJ
-
method of acquisition (purchase, free transfer, donation, transfer between centres, own production),
-
date of acquisition,
-
date of inclusion,
-
location (entrusted property, office, means of transport, unassigned, CRM – company)
-
user (name to whom the property was entrusted, or the name of the office or means of transport).
In the case of MJ type set, it is possible to add i package contents:

The optional data to be added are:
-
the name of the supplier who supplied the property,
-
invoice number,
-
warranty date
-
expiration date
-
name of the resort
-
possibly other notes
All this data is used to better record and trace assets.

Property overview
An overview of the assets registered within the module is displayed in the overview table in the Assets section.

Property search and filtering
It is possible to set a filter in both the "Assets" and the "Discards/Consumptions" section for displaying selected property items.
The user can turn on the filtering option by clicking the + icon in the right part screens.

Subsequently, a table will be expanded in which it is possible to set the required ones criteria for filtering – e.g. by type of property, type of location, registration number, supplier, center, name, etc.

If the filter is active, the name "Filter" will be displayed in red:
To turn off the filter, use the "Cancel" button.
A quick search is then also possible using the "Search" window, which located on the right side of the screen.

Detail of property information
To view detailed information about the property, it is possible to click either on property registration number, its name or type or on the eye icon, which located at the end of the line for each item.

Subsequently, a table will be expanded in which detailed information can be seen relating to the given property and in which it is possible to add others information related to the use of this item of property (its loans, complaints, etc.).

In case of need, it is used to modify the individual data listed for the property
pencil icon  located next to it
each detail in the asset record detail. Every adjustment made is
automatically recorded in the Notes section.
located next to it
each detail in the asset record detail. Every adjustment made is
automatically recorded in the Notes section.
The ability to edit in the asset record detail is only limited to the number of pieces property. When entering the property, the option to adjust the number of pieces is active, after however, this option is lost the first time the asset is written off (the pencil icon disappears).
Consumption and disposal of property
If a user wants to consume/dispose of an asset, they must have a from application administrator assigned rights. Click on the green button "Use up/discard" the asset or its equivalent amount moves to the "Discards/Consumables" section.

Assets that have been consumed or discarded can be viewed in the overview table, in the "Discard/consumption" section.

If necessary, the user can also dispose of property for another a user who has the right to “Edit/Add All and + Inventory lists' or Edit/Add/Delete/Refresh and create inventory/revision lists':

Transfer of property
The transfer of property can be done either by the user who has the right with the given dispose of the property:

Alternatively, it can be a user who is assigned the right “All edit/add and + inventory lists” or Edit/Add/Delete/Restore and create inventory/revision lists" – this user can also transfer property on behalf of someone else:
Deleting an asset item
Only the authorized user can delete an item from the property register assigned rights. To delete an item, use the cross icon, which located at the end of the line for each item.

Deleted items
Only the user with the highest type of rights can find deleted items, i.e. "edit/add all" or "edit/add/delete/restore". Deleted items are displayed to him by clicking the "Deleted" button on the right parts of the screen.
Deleted data is in the recycle bin for 14 days, after which it is automatically deleted removed. For safety reasons, the bin cannot be emptied earlier.
Transfer protocol for trusting property
It is possible to generate a transfer protocol for each item in the record for transfer of property:
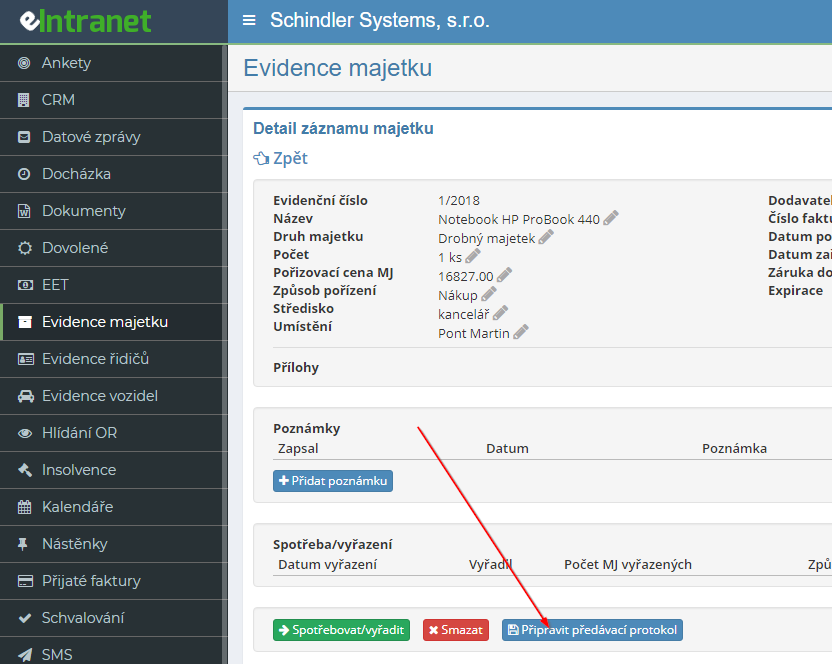
 The generated form is then possible
have the user/employee to whom the property is entrusted signed:
The generated form is then possible
have the user/employee to whom the property is entrusted signed:
It is also possible to generate a transfer protocol for multiple assets; this option must first be enabled in the module settings. Subsequently, it is necessary create a handover log and then add individual items to it property:

Property marking using QR codes
As part of the module, it is possible to have QR codes printed, which they can stick the printouts on a specific piece of registered property.
The QR code can be generated by clicking the "Print QR codes" button:

Subsequently, it is necessary to choose for which property the codes will be printed:


 The labels are automatically adjusted to A4
labels size 70x42.3 mm and can be loaded with any phone
with Android/Iphone - you need to log in to your on the phone
eIntranet in the Chrome browser, then launch the QR code reader application
(eg QR droid for Android freely available in the Play Store) and a label
load:
The labels are automatically adjusted to A4
labels size 70x42.3 mm and can be loaded with any phone
with Android/Iphone - you need to log in to your on the phone
eIntranet in the Chrome browser, then launch the QR code reader application
(eg QR droid for Android freely available in the Play Store) and a label
load:
Detailed information about the registered property will then be displayed directly on the phone:
Creating inventory lists
It is possible to create inventory lists by scanning individual QR codes – only one inventory list must always be active, into which reading the QR code, the selected property will write:
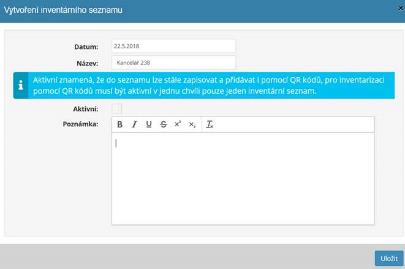
Revision of registered property
It is possible to carry out revisions for registered property. Procedure for implementation asset review is as follows:
- in the module settings, General settings section, you need to enter the number possible asset revisions:

- in the module settings, Revisions section, it is necessary to add revision types - this activates the revision mode in the Property Registry

- for the given asset, enter the type of revision and when it should be next
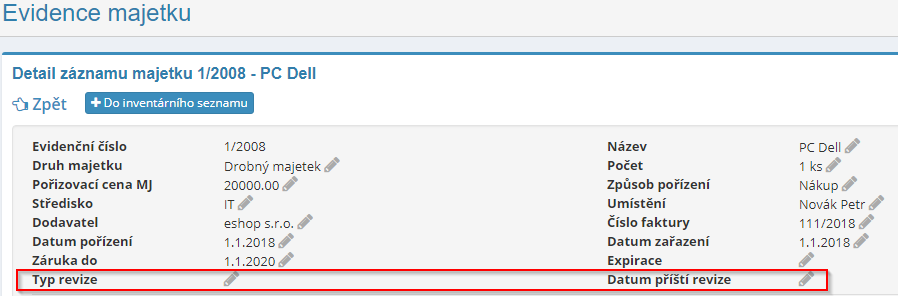
- print the property's QR codes:
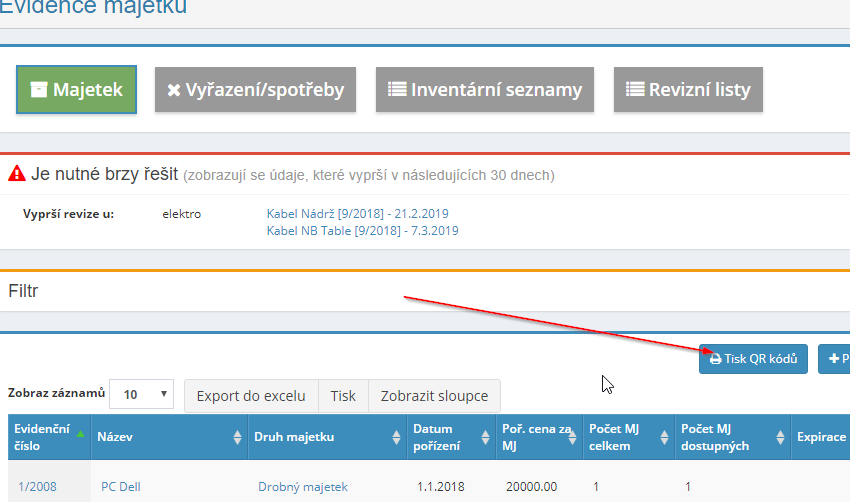
- 30 days before the revision expires, a notification will appear in the eIntranet:
- Carrying out the review:
Establishment of revision sheet
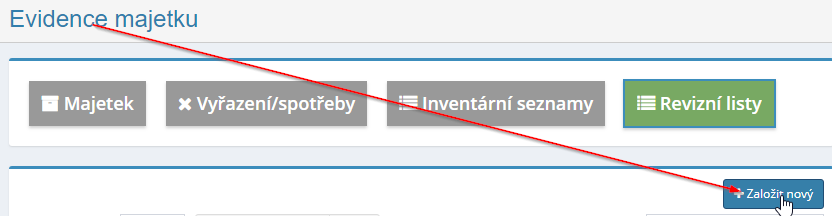
 Read property QR codes - that's it
will display the detail of the property and clicking on the button "Perform revision" will
the property will be added to the revision list and the revision will be extended to the next one
period:
Read property QR codes - that's it
will display the detail of the property and clicking on the button "Perform revision" will
the property will be added to the revision list and the revision will be extended to the next one
period:
After processing everything, it is possible to print the revision sheet:
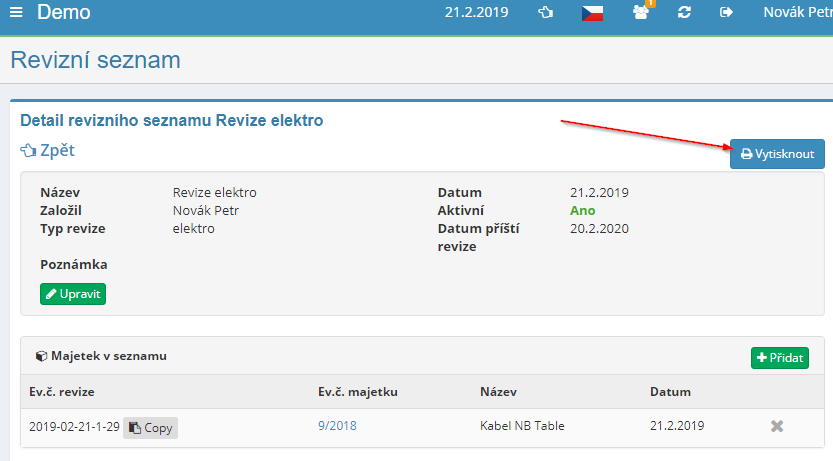
It is possible to leave a certain period of time before the date of the next revision automatically create a task to perform that revision and, if necessary, also writes this task on the calendar. It is first required in the module settings to allow property records to be created before the revision date expires task – how many days in advance the task should be created is also set:

The relevant user is then automatically informed about the creation task.
Export and printing of the property overview
You can either print an overview of the entered property by clicking on the "Print" button, or download to an Excel spreadsheet - by clicking on "Export to Excel" button. Export to Excel is only functional if you have the application running in the Chrome web browser.
Driver registration module
This module allows you to efficiently and clearly record important information about of vehicle drivers in companies (driver's license numbers, groups, for which the driver is authorized to have, any restrictions) and monitor the up-to-dateness related dates (validity of driver's licenses, health inspections or driver training).
The recorded data is divided into several sections – basic data, ŘP groups, training and medical examinations. Dates of medical examinations it is possible to monitor even for users who do not have a driving license.
As part of the registration, it is also possible to register authorizations for pallet trucks.
On the one hand, upcoming deadlines are displayed in the overview within the module a on the one hand, an e-mail message is sent to the relevant persons alerting them to the approaching deadline, namely the selected number of days before the deadline expires.
The main data that will be recorded is defined in the module, but it is possible display of selected columns, or data switch on/off according to needs.
It is possible to search the data of registered drivers using the function quick search or it is possible to filter users by groups driving licenses they own. All entered data is possible have it exported to a clear table in Excel.
The module allows setting different access rights for different types of users - from the option of simply previewing the records to the option entering, editing and deleting data about drivers in the register.
Driver registration module settings
 Access to the driver registration module
with specific access rights, assigns the user an application administrator
in the Settings section, Driver Records tab.
Access to the driver registration module
with specific access rights, assigns the user an application administrator
in the Settings section, Driver Records tab.
In this section, the application manager also sets how many days in advance they should be relevant persons informed about the expiry of the deadline:
Access rights to the driver registration module
 Within the driver record module, they can
users from the application administrator get the following types of rights: without
access to the driver's record - he can read only his data - he can read a
edit self - can read all - can read all and edit all - can
read all, edit and delete all.
Within the driver record module, they can
users from the application administrator get the following types of rights: without
access to the driver's record - he can read only his data - he can read a
edit self - can read all - can read all and edit all - can
read all, edit and delete all.
Overview of driver data in the record
An overview of data on registered drivers is displayed on the home page module. Here the user can choose which columns (data) he wants to have visible in the overview by clicking the "Show Columns" button. After clicking on the selected data, the column with that name will stop display in the table with registered vehicles. It is enough to display it click on the selected data again.
 In the driver registration module settings, si
you can also enable the option to register health and safety and insurance:
In the driver registration module settings, si
you can also enable the option to register health and safety and insurance:
Adding a driver to the record
 It is possible to register a new driver
add by clicking the "Add Driver" button. It will then be unzipped
a table in which the user fills in the data required for registration - mandatory
data is marked with an asterisk.
It is possible to register a new driver
add by clicking the "Add Driver" button. It will then be unzipped
a table in which the user fills in the data required for registration - mandatory
data is marked with an asterisk.
It is also possible to enter a period of repetition in the Health examination section inspection and monitor its expiration date. This function can also be used for users who do not have a driving license.
Editing or deleting data in the driver's record
Editing of registered data can be done by clicking on the pencil icon. To the cross icon is used to delete the registered driver.

Deleted drivers can be found by a user who has been assigned the rights to do so (a possibly return to records) by clicking the "Deleted" button. Deleted data is stored in the trash for 14 days.

Monitoring deadlines
Upcoming dates are always displayed on the module's home page:

At the same time, relevant persons are 14 days before the expiration of a specific term informed via e-mail message.
They are also visible in this section for later reference deadlines that have already expired.
Driver record search
A quick search is possible by entering the required information in the "Search" window:

It is also possible to search according to groups of ŘP that users own:

Data export to Excel
An overview of data on drivers in the register can be downloaded into Excel tables by clicking the "Export to Excel" button. Export to Excel only works if you have the application running in the web browser Chrome browser.
Vehicle registration module
This module is used for efficient and clear management of company vehicles. Outside of keeping track of basic information related to vehicle operation (number plate, name, year of manufacture, VIN, drivers, TP numbers, etc.) the module monitors, a alerts in advance about upcoming deadlines (expires fuel cards, insurance, MOT, first aid kits, etc.). Upcoming dates are both displayed in the overview within the module and sent e-mail message to relevant persons (drivers and fleet managers). warning of an approaching deadline, 14 days before the deadline expires.
The recorded data is divided into several sections – basic data, highway signs, insurance, reflective vests, gas card, tires). As part of the insurance, it is also possible to register subsequent insurance, which will automatically replace the insurance that was originally valid on the 1st day of validity.
The main data that will be recorded is defined in the module, but it is possible display of selected columns, or data switch on/off according to needs. Registered vehicles can be divided into active (in operation) and inactive.
Using the Filter function, it is possible to search by registered vehicles different criteria - e.g. according to drivers, insurance companies, etc. All inserted the data can be exported to a clear table in Excel.
Vehicle registration module settings
Access to the vehicle registration module with specific access rights entered by the application manager user in the Settings section, Logging tab vehicles.
Access rights to the vehicle registration module
 Within the vehicle registration module, they can
users from the application administrator get different types of user rights:
without access to vehicle records - read only - sees vehicles where it is
listed as a driver - sees vehicles where he is listed as a driver and can them
edit - sees all vehicles, can edit those where listed as
driver - sees everything, can edit everything and enter new ones - sees and can everything i
lubricate.
Within the vehicle registration module, they can
users from the application administrator get different types of user rights:
without access to vehicle records - read only - sees vehicles where it is
listed as a driver - sees vehicles where he is listed as a driver and can them
edit - sees all vehicles, can edit those where listed as
driver - sees everything, can edit everything and enter new ones - sees and can everything i
lubricate.
Overview of registered vehicles
An overview of registered vehicles is displayed on the initial page of the module. Here the user can choose which columns (data) he wants to have in the overview visible by clicking the "Show Columns" button. After clicking on selected data, the column with that name will no longer appear in the table with registered vehicles. To display it, just click on again selected data.
Adding a vehicle to the register
A new vehicle can be added to the register by clicking the "Add" button vehicle". Subsequently, a table is expanded in which the user fills in the data required for registration - mandatory data are marked with an asterisk (number plate, vehicle name).

Within the insurance section (compulsory liability, accident insurance) it is possible also enter subsequent insurance. If subsequent insurance is entered, will automatically replace the insurance that was originally valid on the 1st day of validity.
Display the details of the registered vehicle and edit the data, delete the vehicle
Details of the registered vehicle are displayed after clicking the eye icon on at the end of the line of the given vehicle in the overview of registered vehicles. In detail will display the following sections related to vehicle operation: General - Service - Damage - Notes/Changes.

Editing of registered data can be done by clicking on the pencil icon.
The cross icon is used to delete a registered vehicle.

Deleted vehicles can be found by a user who has been assigned the rights to do so (a possibly return to records) by clicking the "Deleted" button. Deleted data is stored in the trash for 14 days.

Monitoring deadlines
Upcoming dates are always displayed on the module's home page:

At the same time, the relevant persons (drivers and vehicle managers) are 14 days before informed by e-mail when a specific deadline expires news.
They are also visible in this section for later reference deadlines that have already expired.
If it is stated outside the insurance and subsequent insurance, the application will automatically convert the subsequent insurance to the current insurance on the day expiry of the existing current insurance and does not draw attention to expiry of the current insurance:

Service Plan
After clicking on the Service Plan button, it is possible to enter data about the planned ones vehicle services:

I.e. when and what should be serviced on the vehicle and for how long - according to kilometers traveled or calendar months. The plan can be created individually i in bulk for any vehicles on record.

Records of information on electronic highway signs
Within the module or it is also possible to register individual vehicles data on electronic highway stamps - data on purchased ones stamps can be imported en masse from an xls file.
In addition, the validity of purchased highway stamps is monitored - the application warns in advance of the end of the stamp's validity.
If necessary, it is possible to print a label with data on the record the purchased stamp, which can be kept directly in the vehicle for information.

Vehicle records search
A quick search is possible using the "Search" window:

A more detailed search is possible using the Filter function, where the user specifies individual criteria for displaying selected types of vehicles:

Handover protocol for entrusting the vehicle
Within the module, it is possible to generate a transfer protocol for entrustment vehicles employees:
It is now possible to generate a transfer protocol for entrustment in the module vehicles employees:
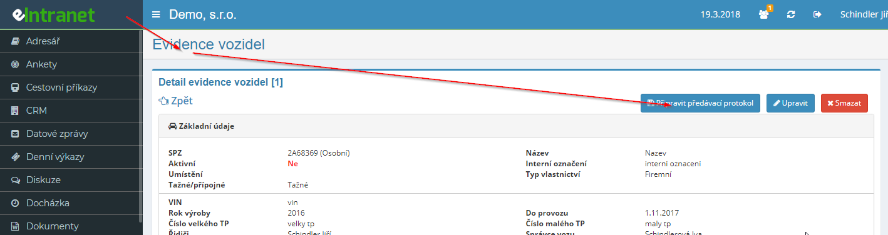

Overview of vehicle financing
In the settings of the vehicle registration module, it is possible to activate part of the financing; subsequently, information about the loan termination date can be entered directly in the records, or enter the user to whom information about the approaching end date should be sent credit:


Driver history
It is possible to activate "Show part of driver history" in the module settings:
Subsequently, the module displays who used the vehicle:

Data export to Excel
An overview of registered vehicles can be downloaded into an Excel spreadsheet, a this by clicking the "Export to Excel" button. Export to Excel is only functional if you have the application running in a web browser Chrome.
Customer registration module
The customer registration module is a simple registration program essential information about the company's clientele. Thanks to this record you will have easy access to all important information about your customers and you may be notified of expiration if necessary relevant terms.
The basic data that will be recorded are preset (e.g. name/name, address, telephone, e-mail), other data can be requested by users fill in according to your own needs (dates, other identification data, etc.).
If the user adds items to the records that need to be monitored deadlines (e.g. certificate validity, etc.), the system automatically informs the user notifies the selected user of the end of this term.
The record is linked to the report of work module. This makes it possible record the work done directly to the given customer and, if necessary, let it be displayed in the work report as well.
Using the Filter function, it is possible to search registered customers by different criteria – e.g. depending on whether it is an active or inactive customer or according to the location of the company's headquarters.
Customer registration module settings
Access to the customer record module with specific access rights entered by the application manager user in the Settings section, Logging tab customers.
In this section, the application manager defines other items that will be registered as part of the records. Logging is set as standard the following data:
-
Name/title
-
Telephone
-
E-mail
-
Address
In addition, the following data can optionally be defined:
-
Optional fields of type date – e.g. end of term validity; it is set how many days in advance the relevant person should be informed about end of validity date, and who is to be informed
-
Optional date and time fields – e.g. date of visit
-
Optional character type fields (up to 100 characters) - e.g. order number
-
Optional text fields – any other additional information
-
Optional attachment type field – registration of other documentation to customers

Access rights to the customer registration module
Within the customer registration module, the application administrator can set users the following types of rights: no access to the module - can read - can read and add notes - can read, add notes and edit – can read, add notes, edit and delete.
Overview of registered customers
An overview of registered customers is displayed on the initial page of the module. Here the user can choose which columns (data) he wants to have in the overview visible by clicking the "Show Columns" button. After clicking on selected data, the column with that name will no longer appear in the table with registered vehicles. To display it, just click on again selected data.

Adding a customer to the register
A new customer can be added to the register by clicking on the button "Add Customer". Subsequently, a table in which the user fill in the necessary data for registration:
Viewing the details of the registered customer and editing the data, deleting the customer
Details of the registered customer are displayed after clicking on the eye icon at the end of the line of the given customer in the overview of registered customers.

The customer detail also records any adjustments that have been made performed in the data record for the given customer.
Editing of registered data can be done by clicking on the pencil icon. To the cross icon is used to delete a registered customer.

Deleted customers can be found by a user who has been assigned the rights to do so (and possibly return to the records) by clicking the "Deleted" button. Deleted data is stored in the trash for 14 days.
Write down the work done
The customer registration module is connected to the work reports; so if the user writes a job in the customer registration module, this will then appear activity and in the statement of work.

At the same time, all the work done for the selected customer can be clearly seen.
Monitoring deadlines
Upcoming dates are always displayed on the module's home page:

At the same time, there are relevant persons in the selected time period before the expiration of a specific term (set by the application administrator in the module settings) informed via e-mail message.
They are also visible in this section for later reference deadlines that have already expired.
Customer records search
A quick search is possible using the "Search" window:

A more detailed search is possible using the Filter function, where the user specifies individual criteria for displaying selected customers:

Invoice received module
The received invoice module is used to clearly record invoices and to make it easier the process of their approval and complete processing.
Receipt of the invoice takes place directly from the sender of the invoice (supplier) by sending it to the e-mail address designated for receiving invoices, or it is possible to insert an invoice into the system scanned.
The sender is automatically informed about the receipt of the invoice into the system. Within the module, it is possible to set up to receive invoices only from verified ones email addresses. If the invoice is sent from "unverified" address, its sender is asked to contact the contact provided in the auto-reply email to include it as verified sender.
When receiving an invoice, it is possible to automatically load data such as variable invoice symbol and amount without VAT. If it is a pdf which is generated as text, it is possible to write notes directly on the invoice.
Invoice approval is also done electronically and if needed can also be set as multi-round - the maximum number of approvers is 8 - after the invoice is approved by the final approver, the invoice is moved to folders for redemption.
Every step that is taken with the invoice is clearly documented, so it is always traceable who did what with the invoice. If necessary, the invoice approval log can be printed.
After entering the ID number of the sender of the invoice, it is possible automatically within the module monitor information about business partners (updated every 24 hours) regarding registration in the insolvency register, permitted numbers bank accounts maintained at the tax office (for VAT payers) a unreliable VAT payers. Obligation to monitor bank account numbers, i.e. that payment cannot be sent to an account that is not registered with the supplier of the tax office, is given by law.
Within individual subfolders of the received invoice module, it is possible simply search according to various parameters, e.g. invoice sender, invoice status or invoice number.
Invoice received module settings
Access the Received Invoice module with specific access rights entered by the application administrator user in the Settings section, Invoices tab accepted.
Invoice module access rights received
Within the Invoices Received module, the application administrator sets the rights to users in the following positions:
-
Observers - only have read access to received invoices with the possibility to enter a note on invoices; they can also check insolvency and unreliability of VAT payers at specified companies
-
Assistants – prepare invoices for approval; the application sends them information about the receipt of a new invoice or they can add to the system scanned invoices, add notes to received invoices, they enter invoice registration numbers, fill in other necessary information and forward invoices to approvers for approval
If necessary (if the module serves primarily as a record of received invoices) it is possible to allow a user with this right to move directly to "Approved, to be redeemed" folder or to the "Processed" folder:

-
Approvers – they have the right to approve invoices that their assistant sends for approval (the application administrator must set the required number of users needed to approve the invoice)
-
Accountants – enter information about the approved reimbursement into the system invoices; if necessary, it is possible to activate the accountant selection function (i.e. when submitting an invoice for approval, a specific selection is possible accountant, one or more that comes then information about the approved invoice for payment):

 How many must be defined in the settings
the invoice from the given sender must have approvers; it is possible to set
for each invoice to be signed by a different number of approvers:
How many must be defined in the settings
the invoice from the given sender must have approvers; it is possible to set
for each invoice to be signed by a different number of approvers:

The received invoice does not have to be approved by only one approver, but the number of approvers can be set according to company needs:
First you need to accept this feature in the settings of the invoice module activate:

 Us possible if needed
approvers to set that they only see invoices for which
are defined as approvers:
Us possible if needed
approvers to set that they only see invoices for which
are defined as approvers:
Setting up reply emails for sending invoices
Makes settings related to e-mails and automatic replies to them application manager in the Settings section, Invoices received tab. In that part, you can see the e-mail address to which the invoices are to be sent send, and on the one hand, the option of setting up automatic replies to sent invoices, while it is possible to set receipt of invoices only from verified addresses.
Furthermore, the application administrator adjusts the wording of automatic e-mails here response in case of invoice acceptance/non-acceptance.


The application administrator also sets here whether invoices will be received only from of allowed e-mail addresses (and adds "allowed" companies to the database), and checks whether replies to received emails will be sent automatically.

Where invoices are only accepted from verified/authorized e-mail addresses, it is possible to set the e-mail of the user to which it will be sent information is sent if the invoice has not been received into the system:
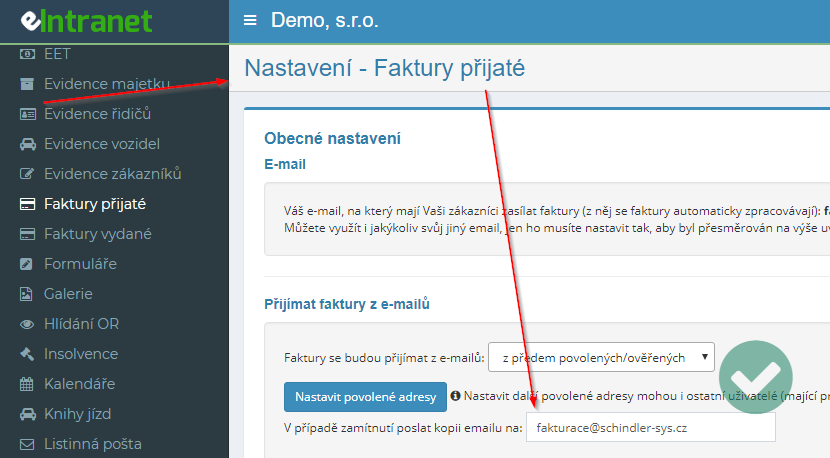
Other general invoice settings
In the module settings, it is possible to tick other options according to individual needs company needs:


In the case of receiving invoices for multiple companies, it is possible within the general framework module settings enter company names and their e-mails for redirection and processing invoices from multiple emails. Then automatically in the invoice overview passes the "For Company" column:
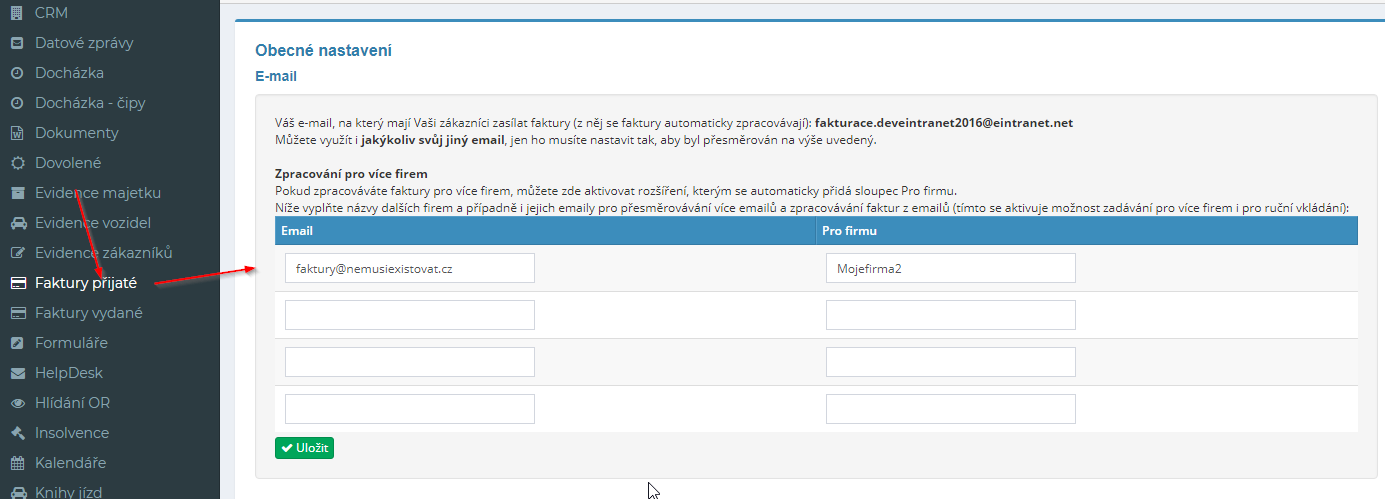
Subsequently, the person assigned to the function of "assistant" enters the persons who will be approve the given invoice and select the final approver.
Individual approvers will receive an email in the order they enter with an invoice approval request:
After the invoice is approved by the final approver, the invoice is moved to "Approved, to be redeemed" folder.
Manual invoice entry
The invoice can also be inserted into the module "manually" by clicking on the button "Add invoice":

 After clicking on it, a table will appear,
in which the user selects the name of the company that sent the invoice, completes it
invoice number, name, or other description, and enters the invoice into the system
(Variable Symbol field is limited to 10 characters - based on request
banking institutions to the maximum number of characters for the variable symbol;
this restriction is mainly important for automatic payment matching and export
of payment orders to online banking, supplier invoice number field
allows you to enter up to 45 characters):
After clicking on it, a table will appear,
in which the user selects the name of the company that sent the invoice, completes it
invoice number, name, or other description, and enters the invoice into the system
(Variable Symbol field is limited to 10 characters - based on request
banking institutions to the maximum number of characters for the variable symbol;
this restriction is mainly important for automatic payment matching and export
of payment orders to online banking, supplier invoice number field
allows you to enter up to 45 characters):

If "Enable (only on manual inserting a new invoice) adding directly to the processed status" is possible when by manually inserting a new invoice, move the invoice directly to the status of Processed:
Automatic loading of data from received invoices
It is possible automatically for invoices received from verified email addresses load the following information (the invoice must be in pdf generated as text, not scanned):
-
Variable symbol
-
Amount without VAT
 Ve is required for this function to work
own module Invoices received go to the List of companies and select here
option to edit a record for the selected company:
Ve is required for this function to work
own module Invoices received go to the List of companies and select here
option to edit a record for the selected company:

Subsequently, you need to fill in the required fields with texts followed by na variable symbol indicated on the invoice, or amount without VAT:
Diagram of the Invoice Received module
The specific procedure for receiving, registering and processing the invoice is given in the following diagram:
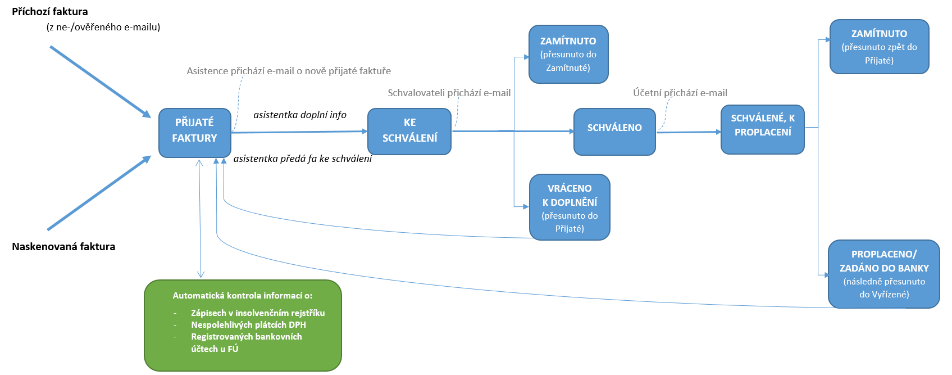
Within the Received Invoice module are the following subfolders (statuses):

Their specific functions are described in the following subsections.
Received invoices
The invoice comes to this folder either via e-mail or it is there the assistant, who has been granted rights to do so by the application administrator, inserts scanned.
Detailed view of the invoice and other information
To view more detailed information about the invoice with the option to add notes
the eye icon is used for additional information
 which is located at the beginning or at
at the end of each line in the invoice overview.
which is located at the beginning or at
at the end of each line in the invoice overview.
A table will then appear with more detailed information about the invoice and next to it it also displays the invoice itself. If it is a pdf, it can be filled in directly to the invoice and note:
 A user with "assistant" rights can
manually add data as needed - e.g. internal invoice ID and number
supplier invoices (for better records and easier traceability
registered invoices) - or it is possible to obtain this data automatically -
see subsection Automatic loading of data.
A user with "assistant" rights can
manually add data as needed - e.g. internal invoice ID and number
supplier invoices (for better records and easier traceability
registered invoices) - or it is possible to obtain this data automatically -
see subsection Automatic loading of data.
It is also possible to add additional operational information to the invoice, in the section "Comment".
 Note can be added by clicking on
"Add Note" button; the invoice can also be "Submitted for approval"
or "Delete".
Note can be added by clicking on
"Add Note" button; the invoice can also be "Submitted for approval"
or "Delete".
If a user with assistant rights clicks the "Forward to approval' is prompted to select the approver to whom it will be sent informational e-mail about forwarding the invoice for approval and which subsequently not/approve the invoice.
The number of approvers who must approve the invoice is set by the administrator app in Settings, Invoices received tab. Standard number of signatures one is required for approval, while it is possible to modify their number as required. If the number of signatures required to approval, this change should only be made if none are pending invoices for approval.
Accepting invoices for multiple companies
 It is possible to receive within the module
invoices for different companies. First it is necessary in the settings
in Settings->Invoices received fill in e-mails and company names
(emails must be forwarded to the given address
billing....@eintranet.net):
It is possible to receive within the module
invoices for different companies. First it is necessary in the settings
in Settings->Invoices received fill in e-mails and company names
(emails must be forwarded to the given address
billing....@eintranet.net):
In the view of the invoices, a quick selection is then displayed for which company they should be invoices are displayed, and at the same time a new column will be added For the company:
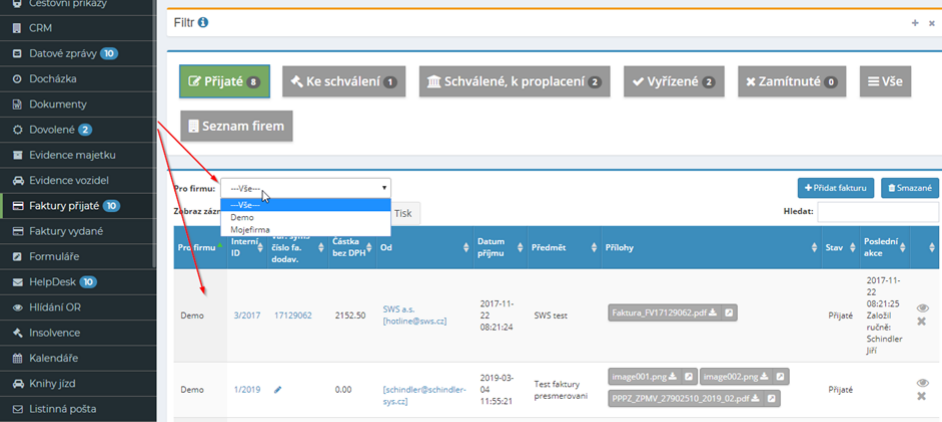
The option to differentiate for which company the invoice was sent also works when by manual entry of invoices (following the setting procedure mentioned above of this function).
Approval protocol
If necessary, it is possible to print the approval log received invoice, in which the individual approval steps are recorded process. The print button is only displayed if the invoice is in status "Approved, to be redeemed" or "Processed":

Invoice search
Invoices entered in individual sub-folders of the module are possible quickly search, by entering the data you are looking for in the "Search" window, which is located on the right side of the screen.
Invoices can be easily searched according to various parameters, e.g. according to the name or e-mail address of the sender of the invoice, the status of the invoice or invoice number.
Furthermore, it is possible to use the search function inside all inserted documents to the received invoice module - using the Filter section. This function allows search in more than sixty file types (such as: .doc, .docx, .xls, .xlsx, .ppt, .pptx, .pdf, .txt, .csv), including pdf and ocr over scanned documents.
In the Approved, to be reimbursed, Processed and Rejected sections, it is in the filter for search also possible to search according to the criteria "Approved" and search so invoices according to their approver.

If the filter is active, the name "Filter" will be displayed in red:
To turn off the filter, use the "Cancel" button.
Deleting an invoice
Only the user who has been assigned the right to delete the invoice can only if the invoice is in the Inbox folder. To delete the invoice the cross icon is used.
Invoices to be approved
The "To be approved" folder contains invoices that have been submitted to the elected approvers for approval. After clicking the invoice detail for with the help of the eye icon, the approver sees more detailed information about the invoice, or he can add a note to it using the "Add" button note".
If the approver agrees with the invoice, he clicks the "Approve" button and the invoice will be moved to the "Approved for Payment" folder. Subsequently, it is an email sent to a user with the "accounting" right to insert a new invoice into "Approved, to be redeemed" folder.
If the approver does not approve the invoice, he clicks a button "Reject" and the invoice will be moved to the "Reject" folder.
In the event that the approver requires any additions to the invoice information, writes with the "Add note" button what information he wants to add and clicks the "Return to inbox" button. Subsequently, it is to the users with the right "assistant" an information e-mail about the return of the invoice was sent to "Inbox" folder. After completing the necessary information, the assistant can submit the invoice again for approval.
 Approved invoices for payment
An invoice that is in the "Approved for Payment" folder can a user with "accounting" rights either approve by clicking the button "Caid/banked" or return with top-up requests to the "Inbox" folder by clicking the "Return to" button received".
In the event that a user with "accounting" rights requests additional information to the invoice, enter the reason for returning the invoice using the button "Add note".
 By clicking the button
"Reimbursed/entered into the bank" a table will then appear in which
the user fills in the date when the invoice will/was paid:
By clicking the button
"Reimbursed/entered into the bank" a table will then appear in which
the user fills in the date when the invoice will/was paid:
 In this section it is also possible in a frame
detail of the received invoice record, print the invoice approval protocol,
in which the individual steps of the approval process are recorded:
In this section it is also possible in a frame
detail of the received invoice record, print the invoice approval protocol,
in which the individual steps of the approval process are recorded:
Processed invoices
 All invoices that were within
module received invoices successfully approved and reimbursed, is located in
"Done" folder.
All invoices that were within
module received invoices successfully approved and reimbursed, is located in
"Done" folder.
For a faster display of processed invoices, there is a select box in this section, ve in which it is possible to enter the calendar year for which the invoices are due display:
Processed invoices can also be exported in bulk - using the button "XML Export“:

Rejected invoices
All invoices that have been within the Received Invoices module in any rejected at the invoice processing stage, is located in the "Rejected" folder.
Overview of invoices
An overview of all invoices that have been inserted into the module (and not deleted). located in the "All" subfolder. If you need to find a deleted invoice, a user with relevant rights can use the "Deleted" button to do so. This button is located in each subfolder of the module (Inbox, To approval, Approved, Payable, Both Completed and Rejected) on the right side of the screen. If, for example, the user wants to find all deleted invoices, clicks the "Deleted" button in the "All" subfolder. If he needs to the user of only deleted rejected invoices must press this button click in the "Rejected" subfolder.
List of companies
In the "Company List" subfolder, authorized users enter a company application administrators who are allowed to send invoices to billing e-mail, by clicking the "Add company" button.
Subsequently, a table will be expanded in which one or more must be completed e-mail addresses from which the company (supplier) will send invoices and her ID number.
 Companies can be imported into the system
even in bulk, using an Excel file prepared according to the model:
Companies can be imported into the system
even in bulk, using an Excel file prepared according to the model:
Entering the ID will automatically retrieve the following from the financial office information:
-
The name of the company
-
Account numbers that are kept at the financial authorities and that can be accessed pay (legal obligation)
-
Whether the company is an unreliable VAT payer
-
Whether the company is undergoing insolvency proceedings
This information is continuously updated on a business day basis and as the case may be changes to the VAT payer or initiation of insolvency proceedings are up to the users module automatically sent an e-mail informing about any changes.
 If not present in the corporate entity
it is possible to enter the ID number, and thus retrieve information about the company according to the ID number (this is, for example,
foreign entity), it is possible to check that company data will be entered
manually:
If not present in the corporate entity
it is possible to enter the ID number, and thus retrieve information about the company according to the ID number (this is, for example,
foreign entity), it is possible to check that company data will be entered
manually:
Export overview of invoices and printing
An overview of inserted invoices in individual subfolders is possible print by clicking the "Print" button, or download to Excel tables - by clicking the "Export to Excel" button.
Issued invoice module
The issued invoice module enables the issuance of invoices according to the needs of users - VAT payers. Within the application manager module, it creates individual invoicing centers and presets general information on invoices concerning with invoice serial numbers or supplier information. He will then assign appropriate user access rights for reading/creating/deleting invoices.
Invoices can be sent directly from the application to the customer (within setting it is possible to enter the text of the e-mail that will be sent), print or indicate whether they have already been paid. Issued invoices contain a QR code for easier implementation of payment by customers.
In issued invoices, it is possible to search according to various parameters (customer, date of issue, amount, etc.), or sort them by whether or not the invoice has been paid.
When creating an invoice, it is possible to load customer data using the ID, from the CRM module or according to previously entered information about the customer in the framework module.
Within the module settings, it is also possible to define how they will be amounts on issued invoices are rounded. Further it is possible set up so that borrowers are automatically notified of outstanding payments invoice.
 In the event of a change to the issued invoice, it is
the original invoice is saved under the notes section and it is written who made the changes
performed
In the event of a change to the issued invoice, it is
the original invoice is saved under the notes section and it is written who made the changes
performed
Invoice module settings issued
Enters access to the invoice module issued with specific access rights application administrator users in the Settings section, Invoices issued tab. However, rights are not assigned to the module as a whole, but to individual ones created centers. The number of centers that can be created is not limited.
In this section, the administrator also creates individual billing centers. New the center is created by clicking the "Add center" button; then a table will appear in which the administrator fills in the data needed for issuing invoices at the relevant center, both regarding the title centers and invoice numbers:
But also information about the supplier, which will be automatically pre-filled on to each invoice:

Furthermore, it is possible to define in the settings how the amounts will be paid invoices rounded off:

And set other options regarding the appearance of the invoice, its name and reminder of its payment:

Document types that can be issued in the Issued Invoice module
Separate invoices can be created in the issued invoice module settings centers for individual types of documents. In the issued invoice module, you can issue the following documents:
-
Tax document invoice
-
Proforma invoice
-
Pro Forma Invoice
-
 Tax receipt for paid deposit
 -
Corrective tax document
-
Tax document, invoice - transferred tax liability
-
Advance invoice – transferred tax liability
-
Proforma invoice – transferred tax liability
-
Corrective tax document – transferred tax liability
Invoice module access rights issued
Within the Received Invoice module, the following can be set for users types of rights within each created center: read - write and read - write, read and delete.

Creating an invoice
A new invoice is created in the relevant center by the user by clicking on "Add invoice" button. Subsequently, a table will appear in which to complete relevant information regarding the invoice:

Customer details can be retrieved from CRM or I can select customers from previously created invoices or enter a new customer as part of the invoices (I can have the data about it loaded according to the ID number):

Detail of invoice issued
In addition to the classic eye icon at the end of the line in the invoice overview, you can to view the detail, click on the variable symbol of the invoice.
Quick information about the items on the invoice can be obtained by clicking on the number of the document - the items listed on the invoice will then be unzipped.

Invoice Attachments
Before sending the issued invoice, it is possible to attach attachments - e.g. detailed breakdown of work, price list or other necessary documents:

Sending and printing the invoice
I can print the created invoice (the printer icon is used for this) or send to subscriber (envelope icon):

The wording of the e-mail that will be sent to the subscriber can be preset in module settings:

It is also possible in the module settings, or for individual settings centers, it is possible to tick the option of offering print sets and selection language:

When sending the invoice, it is then offered as follows:

If the "+EAN" checkbox is ticked, the EAN will also be generated on the invoice code (if entered for items in the warehouse management module) and its display on the invoice facilitates the further process of issue/delivery of items stated on the invoice.
A note is written about sending the invoice and the sent file is also saved of the invoice so that it is easy to find in what form the invoice was sent:

The issued invoice can also be sent via the data module news:

Issued invoices contain a QR code for easier payment from the party customers:

Changes in issued invoices
In the event that there is a modification/overwriting of an issued invoice that has already been saved, a note is made about it and the original file is saved in the attachment invoices:

Paid and unpaid invoices
Within the Issued Invoice module, it is also possible to track whether they have been issued invoices paid - in the invoice overview is possible after payment has been received click to confirm that the given invoice has been paid:

The paid invoice will then be colored green, unpaid invoices will light up in red:

Search in created invoices
In the created invoices, it is possible to search, according to the amount, customer, date of issue or DUZP:

 Invoicing in a foreign currency
If necessary, it is possible to enter an invoice in a foreign currency:
Notification of outstanding invoices
In the settings of the module it is possible to enable the debtors automatically sent information about the outstanding invoice, namely via e-mail or sms:

Issued invoices are checked every day at 11 a.m. and debtors are then automatically send notifications for overdue invoices (as set number of calendar days past due). In the notes for the given invoice, then records information that the notification has been sent.
Invoice export and printing
An overview of invoices created in individual centers is possible print by clicking the "Print" button, or download to Excel tables - by clicking the "Export to Excel" button.
Export to Excel is only functional if you have the application running
in the Chrome web browser. 
The button can be used to import invoices into other applications/programs Export/Import, with which it is then possible to obtain a file of invoices in xml or ISDOC format:
Form module
The form module enables the creation of different types of forms according to company requirements needs, their completion and storage in electronic form. Within the module it is possible to set monitoring of the filling of forms in a specified period, sending reminders to relevant users if the form is not completed or informing superiors about the completion/non-completion of the form users.
The specific type of form will be created by the application administrator according to requirements and needs companies. Access rights are first set globally to the entire module and subsequently, it is possible to define specific rights for each form displaying and filling out individual forms.
The completed forms can be searched by date of completion or by recorder's name. Unused form types can be marked as inactive - The data from the forms will be preserved, but the form will it will stop showing between active forms.
Completed forms can be exported to Excel or printed.
Form module settings
Access to the form module is granted to the user by the application administrator in the section Settings, Forms tab. Within form module settings grants the application manager global rights to the module. Specific access rights are subsequently specified by the application administrator for each individual types of created forms.
In the application manager module settings, it further defines the requirements in the case Form Completion Checks – Form completion may be required on a certain day, exact date, or can be set monthly or yearly reminder of filling out the form:

Access rights to the form module
Within the form module, users can obtain from the application administrator the following global rights: does not have access - write and read only own - write and read own and selected people - write own and read all - write and read all - write, read, delete and restore everything.
Global rights are possible for individual created types of forms edit as needed. Specific access rights can be entered here either by name or by job title.
Creating a new form
Form types are defined by the application administrator in the Settings section, tab Forms. Here, after clicking the "Add form" button, they first create new type of form, sets the rights of individual users and defines requirements for checking the filling of forms.
He enters the specific form of the form (individual fields to be filled) after clicking on the "Edit field" button:


Here, the application administrator defines the names of the individual fields of the form and possible answer types:
Single is required if the response type is select from a list separate values with a semicolon:

For Table - another form, you need to create another one form in the Forms module and write its name in the table - see example:

Where the form (table) employees is defined as:

Next, the application administrator chooses whether a response is required for a given field and whether to appear in the base table with the completed forms.
In case you need to insert between each form field accompanying text for the user, you need to proceed as follows:

It will then appear like this:

Filling out a new form
The appropriate form is filled out by the authorized user in the form module in the section with the name of the relevant form - e.g. Shift progress record - by clicking on the "Write new" button:

Viewing details, editing, copying, printing or deleting the completed form
The eye icon is used to display the details of the completed form. If you need to edit the form, click on the pencil icon. If the same form is filled out every day, it is possible to use the function copying the completed form for the next day. The icon is used for printing printer, if necessary, delete the completed form click on the cross icon.

Form filling by multiple people
In the event that more than one person is to fill in the data in one particular form users can only save the form and leave it unsent for in case of need for further supplementation. It is displayed for unsent forms the inscription "not sent".

If the form is completely completed, it is possible to click on the "Save" button & send”.

Search in completed forms
The "Search" field is used for quick searches in completed forms. It is also possible to filter the forms according to the expected date of completion form or according to the person filling out the form.

Possibility of mass editing of created forms
Completed forms can be marked up and edited in bulk if necessary according to need:
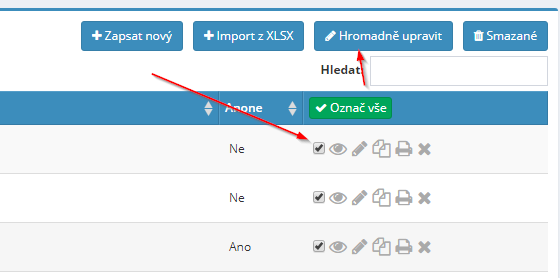
Data export to Excel
An overview of registered vehicles can be downloaded into an Excel spreadsheet, a this by clicking the "Export to Excel" button. Export to Excel is only functional if you have the application running in a web browser Chrome.
Gallery mode
The gallery module serves as a common space for clear storage images and photographs. Photos can be uploaded in bulk and specific images can be sorted into individual types of galleries, i.e. into folders which is established by the intranet administrator.
Access to the galleries can be restricted by access rights to individual users.
Gallery module settings
Grants access to the gallery module with specific access rights app admin users in the Settings section, Gallery tab. As part of the gallery module settings, the application administrator assigns rights to individual galleries, not to the module as a whole.
Gallery module access rights
Within the gallery module, users can get a pro from the app admin specific gallery the following rights: read - read and write - read, write, delete and restore. A certain type of rights can be given by the administrator of the application set en masse for all users or only for selected ones employees.
Add gallery type
Only app admin can add gallery type in Settings section, Gallery tab. Here, on the one hand, after clicking on the button "Add type" of the administrator enter the name of the new gallery type and, on the one hand, complete the rights for the user a new type of gallery.
Editing and deleting a gallery type
Gallery type can only be edited or deleted by the app admin in the section Settings, Gallery tab. Use the icon to edit the name of the gallery type pencils, the cross icon is used to delete the gallery type.
Adding a post to the gallery
A new post will be added to the selected gallery type by the user who has the right to do so rights granted by clicking the "Add Photos" button on the right screens. A table will then appear into which the user drags selected photo or photos, or complement her/theirs description.
Edit photo description
The description of the photo can be easily edited by clicking the "Edit" button description" in the upper right corner of the screen. After clicking this button se expands a table in which you can add the required text.
Delete photo from gallery type
Only the user who it has rights assigned to it by the application administrator. To delete a photo the "Delete" button in the upper right corner of the screen is used.
If necessary, a user who has the rights set to do so can
to find deleted photos from selected gallery type by clicking on
"Deleted" button. Click on the icon
it is possible to keep deleted photos
restore.
Generating a public link
A public link to the file in the gallery can be generated if needed for non-eIntranet users:
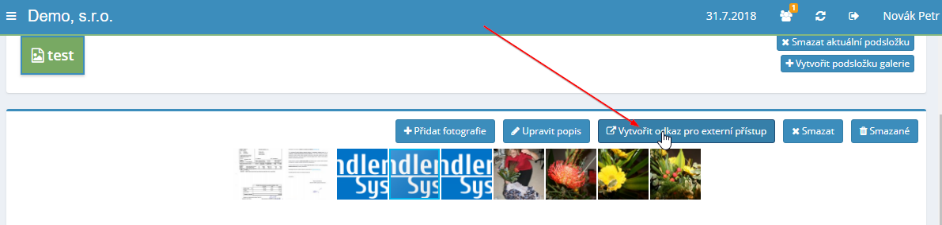
The link can be generated either for a specific image or for the entire image folder:

GPS location module
The GPS location module is used to obtain vehicle operation records and automatic filling of the log book.
To operate the GPS location module, you need to purchase a GPS unit - up-to-date the offer of suitable GPS units and the subscription price for its operation can be found here: https://www.eintranet.net/cs/modul-intranet-GPSLocation. Units to OBD or on the car battery are installed by yourself, with fixed connections units, it is necessary to take into account the departure of the technician.
The vehicle for which the unit is to be activated must be registered within the vehicle registration module.
The GPS vehicle tracking module allows you to track the movement of vehicles on the map v in real time and recording this traffic in the logbook, identification of the driver and switching between private and business driving. It automatically generates logbooks - extracts from the logbook are possible export to different file formats or make available to multiple users.
GPS location module settings
Grants access to the GPS location module with specific access rights app admin users in the Settings section, GPS location tab.
In Settings, the GPS location module in the General settings section needs to be set following:

Next, there is a Vehicles/Machines section in the settings to see for which vehicles are units used. In the Diety CR and Diety/Pocket sections abroad, the administrator of the application/this module will set the appropriate amount diet.
Access rights to the GPS location module
The following access rights can be assigned in the GPS location module settings – reading your journeys – reading your journeys for selected vehicles – reading all of them. In addition, users can be granted the following additional rights: logbook export, logbook export with diets + documents, settings areas and alerting/surveillance, change private/work travel, change driver on the road.
Vehicles section
The vehicles for which the GPS unit is used and theirs are displayed here current position.
Calendar section
In the calendar, the number of kilometers driven for each individual can be clearly seen days. It is possible to choose the display for individual cars separately, if necessary for all cars at once.
 Ridebooks section
The logbook section shows detailed information about each vehicle trips. First, you need to choose a vehicle or a driver, a required date:
 The individual rides will then be displayed
of the given vehicle, for which it is possible to choose whether to display:
The individual rides will then be displayed
of the given vehicle, for which it is possible to choose whether to display:
The view of the rides is then recorded on the map:

For the selected vehicle, it is then possible to download the log book for the selected period in Excel (including diets):

If the user has been assigned some superstructure right (square check-box in the rights settings), these options appear in this section - e.g. possibility to change driver, add documents, change private/business ride:

Documents section
Here you can see an overview of uploaded documents - documents are entered in the section Trip books for individual registered trips.
Tools section
The Tools section allows the following:
- Battery voltage monitoring – allows you to set battery voltage monitoring – when it falls below the selected value, the application will automatically send notification to the selected user (by e-mail or SMS):

-
 Areas - allows to define
individual areas in which the vehicle moves (e.g. residence
companies, etc.).
Areas - allows to define
individual areas in which the vehicle moves (e.g. residence
companies, etc.). -
Areas - entry/exit monitoring - enables automatic dispatch sms/e-mail upon entry/exit to/from the area at the selected time:

-
Correction of km - used to correct the km displayed on the speedometer and calculated km via GPS
-
Manual editing of rides - by clicking on "Manual editing of rides" se the use of this option activates – the inscription is green; consequently it is it is possible to edit, delete and add trips in the Trip books section:

Model Helpdesk
The HelpDesk module allows eIntranet users to create a help desk workplace for their customers. The eIntranet administrator creates individual projects (types of activities) for which support is to be provided through the help desk, and then set them according to the needs of the company and assign access rights to users (request resolvers).
Employees then deal with requests simply and efficiently through online application. The request can be entered into the application automatically via e-mail or can be entered manually by employees (e.g. in the case of telephone reporting by the customer).
In the application, you can clearly see who and how the request is handled, and they are all changes related to the received request are recorded.
In the module, it is possible to assign a priority to individual requests (tickets). search according to different criteria. The advantage of recording customer requests through the HelpDesk there is clarity, efficiency and speed of work with individual customer requests when passing requests between more solvers.
For frequently asked questions, you can also create answer templates whose use then speeds up the answering of customer questions.
HelpDesk module settings
Access to the HelpDesk module with specific access rights is specified application manager users in the Settings section, HelpDesk tab. As part of the HelpDesk module settings, the application administrator assigns rights to the individual projects they create within the module settings, not to the module as a whole.
HelpDesk access rights
 Within HelpDesk, users can
from the application administrator to obtain the following rights for a specific project: no
access - access to assigned tickets - read only assigned tickets
- access to all tickets - access to all tickets and the possibility of them
lubrication. A certain type of permission can be set by the application administrator in bulk for
all users or only for selected employees.
Within HelpDesk, users can
from the application administrator to obtain the following rights for a specific project: no
access - access to assigned tickets - read only assigned tickets
- access to all tickets - access to all tickets and the possibility of them
lubrication. A certain type of permission can be set by the application administrator in bulk for
all users or only for selected employees.
Establishment and setting of individual projects
The application administrator first creates the project to which it will be provided help desk support - in settings, HelpDesk tab, click on "Create project" button:
Subsequently, it sets access rights for the created project of users to a given project and setting up customer support as needed companies.
The following options are defined, for example:
-
whether customer requests will be sent to an email address generated directly from the eIntranet or whether requests will be sent to your own e-mail address with e-Intranet e-mail forwarding - a enter the basic texts of e-mails that will be sent to customers at acceptance of the request.
-
connection with the Orders, Projects, CRM or Worksheets module
-
the content of the information table attached to the email
-
the possibility of inserting your own notes
-
the option of a web form for creating tickets
-
option to enter the severity in the web form
-
the possibility of selecting a solver when entering a ticket in the web form
-
options for entering and editing optional fields
-
possibility to reopen tickets
-
option to send a copy of your own answer by e-mail, etc.

In the module settings it is also possible to enable:
-
own ID for tickets:
-
automatic closing of tickets in case of customer requesting support does not respond to the submitted ticket for a certain period of time:
-
automatic entry of the ticket name in the e-mail subject:
In the Optional fields section, there is also an option to add other data included in a ticket in a specific project as needed:

Request processing statuses
Accepted requests in the module are broken down either by status or by priorities (the breakdown by priority depends on the needs of the company, as it is priority breakdown set). Accepted requests are divided by status as follows:
New - Assigned - Resolved - Awaiting Response - Resolved - Closed

However, the exact display also depends on the assigned access rights specific user. Requests assigned to a specific user will then they show in the sections "Assigned to me" or "Solved by me".
Processing of requests
For a received request, the progress of its processing is recorded using "Add Record/Make Change" button. It is then written in the table the process of solving the request as needed (e.g. it is assigned to the user to resolve, additional information will be requested from the sender of the request etc.).
To create a response for the customer faster, it is possible for the field for
enter the answer click the button
" Add outreach" - automatically
then fill in the address of the customer/ticket issuer (his/her last name) and on
the word "Thank you" is then added at the end:
Add outreach" - automatically
then fill in the address of the customer/ticket issuer (his/her last name) and on
the word "Thank you" is then added at the end:
If the request is already resolved and just needs to be terminated, that's enough click the "Approve/Close" button.
 If the customer's request belongs to another
project, it is possible to move it by clicking the button "Transfer to another
project".
If the customer's request belongs to another
project, it is possible to move it by clicking the button "Transfer to another
project".
Manually adding tickets
 If the request is not sent by email,
but the customer calls it, for example, it is possible to add it to the application manually.
The request is entered after clicking the "Add ticket" button:
If the request is not sent by email,
but the customer calls it, for example, it is possible to add it to the application manually.
The request is entered after clicking the "Add ticket" button:

Subsequently, a table appears in which the customer's request is added:
Response templates
In the "Response Templates" section, it is then possible to create sample types of responses, which can be used when responding to individual types of received requirements from customers.
A new template is created after clicking the "Add Template" button:

Subsequently, a table will appear in which the sample answer will be filled look like - e.g. "Incorrectly entered information" response:

Linking tickets
If necessary, tickets can be combined using the "+" button:

You then select which ticket the ticket is linked to

The selected (unclosed) ticket will be closed.
If necessary, tickets can be separated using the cross icon:

Linking with other modules
In the module settings (for a specific project created) it is possible check the connection of the HelpDesk module with other modules - jobs, projects, CRM and reports of work.
Search
Within the module, it is possible to search according to various criteria, e.g status, date, solver, etc. It is also possible to search in the description or note in individual tickets:

Print and export data to Excel
The list of inserted tickets within the individual can be printed or read download it to an Excel spreadsheet by clicking the button "Export to Excel". Export to Excel is only functional if you have the application running in the Chrome web browser.
OR monitoring module
The module enables automatic tracking of changes in entries in the business register (OR). After entering the identification data of the subject with whom they have changes are tracked, are relevant users through the system email messages automatically notified if they are at this changes made to the subject.
The commercial register is a public register in which they are registered statutory data on entrepreneurs - e.g. company, registered office, subject business, partners. For carrying out some legal acts is an extract from the commercial register that is officially certified must be provided.
If the change in the commercial register is made by the relevant party subject recorded in time, it is possible to avoid major inconveniences - there have already been attempts to steal businesses based on changes in business register, while these changes were made on the basis of counterfeits written documents. Likewise, timely recording of the conversion effort failing companies to a new unknown entity can prevent a possible large financial loss.
Setting the OR monitoring module
Grants access to the OR watchdog module with specific access rights application manager users in the Settings section, OR Watch tab.
Access rights to the OR watchdog module
Grants access to the OR watchdog module with specific access rights application manager users in the Settings section, OR Watch tab. Maybe access rights are: no access - read - read and receive info by e-mail about changes - read, info by e-mail and add - read info by e-mail, add and delete.
Adding a new subject to watch
A new subject can be entered by a user who has been assigned the rights to do so, by clicking the "Add Subject" button.
Subsequently, a table will be expanded in which the relevant fields must be filled identification data of the subject:

Display information about changes in OR
In the overview of the entered entities, then on each line for an individual to the subject, information is shown as to whether any were performed on the given subject changes.

For better understanding of the change made in ARES, it is sent to the relevant users an informational e-mail in which they are clearly in the table changes made are displayed:

Import data from Excel
Entities to be monitored for changes in the commercial register are possible to import in bulk from Excel - you always import the maximum 100 companies/persons at once.
A sample file (demonstration) based on which data to import to prepare, you can find here:

Insolvency module
The insolvency module enables automatic tracking of information on whether your the business partner does not have an entry in the insolvency register, and automatic tracking information about whether the supplier is among the unreliable ones the VAT payer, i.e. whether he fulfills his obligations in relation to tax administration.
The entity against which it is filed is entered in the insolvency register a proposal to initiate insolvency proceedings. If such an entity (supplier) gets into the insolvency register, it then becomes risky entity for concluding other business relationships.
The module also verifies the reliability of VAT payers - if the company is a VAT payer, takes goods or services from an unreliable VAT payer, is responsible for the unpaid VAT on this taxable supply on its own behalf supplier, if he was on the list at the time of performance unreliable VAT payers.
After entering the identification data of the entities to be monitored due to the insolvency or unreliability of the VAT payer, the module automatically monitors any changes. If there is a change in the embedded entities, the application will send an informational e-mail to the relevant persons.
Insolvency module settings
Enters access to the insolvency module with specific access rights application manager users in the Settings section, Insolvency tab. In this section, the application administrator not only specifies access rights for individual users, but also whether they will only be tracked within the module ongoing insolvency or all (i.e. already closed) insolvency.
Insolvency module access rights
Under the Insolvency module, users can obtain applications from the administrator the following rights: no access - show info - show info, receive information by e-mail about changes in the insolvency register and of unreliable VAT payers - display info, receive info by e-mail about changes in the insolvency register and unreliable VAT payers, add watchdog subjects - display info, receive info about changes by e-mail in the insolvency register and unreliable VAT payers, add watchdogs and delete watchdogs.
It is also possible to assign the right to send notifications to selected users about changes in management.
Adding a new subject to watch
A new body for tracking information on insolvency and reliability VAT payers can be added by a user with relevant access rights po clicking the "Add Subject" button. Subsequently, the table will be expanded, in which the user fills in the following data:
-
Entity name or natural person name
-
The relationship - supplier, customer, client, etc. - serves for better orientation users in the information entered
-
Social security number - in the case of a natural person
-
ID number, VAT number - in the case of a company contact

Display of information on insolvency and unreliability of VAT payers
In the overview of the entered entities, then on each line for an individual information shows the entity whether or not the entity is insolvent and whether possibly an unreliable VAT payer.

Import data from Excel
Entities that are to be monitored for insolvency or unreliability VAT payer, it is possible to import in bulk from Excel - you import yourself a maximum of 100 companies/persons at a time. Sample file (sample), according to which the data must be prepared for import can be found here:

Calendar module
The calendar module provides an overview of events, dates, meetings, meetings and other events related to the operation of both the entire company and individual departments.
All employees have an immediate overview of all entered dates. O changes to the calendar are relevant to users immediately after they are made automatically notified of changes via e-mail.
The application allows you to set up an unlimited number of shared calendars and subsequent setting of permissions for their use for individuals employees. The calendar can be shared department-wide or department-wide businesses, either in read-only mode or in a mode where others have allowed to change calendar entries.
It is possible to set reminders for individual entries in the calendar (even for more employees) - a reminder will arrive at the set time before the event by e-mail.
Calendar module settings
Grants access to the calendar module with specific access rights app admin users in the Settings section, Calendars tab. As part of the calendar module settings, the application administrator assigns rights to individual calendars created, not to the module as a whole.
For individual calendars, it is also possible to enable the attachment of attachments - at the option to write a specific event in that calendar will then appear attachment entry:

Access rights to the calendar module
Within the calendar module, users can obtain a pro from the application administrator specific calendar the following rights: read - read and write - read, write, delete and restore. A certain type of rights can be given by the administrator of the application set en masse for all users or only for selected ones employees.
Display of specified events
Events entered in the calendar can be viewed either in calendar view or as a list of events by clicking on the corresponding "Calendar" or "List" buttons.

Within the module, a daily, weekly or monthly view of the calendar is possible.
Export and print the event overview
In the list view of events, it is possible to keep recorded events export to Excel or print.
You can print an overview of embedded events by clicking the button "Print", or download to an Excel table - by clicking the button "Export to Excel". Export to Excel is only functional if you have application running in the Chrome web browser.
Adding a calendar
Only the application administrator can add a calendar, in the Settings section, Calendar tab. Here, on the one hand, after clicking on the "Add administrator" button enter the name of the new calendar, or its description, and also add rights for users of the new calendar.
Editing and deleting the calendar
 The calendar can only be edited or deleted
application manager, in the Settings section, Calendars tab. To edit
the name of the calendar or its description is used by the pencil icon to delete
the calendar is served by the cross icon.
The calendar can only be edited or deleted
application manager, in the Settings section, Calendars tab. To edit
the name of the calendar or its description is used by the pencil icon to delete
the calendar is served by the cross icon.
Adding a post to the calendar
A new post is added to the calendar by the user assigned to it right, by clicking the selected date. A table will then appear into which the user enters the name of the event, the date and place of the event, color highlighting the event and its content.
In the calendar, it is possible to set the sending of reminders of recorded events to selected users, via e-mail or SMS. It is also possible set the number of minutes before the event when the reminder should be sent.
Events in the calendar can be entered as recurring, thanks to the function "Repetition". Actions can be repeated daily, weekly, monthly or annually.
Notification of a new event in the calendar
When writing a new event to the calendar, it is possible to specify whether they should be selected users of the given calendar are informed about the insertion of a new event into calendars:
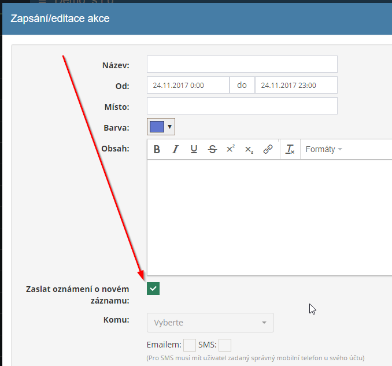
The sponsor of the new event then chooses who the information should be sent, and whether it should be sent via sms or e-mail:

Editing and deleting a post in the calendar
Only the user can edit or delete posts in the calendar who has been granted rights to do so by the application administrator. The specified event can edit or delete completely after clicking on the selected event in the calendar.
You can edit an event (its length) by simply expanding or reducing the field in which the event is written.
Moving the event to another date is possible by simply dragging the event to the desired date.
If necessary, a user who has the rights set to do so can
to find deleted events from the selected calendar by clicking on
"Deleted" button. Click on the icon
it is possible to leave deleted events
restore.
Logbook module
The logbook module is intended for recording the logbook in electronic form and allows you to record the necessary data related to company trips vehicles.
The electronic logbook management is completely comparable to the classic, in print, in the way of keeping a log book (similar procedures), but it is more convenient and economical than keeping a printed log book.
As part of keeping an electronic logbook, company management has a perfect overview, how many kilometers the vehicle has been driven, who drove it, when and where it was last driven, for what reason the vehicle was used, when it was refueled, how many kilometers the driver of the vehicle drove on business and how much privately. It is possible if needed view or complete this information from anywhere, where there is a connection to internet, and there is no need to wait for a printed version of the log book.
If the vehicle makes certain journeys regularly (same journey), the count kilometers can be added automatically.
The module is linked to the travel orders module - embedded record in the book journeys can be rewritten from a new travel order.
If necessary, it is possible to download the overview of the use of the vehicle for convert individual months or any trip into printed form.
Logbook module settings
Enters access to the logbook module with specific access rights application manager users in the Settings section, Logbooks tab.
Logbook module access rights
Within the logbook module, users can obtain from the application administrator the following rights: a regular driver (has access to the log books in which he is conducted as a driver) or fleet manager (can control any log book).
Adding a vehicle to the log book
Only the administrator of the application can add a vehicle to the log book, in the section Settings, Logbook tab. Here, after clicking the button "Add vehicle" enters the name of the new vehicle, its license plate number, the default km status and assigns the driver.
Adding a ride for the selected vehicle
Only the selected vehicle can add a new trip to the log book a user who has been granted rights to do so by the application administrator, viz by clicking the "Add Ride" button. This button is located on the right part of the screen on the start page of the logbook module.
Subsequently, a table will be expanded in which the driver fills in the necessary data regarding the use of the vehicle (date and purpose of the trip, from where and to where it was driven, mileage status, possibly refueling).

Editing of data for the specified trip
After saving a trip within the logbook, it is no longer possible, for a reason security and administrative, subsequently change the specified trip.
Detailed display of data for the entered trip
A detailed display of the entered data for the selected ride is possible using the icon mesh, which is located at the end of the line for each entered trip in the overview rides with the selected vehicle. Subsequently, the table in which they are will be expanded detailed information about the completed trip is given.
Deleting the entered trip
Only her can delete a trip that has already been entered in the trip book client or fleet manager by clicking on the cross icon, which is located at the end of the line in the overview of entered trips for the introduction module page.
However, only the last ride that was in the given ride book can be deleted vehicles entered!
Binding to travel orders
After inserting a new ride, it is possible by clicking on the arrow icon next to the given ride add a trip to a new travel order:
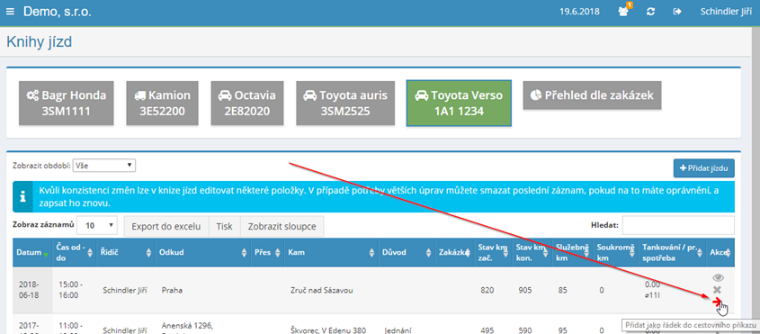
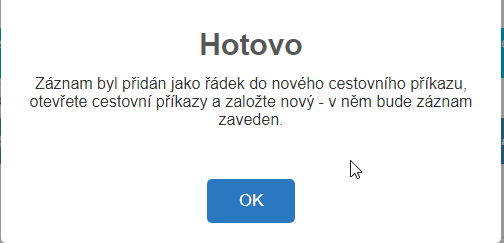
Export and printing of trip overview
You can print an overview of recorded rides by clicking the button "Print", or download to an Excel table - by clicking the button "Export to Excel". Export to Excel is only functional if you have application running in the Chrome web browser.
Exchange rates module
The currency rates module shows the rates of each currency since 2000. Thanks to this history, it is possible to display the development of the currency in a clear way graphs:

This module has no special settings. Courses are downloaded automatically from the CNB after the publication of the current exchange rates every working day - at 2:35 p.m.
The module is linked to the invoice issued module - when printed/emailed invoices in a foreign currency, the current currency rate on the invoice will be displayed:

Document mail module
The registered mail module is intended for recording incoming and outgoing registered mail corporate mail and is linked to the approval module, allowing forwarding of the entered record for approval by responsible personnel in the electronic form.
The application automatically assigns a registration number to the inserted documents (in number/year format) and monitors the continuity of the number series.
When entering mail into the module, it is possible to determine the possible addressee of the recipient of the document – the appointed solver is informed about the insertion of a new document automatically via an email message.
The system allows, if it is necessary from the point of view of archiving, to upload a scan incoming/outgoing document and save it within the module.
It is possible to generate envelope labels and print them, distinguish national or international shipments or generate inserted records in the sent mail on the ČP filing sheet.
Document mail module settings
Access to the registered mail module with specific access rights is specified application administrator users in the Settings section, Paper Mail tab.
The administrator can then set another option under the General Settings section module - e.g. entry of national/international mail, types of shipments (ordinary/recommended/valuable writing, ordinary/recommended/valuable package, data message, internal mail), delivery status (delivered/not delivered/at on the way) etc.:

Access rights to the registered mail module
Within the registered mail module, users can obtain from the application administrator the following rights: does not have access - read all and solve your - read, solve and write all - read, solve, write and delete + restore all.
 Adding record to registered mail
A new entry in the inbox/outbox is inserted by clicking the button "Add Record/Mail". Subsequently, a table will be expanded into which the user who has been assigned the rights to do so will complete the information about the sender and content of the recording, or uploads the necessary attachments.
If it is an incoming document, the user who enters it into the system, also specifies the solver who is in charge of processing the given document. The designated solver will then automatically receive an e-mail message in which it is informed of the insertion of a new document for resolution.
 The registration number for the new record
assigns automatically so that numerical continuity is maintained
advice.
The registration number for the new record
assigns automatically so that numerical continuity is maintained
advice.
When registering incoming/outgoing paper mail, it is possible to use the option sender/recipients from the CRM module:
Detail of registered mail record
More detailed information about the record in registered mail can be obtained by the user who has rights assigned to it, view by clicking on the eye icon that located at the end of the line for each record listed in the records overview at module's home page. A table with closers will then expand information related to the record, such as the registration number of the record, the date acceptance, to whom it is addressed, who handles it, etc.

It is then possible to add notes within the detail view of the record to record or upload additional attachments.
Editing and deleting an entry in registered mail
Only he can edit or delete entries in the registered mail module a user who has been granted rights to do so by the application administrator. To edit the pencil icon is used to record and the cross icon is used to delete a document. Both icons are listed in the list of registered mail entries on the homepage module page at the end of the line for each entry.
If necessary, a user who has the rights set to do so can
find deleted records from registered mail by clicking a button
"Deleted". Click on the icon is
possible deleted records to be restored.
Envelope labels
It is possible to generate labels to
envelopes and print them:
Filing sheet ČP
In the sent registered mail module, it is possible to generate a sheet for submission registered letters for Czech Post:


Records to be generated on the filing sheet are possible first filter as needed – e.g. domestic shipments only, and then only to have a filing sheet created.
Search in the registered mail module
The registered mail module allows searching not only by basic criteria, such as document registration number, date of receipt, status, solver, etc., but also in the content of documents - in the box "V of content/description" the keyword that the document should contain is entered, and after clicking the "Search" button, the user will be presented with a list documents that contain the given keyword.
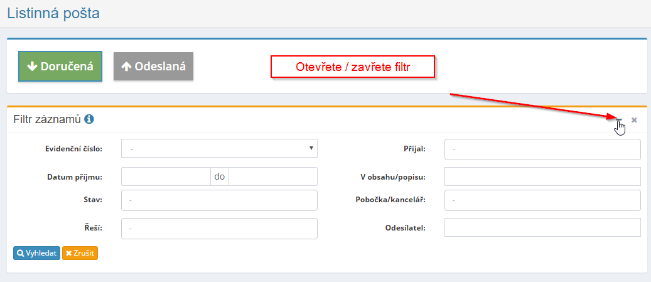
Connection of the registered mail module with the approval module
The registered mail module is linked to the approval module. This feature enables after entering the record into the received paper mail of his automatic submission for approval within the approval module (applies to e.g. incoming invoices - after entering the invoice in the inbox it is possible its electronic transmission to the approval module, which enables its approval or rejection by the relevant person).
After the record is submitted for approval, it is automatically registered in the module marks the delivered record as processed and notes that it was passed to the approval module.
In the approval module, the record is automatically created and credited to it note that the user forwarded this record from the registered mail module.
It is relevant to submit a record from registered post for approval the approver is automatically informed via e-mail message.
Export and print of the list of registered mail
In the list view of received/sent mail, it is possible to keep export recorded records to Excel or print them.
An overview of the inserted records can be printed by clicking the button "Print", or download to an Excel table - by clicking the button "Export to Excel". Export to Excel is only functional if you have application running in the Chrome web browser.
Module menu-custom links
The menu-custom links module enables the inclusion of important company links within the eIntranet menu. This is how to create a custom module with a link to the company archive, photo gallery, video gallery and other company documents and important links.
Within the menu-custom links module, the application manager sets a link that will also become a new module in the menu. The module is set up in the Settings section, tab Menu-custom links. The custom module then will include in the menu according to the name of the link (e.g. Archive, Company documentation etc.).

Module settings menu-custom links
Menu module access - custom links with specific access rights gives the user the application manager in the Settings section, tab Menu-custom links. Assigned by admin within module settings application of rights to individual modules created by reference, not to the module as a whole.
Access rights to the menu-custom links module
Within the menu-custom links module, the application administrator can define a pro specific module of users who can see the module. Access to users it is possible to enter by name or by individual job positions.
Creating a new link
A new link will be created by the application administrator by clicking the "Add Link" button in the Settings section, tab Menu-custom links. It will then be unzipped the table in which it is necessary to complete:
-
Name of the link – the name of the link is also the name of the module; created the link will be listed under this name in the menu between modules
-
Link address

Next, you need to choose whether the link will open in a new window or as iframe, and the icon that will be associated with the link (i.e. the new module).
Edit and delete link
The created link (new module) can be edited by clicking on the pencil icon. The cross icon is used to remove the created link. Both icons are can be found in the overview table of created links in the Settings section, tab Menu-custom links.

Creating link groups
If necessary, link groups can be created into which it is possible unify multiple links. The links are then displayed under the name in the menu groups:
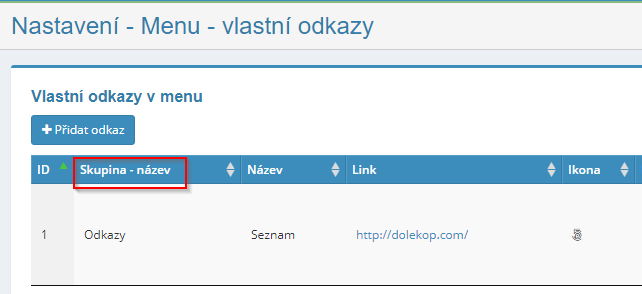
Menu module
The offer module is used to create offers for your customers, business partners. It must be defined first in the Menus module settings groups of offers and data displayed on the offer – e.g. name of the supplier, contact information, logo, etc.
The module is connected to the order module (selection from registered orders) a with the CRM module (selection from registered customers). In the overview view other subsequent, related documents are then visible - orders received and issued, requests, delivery notes, invoices received and issued.
Requests from customers (for creating offers) can be added to the module also receive via e-mail.
The created quote can be emailed directly from the app or print. It is also possible to search for created offers according to various criteria and view the success statistics for individual offers years, respectively calendar months.
Menu module settings
 Enters access to the menu module
app admin users in the Settings section, Menus tab.
First, you need to create a specific menu group in the module settings and
assign relevant access rights to it to users.
Enters access to the menu module
app admin users in the Settings section, Menus tab.
First, you need to create a specific menu group in the module settings and
assign relevant access rights to it to users.
Within the module settings it is possible to define:
-
the form of the offer form (data on the supplier, bank details, serial numbers, default texts above and below items)
-
files in pdf to be attached to the offer - here it is possible to insert e.g. a file with offered services or references, which automatically appends to the file with the offer - before or after the offer
-
receiving requests for offers by e-mail:
-
 acceptance of the offer by the customer
online - an option will appear in the offer email to the customer
approval of the offer online; after clicking the "I agree" button
with an offer and I will electronically sign” a name entry is required
and the customer's signature:
acceptance of the offer by the customer
online - an option will appear in the offer email to the customer
approval of the offer online; after clicking the "I agree" button
with an offer and I will electronically sign” a name entry is required
and the customer's signature:
The customer's online signature of the offer is recorded in the offer detail:

Menu Module Access Rights
Within the menu module, users can get a pro from the app admin specific group of offers the following rights: no access - sees the offers – sees and can create new ones and edit their own – sees and can edit a create all - sees, edits, creates and can delete everything.
Creating an offer
A new offer is created by the user after clicking the "Create" button offer". He will then be shown a table in which he will fill in everything information about the offer:

It is also possible to attach attachments - either as a public part of the offer or as internal.
Offer detail
Clicking on the eye icon in the menu overview table will show a detail offers created. Individual menu items are then entered here (ie it is also possible to add from stock management) and set discounts for of the customer:

In the detail of the given offer, you can also create an inquiry or order accepted. Documents related to the created offer are also displayed here:


Print and send the offer
The created offer can be generated for printing or for sending by e-mail and printing:
Search in menu module
For a quick search, use the "Search" field at the top right. Further it is possible use the search filter, in which it is possible to search according to various criteria:

It is also possible to display offers by individual years, all/active bids and view bids successfully converted to orders received:

Statistics by year
Under the button "Statistics by year" you can view an overview of success
submitted bids: 
Board module
The bulletin board module is used to quickly pass information, e.g with operations, warehouse, IT requirements, etc. This is a virtual bulletin board, on which can be used to post anything – from the lunch menu to contact details maintenance worker.
For each department/team of employees, the administrator can create applications own message board to which only members will have access department/team. The selected bulletin board can be set as default.
Full text is possible between notes on individual boards search, which allows you to quickly find what you need.
Individual posts posted on the bulletin board can be colored differently or changed their positions as needed. Posted posts on the message board can be between easy to move with bulletin boards.
For embedded posts, it is possible to confirm reading by a logged-in user and view a list of those who have read the post.
Board module settings
Grants access to the bulletin board module with specific access rights app admin users in the Settings section, Bulletin Boards tab. As part of the bulletin board module settings, the application administrator assigns rights to individual boards, not to the module as a whole.
Board module access rights
Within the bulletin board module, users can get a pro from the app admin specific message board the following rights: read - read and write - read, write, delete and restore. A certain type of rights can be administered by a user set en masse for all users or only for selected ones employees.
Adding a message board
Only the application administrator can add a board, in the Settings section, Bulletin Boards tab. Here, on the one hand, after clicking on the "Add bulletin board" button the administrator enters the name of the new bulletin board and adds rights for the user new bulletin boards.
Furthermore, the administrator can set the display of image previews directly (not until after clicking on the post) and define the colors of the notes on the bulletin board (either chosen by the author of the post himself or they can be fixed with the description of the ticket):

Editing and deleting the message board
Only the administrator of the application can edit or delete the bulletin board in the section Settings, Bulletin Boards tab. The icon is used to edit the name of the board pencils, the cross icon is used to delete the board.
Default wall settings
 On a specific bulletin board it can be set to
was displayed to the user as default - this bulletin board was then displayed to the user
automatically displays when you click on the bulletin board module (if you
the system will not remember the last visited bulletin board).
On a specific bulletin board it can be set to
was displayed to the user as default - this bulletin board was then displayed to the user
automatically displays when you click on the bulletin board module (if you
the system will not remember the last visited bulletin board).

Adding a post to the message board
A new post is added to the board by the user assigned to it rights by clicking the "Add a post to this board" button on the right parts of the screen. Subsequently, a table will appear in which the user enters title of the post, coloring of the post, content of the post and any attachments.
Editing and deleting a message board post
Only the user can edit or delete posts on the bulletin board, who has been granted rights to do so by the application administrator. To edit a post the pencil icon is used on the bulletin board, it is used to delete a post on the bulletin board cross icon. Both icons are located directly below the inserted post.
If necessary, a user who has the rights set to do so can
find deleted posts from the selected board by clicking on
"Deleted" button. Click on the icon
it is possible to keep deleted posts
restore.
Moving a post between boards
Embedded posts can be easily moved between individual boards, and by clicking on the arrow icon:

Notification of a new post on the message board
If the user wants to be notified by email about the insertion of a new post on the bulletin board or about its change, must be on each bulletin board tick this feature.
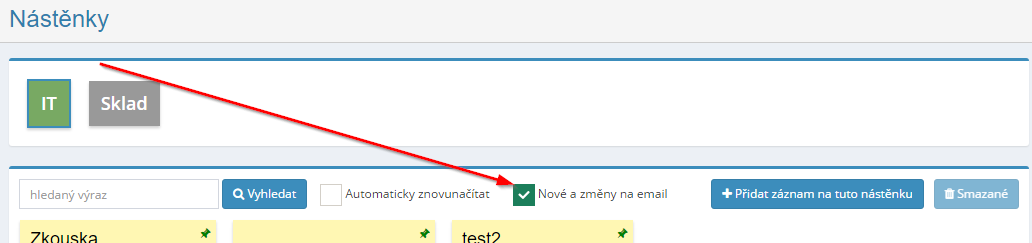
If the user wants to notify everyone (regardless of whether users with access to that board have 'New and changes to e-mail), ticks "Email to all".
It is also possible to enter "Email as BCC" - in which case the email will be sent to everyone who has "News and changes to email" checked in the bcc; if the user wants to send an email to all users with access to the message board in a blind copy, he also ticks the "Email to all" checkbox; same the principle also applies to the "Attachments by email" checkbox.
 Moving posts on the board
A user with relevant rights has the ability to change post positions to bulletin board so that the most important one is always on the first place or so groups of the same post types were together.
 The application administrator can do this function
turn on in Settings, Bulletin Boards tab, by ticking the check-box
"Allow listings to be moved" for a specific board. The selected record se
then moves using the crossed arrows icon (the post can be moved
only if the user "holds" the post by this icon).
The application administrator can do this function
turn on in Settings, Bulletin Boards tab, by ticking the check-box
"Allow listings to be moved" for a specific board. The selected record se
then moves using the crossed arrows icon (the post can be moved
only if the user "holds" the post by this icon).
When adding or editing an entry to the bulletin board, it is also possible to choose whether the post is placed at the beginning of the message board or at the end:
Post read confirmation
It is possible to enable the post display option in the module settings users:

Subsequently, users are shown an option for individual posts confirm reading the post. If the confirmation symbol is:
-
 green - already logged in user
read the post and a list of other users who
have already confirmed reading the post
green - already logged in user
read the post and a list of other users who
have already confirmed reading the post -
red – the logged in user has not read the reading yet
If the list of read receipt users is too long, it is possible to click on the green confirmation icon to view it in a separate table:

News module
The news module is designed for quick intra-company communication, it allows clear and continuous transfer of information between employees. Sharing news promotes better awareness of employees and contributes to them affiliation with society.
As part of the news module, the company gets a single place, available at any time for all employees, where not only operational information can be posted - deadlines, tasks, announcements (another type of news can, if necessary add application manager). If necessary, access can be restricted to news only for some users, or to determine who has the right to news write down.
After logging into the application, the user immediately sees how many new items from his last login was entered, thanks to the number that displays news in the left menu next to the name of the module. If you are a user he sets in the module, he can also be informed about the entry of new news via e-mail.
The news is displayed from-to the date you enter, or indefinitely, and it is it is also possible to enter the validity date of the news.
News module settings
Enters access to the news module with specific access rights app admin users in the Settings section, News tab.
News module access rights
Within the news module, the user can have the following accesses: read news, read and write news, read, write, delete and restore news from the trash, or may not have access to this module at all. Rights to use this module are assigned by the application administrator.
Breakdown of the news module
The registered news items are listed from the most recently registered to the oldest news item. AT each news item is always assigned an icon that determines the focus of the news item - announcement, deadline, task, lunch. After logging into the application, in the left menu next to the name of the news module, a number appears, how many new news, since the last one of user visits to the news module has been published.
Setting the type of news and their display on the module's front page
Notification, Deadline, Task and Lunch news types are specified in the application.

Application admin can add new type in Settings section, News tab news. After clicking the "Add Type" button, the application manager will select the name of the news, its color and icon.
Furthermore, the administrator can set how the news will be displayed on on the initial page of the module - whether everything on one page or whether it will be on the initial page only the title and image on the page, more will be displayed after clicking.

Adding news
If the user has the right to add news, just click the button "Add New" on the right side of the screen. Subsequently, the window for writing/editing news.


Here you need to fill in the name of the news, the type of news (announcement/date/task/lunch) and how long the news should be displayed, respectively how long it is current. Subsequently, the content of the news will be added, possibly an attachment.
If a link or image is part of the news, it can be done easily insert directly into the text:
To clearly display the news in the news overview, it is then possible to use underscore (the text above it is then displayed in the news overview):

Editing and deleting news
The pencil icon is used to edit the news; if the user is allowed by the data to edit the news, the icon is displayed below the news text. To delete news is served by the cross icon; if the user is allowed to delete the news, the icon will also appear below the news text.
Show news in the module
In the settings of the news module, it is possible to choose from 3 types of news display in the news module:
-
All on one page
-
Title and image only, more after clicking
-
First big news + 3 lines of text, 3 more news on the right, more after clicking

News Archive
In the case of the view type "First big news + 3 lines of text, right 3 more news, more after clicking" it is then possible to use the function "News Archive". If this option is activated, they are displayed on on the initial page of the module only the first 3 news, other news are hidden under the Archive button.
News distribution
When creating news, it is possible to choose who will receive information about the news newsletter sent by e-mail - it is possible to set it to be sent to everyone users/selected groups of users.
It is also possible to choose to send the e-mail in a blind copy:

Search in the news module
Searching for embedded news is possible using a filter in which you can
search according to various parameters – e.g. name, contractor or type
novinky:
 Finding deleted news
If the user needs to restore a deleted news, just click on the "Deleted" icon in the upper right corner. Subsequently, the table will be expanded with an overview of deleted news and with the option to restore the selected one novelty.
 Sign up for newsletter
 If the user has permission to read the module
news and wants to be immediately informed about the posting of new news, just
check the "Send news to my email" box in the upper right corner.
If a new item is posted in the module, the user will be notified by e-mail
message.
If the user has permission to read the module
news and wants to be immediately informed about the posting of new news, just
check the "Send news to my email" box in the upper right corner.
If a new item is posted in the module, the user will be notified by e-mail
message.
 After clicking on the given link
in the email message, the user will be redirected to the company eIntranet
or possibly on the wording of the posted news.
After clicking on the given link
in the email message, the user will be redirected to the company eIntranet
or possibly on the wording of the posted news.
If you need to verify who and when emails were sent, you need to click on the eye icon under the text of the news:
Subsequently, detailed information about sending the e-mail will be displayed.
Display news on the home page of the application:
News from the news module can also be displayed to users on the homepage application page - set this option in Settings, Basic tab Settings:

Order received module
The received order module is used for creating and electronic records of received orders and enables efficient work with orders received from business customers. In the Orders module settings received, you must first define a group of orders and then data displayed on the order – e.g. supplier name, contact details data, logo, etc.
The module is connected to the order module (selection from registered orders) a with the CRM module (selection from registered customers). In the overview view other subsequent, related documents are then visible - offers, requests, orders issued, delivery notes, invoices received and issued.
The created order can be emailed directly from the app or print. It is also possible to search for created orders according to different criteria.
Order Module Settings Received
Access to the order received module is granted to the user by the application administrator in the Settings section, Orders Received tab.
First, you need to create a specific group in the module settings of orders received and assign relevant access codes to users rights.
Order module access rights accepted
Within the Order Received module, users can from the application administrator obtain the following rights for a specific group of orders: no access – sees orders – sees and can create new ones and edit theirs – sees and can edit and create everything - sees, edits, creates and can delete all.
Creation of order accepted
A new accepted order is created by the user after clicking the button "Create order". He will then be shown a table to fill in all order information:

Attachments can also be attached - either as a public part of the order or as internal.
Order received detail
After clicking on the eye icon in the overview table of orders received will display the detail of the created order received. They are entered here individual order items (it is also possible to add them from stock economy) and set discounts for the given customer:

In the detail of the given order, you can also create a demand, an order issued, order, delivery note or invoice issued. They are also displayed here documents related to the created order received:

Print and send order received
The created order received can be generated for printing or for sending by email and print:

Order Received Module Search
For a quick search, use the "Search" field at the top right. Further it is possible use the search filter, in which it is possible to search according to various criteria:

Orders received can also be displayed by individual years, all/active orders:

Statistics by year
Under the button "Statistics by year" you can view an overview of success created orders received:

Order module issued
The issued order module is used for creating and electronic records of issued orders and enables efficient work with issued orders for your suppliers. In the Orders Issued module settings, you need to first define a group of orders and then the data displayed on order – e.g. supplier name, contact details, logo, etc.
The module is connected to the order module (selection from registered orders) a with the CRM module (selection from registered customers). In the overview view other subsequent, related documents are then visible - offers, requests, orders received, delivery notes, invoices received and issued.
The created order can be emailed directly from the app or print. It is also possible to search for created orders according to different criteria.
Order module setup issued
Access to the issued order module is given to the user by the application administrator in the Settings section, the Orders Issued tab.
First, you need to create a specific group in the module settings of orders received and assign relevant access codes to users rights.
Order module access rights issued
Within the Orders Issued module, users can from the application administrator obtain the following rights for a specific group of orders: no access – sees orders – sees and can create new ones and edit theirs – sees and can edit and create everything - sees, edits, creates and can delete all.
Creation of order issued
A new issued order is created by the user after clicking the button "Create order". He will then be shown a table in which fill in all the information about the order:

Attachments can also be attached - either as a public part of the order or as internal.
Order detail issued
After clicking on the eye icon in the summary table of orders issued will display the detail of the created order issued. They are entered here individual order items (it is also possible to add them from stock economy) and set discounts for the given customer:

An accepted invoice can then also be created in the order details. Documents related to the created order issued are also displayed here:

Print and send order issued
The created order received can be generated for printing or for sending by email and print:

Order Module Search Issued
For a quick search, use the "Search" field at the top right. Further it is possible use the search filter, in which it is possible to search according to various criteria:

Orders issued can also be displayed by year, all/only valid orders:

Appointment scheduling module
The meeting scheduling module is used to efficiently schedule meetings online. The module allows you to create an event, invite participants and vote for them about an acceptable meeting date. It is possible to vote on specific days i meeting times and it is possible to select only 1 date or all suitable ones terms.
Meeting invitations can be sent either only to eIntranet users or via also send the generated link to "non-users" of the eIntranet. About the progress voting by individual participants is the founder of the event continuously notified via e-mail.
Votes are continuously displayed in the event detail. After completion of voting is an agreed date sent to invited participants. Results Voting can be ended outside the set one if necessary date.
Appointment scheduling module settings
Access the appointment scheduling module with specific access rights entered by the application manager user in the Settings section, Scheduling tab meetings.
Access rights to the appointment scheduling module
The module settings are done by the application manager in the Settings section, tab Appointment scheduling. Individual users can have the following types rights: no access – display all – creation, modification and display – creation edit and display + delete.
Setting up a meeting, voting
A new meeting is created by a user with the relevant rights after clicking on "Add meeting/voting" button:

 Next, a table will expand in which
the convener of the meeting adds the necessary information, e.g.:
Next, a table will expand in which
the convener of the meeting adds the necessary information, e.g.:
-
Title
-
Place
-
To which e-mail will the voting info be sent
-
Possibility of user choice - 1 term or more terms
-
The option to fill in even for users outside of eIntranet.net
After filling out the basic meeting information, the meeting details are in the meeting details filled in more detailed information, or entered dates from which can choose (by clicking on the button "Add term") and sent out vote.
 Voting can be set either only for
eIntranet users or even for users outside the eIntranet (it will be generated
a unique link that is sent to invitees via e-mail):
Voting can be set either only for
eIntranet users or even for users outside the eIntranet (it will be generated
a unique link that is sent to invitees via e-mail):

If only eIntranet users are to vote, convenors will be offered meetings of user names (or groups of users according to positions or office if this information is entered in the information about users in Settings, Users tab):
The user is invited to vote by e-mail:

For users outside of eIntranet.net, a unique link will be generated which the convener of the meeting will send it out in the standard way.
eIntranet users who are invited to vote can also vote directly in the application environment in the meeting scheduler:

End of voting, results
Voting ends either when the deadline expires (when the meeting is created, entering the date by which voting can be done) or by clicking the button "End Voting".
In the voting settings, it is possible to specify the email to which they are sent continuous information about the invitees' voting. At the same time, there are results visible in message detail:

After the end of the voting, it is possible to send out the final result of the voting by e-mail - by clicking on the "Copy everyone's e-mail" icon and by then pasting it into the Recipient/To field of the email.
It is also possible to export the results for further work with the voting results to Excel:

Shift planning module
The shift planning module is used for simple and efficient assignment necessary resources (people, cars, technology, etc.) to ensure individual shifts.
The module is laid out as follows:
-
regular users enter their time options for individual days, and that in the My Time Options section
-
users with a higher type of access rights (e.g. vehicle administrator park) then define their own availability in the Resources section own resources (cars, classrooms, other equipment); specific types own resources must first be defined by the application administrator in Module Settings
-
the user with the highest type of rights then specifies what human and other resources he needs to secure the exchange, and he will then be shown which resources available to it, and then chooses which specific ones from the menu assigns resources to secure the given shift (see the Shifts section).
The user is automatically informed about the shift assignment via e-mail messages. The overall overview of assigned shifts can be found in the section My shifts.
Shift planning module settings
Enters access to the shift planning module with specific access rights app admin users in the Settings section, Shift Scheduling tab.
Furthermore, it is still necessary to define our own resources (except human resources), which should be available for planning (cars, classrooms, projector, laptop, other technology...).

Access rights to the shift planning module
The module settings are done by the application manager in the Settings section, tab Shift planning. Individual users may have the following types of rights: without access - enter your time options and see your shifts - enter your time options, see your shifts and set the availability of your own of resources (cars...) - see everything and enter resources for shifts - see everything, assign resources to shifts and create and delete shifts.

The shift planning module is divided into several sections into which they have users access according to assigned rights:
Resources - own
This is where the user who has the rights assigned to it enters the time disposition own resources (cars, technology, etc.).

Resources - People
In this section, the user who has the rights assigned to it can see the time options of individual users in the selected period.
If necessary, a user with a higher right type can time options adjust specific workers (e.g. in the case of a worker's illness).
Primarily, however, each user should enter their time options themselves - see My Time Options section.

My time options
In this section, the user enters his time options for shift planning. If necessary, he can add a note to the individual days.

Shifts in preparation
Here, the user who has the rights assigned to it plans the occupancy (by people i.e other own resources) of individual shifts.
First, you need to create a shift by clicking the "Add" button:

Subsequently, a table will be expanded in which basic data must be filled in shift:

After clicking on the name of the shift, the Detail of the shift will be displayed, in which the user adds the required resources.

Resources are only selected in general at this stage, i.e. the position that is must be occupied. Positions are uploaded to the module from the Settings section, Users tab. For these reasons, it is important to have individual users well-defined their positions. If input is required multiple positions must be separated by a comma (e.g. executive, IT technician, associate professor).

Subsequently, it is possible to assign by clicking the "Select resources" button specific workers or other own resources for individual positions from the menu.

 If the shift is completely scheduled next door
data in the "Count" column, a green check mark will appear.
If the shift is completely scheduled next door
data in the "Count" column, a green check mark will appear.
If needed, it can be enabled in the shift planning module settings resource login for multiple shifts within 1 day:

The condition for 1 resource to be usable for multiple shifts within 1 day is that shifts DO NOT OVERLAP.
If you enable the option to log 1 resource to multiple shifts within 1 day, please keep in mind that the application then no longer monitors the maximum the legal length of the employee's working hours.
Shifts
If the shift is ready under the Shifts in Preparation section, it can then user with relevant rights to confirm via button "Scheduled":

Subsequently, prepared shifts will be displayed to all users.
My shifts
In this section, the user can see the shifts he had in the selected period scheduled.

Cash register module
The cash register module is used for clear management of the cash book. Module enables the issuing of income and expenditure documents and their approval.
Groups must first be defined in the Checkout module settings of cash registers and data displayed on income and expenditure documents – e.g. customer name, contact details, etc.
The module is connected to the CRM module (selection from registered customers). The created documents can then be approved electronically, or to sign, a print.
It is possible to enter a purpose in individual income or expenditure documents payments and define links to issued and received invoices and travel invoices commands.
It is possible to search the issued documents according to various criteria. The checkout status can then be seen in a clear view.
Cash register module settings
Access to the checkout module is given to the user by the application administrator in the section Settings, Checkout tab. First, you need to create a specific checkout group in the module settings and assign relevant access rights to users.
In the settings of the checkout module, you need to enter the data that will be display on the income/expense document - data about the customer, setting document number series, default currency. It is also possible to activate "Status" field and define the possible document statuses (e.g. for repair, pending, etc.). Subsequently, on the income/expense document the option to select the status of the document will appear in the relevant document from the predefined list:

Access rights to the checkout module
Within the checkout module, users can get a pro from the app admin specific group of cash registers the following rights: no access - sees documents - sees his own and can create new ones and edit his own - sees, edits and creates everything - sees, edits, creates and can delete everything. Moreover, it is possible it is possible to assign the additional right "can approve" to the user.
Creating a document
The user creates a new income or expenditure document after clicking the button with the name of the relevant document type:

He then fills in the relevant data of the document:

Document detail
The created document can be edited using the pencil icon or by clicking on it document detail (eye icon), using the "Edit" button. Further it is possible in the document detail, have the given document signed by its recipient, or him approve by relevant user:

The created documents can be printed - either by using the "Print" button in the document detail or by using the printer icon in the issued overview documents.
Checkout status
The current state of the cash register can be seen in the Balance column in the overview table:

You can also get information about the state of the cash register using the button "Status of the cash register to date" when the cash register status for the selected date is displayed:

Search in the checkout module
For a quick search, use the "Search" field at the top right. Further it is possible use the search filter, in which it is possible to search according to various criteria:

Demand module
The demand module is used to create offers for your business co-workers and suppliers. In the settings of the Demands module, you must first define demand groups and the data displayed on the demand – e.g. supplier name, contact details, logo etc.
The module is connected to the order module (selection from registered orders) a with the CRM module (selection from registered customers). In the overview view then you can see other subsequent, related documents – offers, orders received and issued, delivery notes, invoices received and issued.
The created request can be sent by email directly from the application or print. It is also possible to search for created requests according to different criteria.
Demand module settings
Access to the demand module is granted to the user by the application administrator in the section Settings, Requests tab. First, a specific demand group needs to be created in the module settings and assign relevant access rights to users.
Request module access rights
Within the request module, users can get a pro from the app admin a specific group of requests the following rights: no access - sees requests - sees and can create new ones and modify its own - sees and can edit and create everything - sees, edits, creates and can delete everything.
Create demand
The user creates a new demand after clicking the "Create" button demand". He will then be shown a table in which he will fill in everything request information:

It is also possible to attach attachments - either as a public part of the request or as internal.
Request detail
Clicking on the eye icon in the demand overview table will show a detail created demand. Individual demand items are then entered here (ie it is also possible to add from stock management) and set discounts for of the customer:

An accepted order can then also be created in the detail of the given demand. Documents related to the created request are also displayed here:

Print and send the request
The created request can be generated for printing or for sending by e-mail and printing:

Search in the demand module
For a quick search, use the "Search" field at the top right. Further it is possible use the search filter, in which it is possible to search according to various criteria:
Requests can also be displayed by year, all/active requests:
Worksheets module
The work report module enables the electronic recording of work performed and related costs for customers, incl. electronic signature options customer.
In the module settings, it is possible to create different groups of work reports according to company needs and define databases of used devices in them, equipment, service work, material, transport from which it is possible then select as part of filling out your own return.
It is also possible to define the form of the report (insert logo), e-mail for sending statement etc.
The module is linked to the CRM (customer information retrieval) module and is it is also possible to connect it with the HelpDesk module.
The created work sheet can be signed by the customer directly on electronic device on which the statement is filled out (tablet/telefon/notebook).
Worksheet module settings
Access to the module projects with specific access rights application administrator users in the Settings section, Worksheets tab.
First, you need to create a specific group in the module settings work reports and assign relevant access rights to them rights.
It is then necessary to define the general ones within the individual groups of reports parameters – what exactly will be displayed on the report (devices, work, material, transport), default prices, form of serial numbers, used statuses (established - assigned - resolved - to be billed - to be billed + more statement - processed). Furthermore, it is possible to define the wording of the e-mail when it is sent report and the possible form of default texts displayed in reports (automatically completed texts when checking the R or T check-box in the frame statement).
This section also specifies the types of possible devices/instruments used in reports, types of work/service operations, possibly used materials.
Access rights to the Worksheets module
Within the timesheets module, users can from the application administrator obtain the following rights for a specific group of reports: no access – sees his - sees everything - sees and can create new and edit his - sees a can edit and create everything - sees, edits, creates and can delete all.
Creating a new timesheet
A new timesheet is created by a user in the appropriate timesheet group by clicking the "Create" button. A table will then appear in which the user fills in the basic data:

The created report can be saved and returned to the report overview (button "Save and go to the list") or save and view the detail of the created report ("Save and go to detail" button).
Worksheet detail
In the job report detail, the user fills in specific report items – devices/equipment, work, material - these items can be selected by the user from the database created in the module settings or can write them manually.
In the side expenses section, the user adds transportation costs, time spent on on the way, or number of technicians, parking fees.
Subsequently, the total price is calculated and the report can be signed by the customer:

If link to module option is checked in settings HelpDesk, it is possible to use the button "Link with Ticket" and then select a specific ticket to work with statement linked.
Copying work reports
The ability to copy work reports is available to a user with access rights at least "Sees everything and can create new ones and edit their own". The report must be in "Processed" status:


Print and send work reports
The created work report can be sent by e-mail (the "Email" button):
Or generate a pdf for printing ("PDF/Print" button):

Searching in Worksheets
The created work reports can be filtered according to the statuses of the defined reports in module settings:

Or it is possible to display all/only my reports:

Export and print overview of work reports
It is possible to keep written records in the work report overview export to Excel or print.
An overview of the inserted records can be printed by clicking the button "Print", or download to an Excel table - by clicking the button "Export to Excel".
Export to Excel is only functional if you have the application running in the Chrome web browser.
Projects module
The projects module is a simple project management program. Facilitates planning and tracking project implementation progress and compliance time schedule.
Within the application manager module, it sets general access rights, but u it is possible to define individual access rights for each project users as needed.
The project information that is recorded consists of basic information - these are predefined and are always filled in - and from the optional ones information - these are set by the application administrator in the settings as needed module.
Within the module, basic project data is first entered and then individual project activities are created in the project detail - to them then enter the implementation date, the leader of the given project activity, etc.
To monitor the effective implementation of the project, or his management, se within the module, projects are created for individual project activities A Gantt chart, which enables the display of individual continuity of project activities over time.
The projects module is linked to the tasks module - either can create a new one a task for an individual project part or an already created task is possible in the tasks module, assign it to a project activity in the projects module.
All events and changes related to project implementation are recorded under the Notes section. Projects can for easier orientation and search mark projects as active/inactive.
Settings of the projects module
Access to the module projects with specific access rights application admin users in the Settings section, Projects tab.
As part of the module settings, projects are assigned by the administrator of the general application access rights to the module as a whole. For individual projects, you can then set specific access rights.
In this section, the application manager further sets the individual optional parts project:
- Project - optional fields
Here, the application administrator defines other items (besides the basic ones, which are preset - see point "Entering a new project") that will be filled in when registering a new project:

- Project parts - optional fields
To each basic part of the project that is predefined is additional fields can be added as needed:

- Types of notes/documents
Using the settings of this section, they are then recorded during the implementation of the project important events or documents – e.g. deadline, announcement, contract, document, etc. Only a note of the change type is automatically defined.

Access rights to the projects module
Within the projects module, a user can have the following accesses: none access – display – create/write, modify and display – create/write, edit, display and delete. Each higher right (at proceeding from left to right) also includes preceding (lower) rights.
The above access rights are only general, allowing access to module. Specific access rights to individual projects are possible define for individual projects - who can see and who can edit.
 Entering a new project
A new project is entered by a user with relevant rights by clicking the button "Add project". Subsequently, a table in which the user completes the relevant project fields, attaches attachments and assigns rights, who can see information about the project and who can edit it.
Basic project data is displayed in the Project Entry table:
Additional information about the project is written according to what the application manager set in module settings.
After entering the basic information about the project, it is necessary to click on the icon eye in project overview:

Subsequently, a detail of the project will appear, in which individual items are entered project parts/activities – when entering individual project of activities is distinguished whether it is a group of project items or o project item:

If a project item is being written, it must be linked to a parent group of items (within the Parent group field).

Gradually, a Gantt chart is created, which allows a graphical representation planning the sequence of activities over time. It is clear within the diagram shown how many days a certain project phase should last, what % of the project is fulfilled, etc. It is possible to display parts of the project after days, weeks, etc months.
Tasks can then be assigned to individual project parts individual users - after clicking on a project item (not a group items) the "Create Task" option will appear in the Project Parts section:

It is also possible to just assign a task to a project - if the task is specified created in the tasks module and to be assigned to a project activity is for example, click the "Attach task" button. A list will then appear of tasks entered in the tasks module for assignment to a project activity.
In case the task needs to be disconnected, this button should be clicked:

Project notes are also documented in the project detail - all changes and other events or inserted documents are recorded here related to project implementation.
It is possible to search between individual events by type event/document:

Postponement of project implementation
In the case of postponing the implementation of the project, it is possible to use the check box which enables automatic shifting of subsequent parts of the project as well:

Editing and deleting a project
Basic information about the project can be edited by clicking on the icon pencils in the project overview or after clicking the "Edit" button in the project detail.
Information on individual project parts can be edited by clicking on the appropriate line:

The project can be deleted by clicking on the cross icon in the project overview.
Scheme of the project module

Project overview export and project printing
If necessary, data from the project overview on the home page is possible export the module to Excel or print it as part of the project detail information on specific projects.
Protocols module
The protocols module allows you to create individual form templates user needs. You create individual sections in the module settings of the protocol as needed and then you enter the specifics in your own form values or select from preset options.
Templates can be created, for example, for records of measurements, inspections, meetings, etc. The generated log can be signed by the user which log created Mathematical calculations can also be set up within the protocol.
The created protocol (its final version) can be "submitted" and then forwarded for further processing within the company. The completed protocol form is below it is possible to send an e-mail or have it printed (it will be generated in pdf).
The module is linked to the CRM module (loading data about customers/suppliers, etc.), property records (defining of used devices in case of measurement) and HelpDesk (possibility of connection with tickets in the HelpDesk module).
Protocols module settings
Enters access to the booking module with specific access rights app admin users in the Settings section, Logs tab.
Logs module access rights
Within the waybills module, the user can have the following accesses: without access - read yours - read and edit yours, create new ones - read everything, edit yours, create new ones - read, edit and create everything + delete - all + delete.
Setting log templates
In the module settings, individual log templates are defined as needed. First, by clicking the "Add" button, you need to enter a new type protocol:

The individual parts of the log are then created in the log detail:

The created log template can be copied and edited. When modification of the protocol, it is necessary to keep in mind that the modification will affect already written protocols.
In the protocol detail, under general settings, then define:
- Serial number:

- Subject and text of the e-mail when sending the log to e-mail:

- Linking with HelpDesk
Next, individual sections of the protocol are entered - the number of sections depends on individual needs; each section then consists of individual parts that can be added again as needed:

When entering a new section, fill in the title, order and details for print log.
Individual sections are then composed of parts (lines) that are defined using this table:

A default can be defined for each row if desired value/properties.
A value is then given for the type field and can be chosen from the following options:

The entire defined section can then look like this:

Entering user signatures
In the module settings, it is possible to upload signatures of users who have allowed access to the module. These signatures are then part of the exhibit protocol.
Creating a new protocol
In the module itself, a new protocol is entered using a button "Create" - in the opened window it is necessary to choose the type of protocol which will be filled in:

Individual parts of the protocol are then filled in according to the set template. The created protocol can be submitted, sent by e-mail (it will be generated pdf), or modify:

Logs module section
Within a log, you can have logs in these sections
-
All – all created logs are displayed here
-
Established - This section contains logs that have been written but they have not yet been submitted
-
Submitted – after clicking on the "submit" button, a written protocol is written gets to this section
-
Done - can be specified in module settings to be able to if needed move only administrator logs to the "Done" section
Furthermore, it is possible to distinguish between the created protocols, whether they are only logs created by me or all logs.

Search in the logs module
Saved logs are searchable by selected type protocol using the Filter section.

The waybill module
The transport forms module is intended for transporter healthcare organizations patients. It enables easier and more efficient organization of patient transport and the data needed to transport patients is written within the sheet.
The module is divided into Enrolled – Assigned/Assigned to me – Today/Today sections my - Done - Canceled - All and is searchable by type transport.
Settings of the waybill module
Access to the waybills module with specific access rights application administrator users in the Settings section, Waybills tab.
Access rights to the waybills module
Within the waybills module, the user can have the following accesses: no access – read my assigned – read all – +write – +edit a lubricate.
Rights are ordered from lowest to highest, each higher right to the right it contains all lower rights on the left.

Entering a new sheet
A new sheet can be added by clicking the "Add sheet" button.

Subsequently, a table will be expanded in which the relevant data must be filled in about transportation:
Assignment of waybill
After entering the basic data in the consignment note, the specified consignment note is entered appears in the overview table on the module's start page.

Subsequently, the relevant worker responsible for the organization of transfers clicks on the specified waybill and the Waybill Detail appears.
Here you need to select the person providing the transport, and then fill out the form save ("Save" button; if an sms is also to be sent to the selected persons message, you need to click on the button "Save and send to the selected SMS).

The individual sections of the module are transfer slips
Registered Newly registered consignment notes are registered here, for which the specific personnel providing the transport have not yet been assigned
Assigned here are registered the waybills for which they are already assigned specific personnel providing transportation
- Assigned to me - this subsection contains bills of lading in which is a logged-in user entered as a worker providing transportation
Today here are registered bills of lading relating to today transfers
- Today my - in this sub-section you will find the bills of lading relating to to today's transfers to be provided by the logged in user
Processed here is an overview of all the waybills
Cancelled here are the waybills that were for some reason canceled
All here is a complete overview of all waybills
Search
A quick search is possible by entering the required information in the "Search" window:

Complaints module
The module enables clear and efficient management of the complaints process. The Intranet administrator creates the types of complaints for which a complaint can be made submitted, and subsequently set them according to the needs of the company and assign access rights to users (solvers).
Employees then deal with requests simply and efficiently through online application. The request can be entered into the application automatically via a web form or can be entered by employees manually (e.g. in case of telephone reporting by the customer).
In the application, you can clearly see who and how the request is handled, and they are all changes related to the accepted complaint are recorded.
In the module, it is possible to assign priority to individual complaints and search according to different criteria. The advantage of registering complaints using the module the complaint is the clarity, efficiency and speed of working with individuals customer complaints in the case of forwarding requests between multiple solvers.
In the module, it is also possible to create response templates, which can then be used speeds up the processing of submitted claims.
Claim module settings
Enters access to the booking module with specific access rights application administrator users in the Settings section, Complaints tab. As part of the claims module settings, the application administrator assigns rights to individual types of complaints, not to the module as a whole.
In the settings of the application manager module, you create individual types of complaints. A new claim type is created by clicking the "Create type" button complaints". Subsequently, a field for entering the name of the complaint type will appear.
After creating a reservation type, specific settings need to be made of the type of complaint created:
-
define access rights for individual users
-
enter the address to generate the address label for sending the complaint - when submitting a claim, the claimant will receive a label as an attachment to the e-mail to mark the shipment
-
enable the possibility to connect with the CRM module - for loading companies z modulu CRM
-
enable the possibility of linking with the Work reports module - it will allow to report the work done in the reports of work module
-
enable the option of choosing a complaint resolver
-
enable the option to insert your own notes
-
enable the possibility of a web form for filing a complaint - allows you to file a claim from a web address
-
supplementing the introductory text above the web form for submitting a complaint
-
the option of choosing the type of claim handling – repair, replacement, reasonable discount, withdrawal from the purchase contract
-
the option of picking up/transporting a processed claim
-
supplementing the number of days to resolve the complaint
-
setting up e-mails to customers
-
completion of other optional fields as needed
-
defining the severity of complaints - without defining at least 1 priority (e.g. standard) the claim form will not be functional
-
setting the necessary claim statuses
Access rights to the claim module
Access rights to the claim module can be as follows:
-
no access
-
access to all complaints
-
access to all complaints and the possibility of deleting them
 In addition, it is possible to specify which users
information about the newly submitted claim will be sent to e-mail.
In addition, it is possible to specify which users
information about the newly submitted claim will be sent to e-mail.
New complaint
A new complaint can be submitted via the web form or directly within the eIntranet.net application by clicking a button "Add claim".
Subsequently, a table appears in which the claimant/eIntranet user fill in the necessary information:
Claim handling process
After receiving the complaint, the complaint is displayed as new within the module:

After clicking on the detail of the complaint, it is possible to add notes and execute changes with accepted complaint:

E.g. change the claim status (e.g. from new to "Awaiting addition" or Received), complete an internal note, send info to the customer, etc.
To create an answer faster for
customer, it is possible to click on the button next to the field for entering the answer
"Add address" - the address is automatically pre-filled
customer/ticket issuer (his/her last name) and then fill in at the end
the word "Thank you":
Response templates
It is also possible to use the response template for handling complaints. Templates responses are created in the "Response Templates" section:

It is necessary to create a possible universal request for supplementing documents, etc.
Claim statuses
Claim statuses that will be part of the claim processing process used are defined in the module settings. Possible states of the process Claim processing can be:
-
New
-
Waiting for replenishment
-
Accepted
-
Handed over to supplier
-
Solved
-
Done - fixed
-
Dealt with - replaced
-
Handled - rejected
Searching and sorting complaints
For a quick search, use the "Search" field on the right above the table with a list of complaints. Further filtering of complaints is according to priority, status or quick selection - not closed/all.
Export of the overview of entered complaints and printing
If necessary, the overview of entered claims can be exported to Excel or print.
Reservation module
The reservation module facilitates the sharing of individual company objects – cars, meeting rooms, data projectors and other technical equipment. Thanks to the clear calendar for each object, it is immediately clear whether is the object available at the required time, or for whom it is already booked.
If the user reserves the object regularly at the same time, he can enter rebooking.
Reservations are clearly displayed in the calendar and it is possible to choose who will be have what rights to the selected object to reserve, such as read only or read and record reservations etc.
Within this module, the app admin can add an unlimited amount of objects to reserve. The application automatically notifies the user in case entering a duplicate reservation.
Reservation module settings
Enters access to the booking module with specific access rights app admin users in the Settings section, Reservations tab. As part of the reservation module settings, the application administrator assigns rights to individual reservation objects, not to the module as a whole.
In this section, the application manager also sets the minimum time for which the object is reserved, as well as the names of the users who will receive the e-mail in the event that a new reservation is inserted into the relevant reservation calendars.
Furthermore, it is possible to check the option to display the given calendar in the interface calendar and adding the name of the intersection calendar - in the module itself then it displays the calendar under the selected name and all are visible in it entries from calendars that have this option checked display.
Access rights to the booking module
Within the booking module, the user can have the following accesses: may see bookings – can book and can cancel bookings for anyone. Right for the use of this module is assigned by the administrator of the application. The lowest type rights are "may see reservation". If the user is assigned the right "may book", can also see the booking automatically. When of the assigned rights "may cancel reservations to anyone" the user can see and make reservations automatically. So for a specific user it is not necessary to enter lower levels of rights, it is sufficient to enable only the highest one the degree of right that the user may have.
Adding an object to a reservation
The application administrator can add a new object to the reservation in the section Settings, Reservations tab, clicking the "Add" button. Then a table called Create/Edit Object to Book will expand, in to which the administrator adds the name of the object or its description.

Editing and deleting a booking object
An already specified reservation object can be modified/deleted by the application administrator in the Settings section, the Reservation tab, by clicking on the pencil icon or a cross. These icons are listed at the end of each line in the overview of objects to reserve. By clicking on the pencil icon, a table will appear, in which is a possible object to reserve, or edit its description. By clicking the option to delete the reservation object will appear on the cross icon.
Add reservation
Only the user authorized to do so by the administrator can add a reservation application assigned rights by clicking on the button "Add rez." u of the selected object for reservation, or on the selected calendar day. Subsequently, a table will be expanded into which the user fills in the reservation date, or you can specify whether it will be a repeated reservation of the object.

If the user would like to enter a reservation for a date when the object is already available booked (especially in the case of repeated bookings), the user's application will draw attention to this fact and the reservation will not be made.
New booking notification
In the settings of the booking module, it is possible for individual objects to be booked enter the users to whom information about entering a new reservation should be sent:

Modifying and canceling a reservation
Only the user who has the right to modify or cancel the reservation can do so application administrator assigned rights by clicking on the pencil icon (for modification of the reservation) or a cross (to delete the reservation) next to the one entered reservation.
When modifying a reservation, it is not possible to additionally add a frequency reservation; if the user wants to specify regular use of the object, he must create a new reservation.
Finding a deleted reservation
If you need to restore a deleted
booking, just click if you have permission from your app manager to do so
assigned rights, to the "Deleted" icon in the upper right corner. Subsequently,
expands a table with an overview of deleted reservations and a menu of options
restore the selected reservation.
Vehicle reservation module
The vehicle reservation module allows you to make vehicle reservations for individual eIntranet users. This module is connected to the module vehicle records - the vehicles it is for are loaded from this module it is possible to make reservations and it is also on record for individual vehicles it is possible to specify whether they should be available for booking.
Within the module, it is possible to assign different access rights to users from from simply reading reservations to the possibility of making reservations for others user.
The user creates a reservation request, which is then sent supervisor for approval. About new applications for approval and about whether the application was approved or rejected is always relevant information email sent to users.
Approved reservations for individual vehicles can be displayed in annual or monthly reports. In reservations or approved requests can be further searched according to the person who submitted the reservation, reserved vehicle or reservation date.
Vehicle reservation module settings
Enters access to the booking module with specific access rights app admin users in the Settings section, Reservations tab. Allocated by admin under vehicle booking module settings application of law to individual bookable vehicles, not to the module as a whole.
Vehicle Reservation Module Access Rights
Within the vehicle reservation module, the user can have the following accesses: without access - can read reservations and reserve selected vehicles - can book any available vehicle for booking - Approves the booking selected vehicles - approves any vehicle reservations - makes reservations on someone else's behalf. It is therefore not necessary to enter for a specific user lower levels of rights, it is enough to allow only the highest level of law, which may be disposed of by the user.
The vehicles that the user is allowed to reserve are loaded from the registration module vehicles.
Create a reservation request
A user with the relevant access rights creates a new request for reservation by clicking the "Add request" button. It will then be unzipped table in which the user enters the parameters of his reservation:

Approve/reject reservation request
The user who has the right to approve requests for reservations will come e-mail information about submitting a new request:

Subsequently, the user can Approve/Reject/Delete this request:

The applicant is then informed again about the result of the reservation via e-mail:

This option can also be checked in the module settings:

Thanks to it, a user who does not have the general right to delete reservations can delete them reservations made by him.
Monthly overview of reservations
Approved reservations can be viewed by month and vehicles:

After hovering the mouse over a specific reservation, you will see for which user the reservation has been approved.
Annual overview of reservations
Approved reservations for individual vehicles can be viewed also in the annual overview (after hovering the mouse cursor, the name will appear again user for whom the reservation was made:

Vehicle reservation for a specific hour
In the vehicle reservation module, it is possible to make reservations not only for the whole day, but also for a specific time. This option makes it easier to submit applications about reservation - the applicant can see directly in the calendar when the car is available, and can immediately submit a request for a free appointment.
The time booking option must be enabled in the module settings:

It will then appear directly in the module under the Monthly Overview section the calendar in which bookings are displayed and is possible by clicking on specific time to make a reservation. A user who has the relevant rights, can also make reservations through this calendar approve/reject:

Search for reservations
Created reservation requests can be searched by submitter requests, vehicles that were requested or according to the date of creation reservation:

Export and print overview of documents
The overview of inserted reservations can be printed either by clicking on the "Print" button, or download to an Excel spreadsheet - by clicking on "Export to Excel" button. Export to Excel is only functional if you have the application running in the Chrome web browser.
Work schedule module
The schedule of work module is a simple tool for clear planning the work utilization of employees in companies in the selected time period. It is possible to create individual work within the module teams for which the schedule is created.
Individual work types can be defined in the module settings activities and their color differentiation, which can then be done simply by dragging from the offer they insert into a specific schedule.
The user who prints the schedule first selects the desired date planning - from - to - and subsequently complements the planned use of employees – e.g. name of contract, place of contract, doctor, holiday, illness – acc needs.
It is possible to send a link to the created schedule of work to the relevant workers by e-mail. It is possible to create schedules for different time periods print.
The module is linked to the vehicle reservation, so after creating the schedule it is possible for individual workers to create and at the same time approve a reservation vehicles.
Work schedule module settings
Access to the work schedule module with specific access rights application administrator users in the Settings section, Work Schedule tab.
In the module settings, the application manager then creates individual work teams by clicking the "Create a team" button:

He then adds the name of the team in the table:

And assign eIntranet users access rights within a specific work team.
It is also possible in the module settings for individual work teams define activity types and their color differentiation for display in the schedule (must check "Use colors"):

If the "Insert also text" box is also checked, the field in the schedule is not only color marks, but also inserts text (e.g. holiday).
Access rights to the schedule of work module
Within the work schedule module, a user can have the following accesses: none access - view your schedules - view all schedules - planning schedules.
In addition to access rights, it is also possible to check the employee's name the field "Automatically add employees to the schedule" - then it is an employee registered within the given work team (if not already employee a member of the team, this checkmark must be removed).
Rights to use this module are assigned by the application administrator. Within The work schedule module settings are assigned by the rights application administrator to individual work teams.
Creating a schedule of work
To create a new schedule of work, it is first necessary for the selected one work team choose planning date:

Subsequently, it is possible to write individual work in individual fields events – e.g. place of work, doctor, illness, vacation – according to needs.
If "Use Colors" has been checked in the module settings, it will be displayed
below the planning date, a menu of individual work events and their
addition is done by simply dragging and dropping from the menu:

The created schedule can be sent by e-mail to relevant users:

Link to the vehicle reservation module
The module can be connected to the vehicle reservation module - this option enable in module settings:

 For each employee, or everyone
of the working day can then be created by the user who creates the schedule
reserving a vehicle as needed - the condition of the reservation is to register a place
work:
For each employee, or everyone
of the working day can then be created by the user who creates the schedule
reserving a vehicle as needed - the condition of the reservation is to register a place
work:
Subsequently, the user is connected to the reservation request, which he can at the same time authorize:

Created bookings do not need to be approved - the user creating the schedule also has the right to make binding reservations.
If necessary, the created reservation can be canceled by clicking on the cross icon next to the vehicle name. The requester is about deleting the reservation notified via e-mail.
Field for internal notes
If necessary, it is possible to enable free replenishment in the module settings fields for additional internal notes:

Additional employee addition/removal
If necessary, it is possible to add to the already created work team employees by clicking the "Add employee" button:

If the employee is no longer to be a member of the work team, you need to click on the cross icon next to the employee's name. The name of the employee then deletes on the date specified in the displayed schedule (in the Date field planning). If an employee's name is to be removed from the roster more permanently, you need to disable "Automatically add employees to the list".
Deleting a work team
Only a user can delete an entire work team from the database with relevant rights. Delete teams in Settings, Schedule tab work by clicking the "Delete team" button for the relevant work team:

Print the schedule of work
It is possible to create a schedule of work on the selected planning date as needed print:

Approval module
The approval module is a significant helper for ensuring clear circulation any company documents and to ensure their effective approval process. It can be used, for example, for approving invoices, orders etc.
It simplifies and speeds up the administrative matters associated with the process by approving within the company, more complicated paper handling is eliminated documents.
The application administrator will create individual types of documents for your company – invoices, contracts, offers, orders and assigns user rights to them, who can enter them - assistants, accountants, economists - and users, who can approve them (supervisors); document then within the intranet it goes through the input, approval/rejection process and remains in the system also recorded with notes on individual steps.
With the workflow set up in this way, it is possible to solve any approval processes different types of documents in a multi-level hierarchy by company structure and according to company requirements.
Approval module settings
Grants access to the approval module with specific access rights app admin users in the Settings section, Approvals tab.
In this section you also set whether you want single or double approval wheeled.
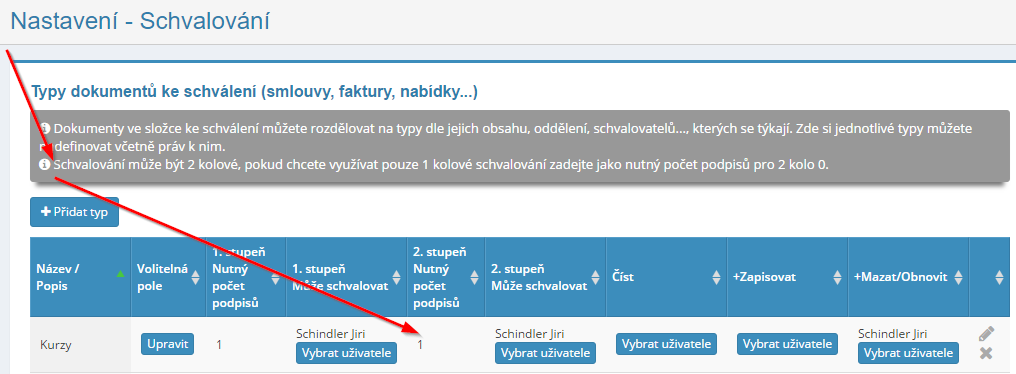
Access rights to the approval module
Within the approval module, a user can have the following accesses: read, read and write, read, write, delete and restore.
Rights to use this module are assigned by the application administrator. Within the approval module setting assigns rights to the application administrator to individual document types, not to the module as a whole.
In the Settings section, the Approval tab, then the intranet administrator assigns their relevant documents to specific types of documents approver.
Add document type for approval
The app admin can add a new one in the Settings section, Approvals tab type of document to approve. After clicking the "Add Type" button, it will complete application manager name of document type, its description and number of signatures needed to approve/reject the document.


Adding a document for approval
A new document is added for approval by the user assigned to it rights by clicking the "Add document" button on the right side of the screen. Subsequently, a table appears in which the user enters the name of the document, his description, deadline by which the document should be approved, and adding an attachment uploads the wording of the document.
 After adding the document, they are defined
approvers are automatically notified by e-mail about the insertion of a new one
document for approval/rejection. Click on the document name listed
in the body of the email sent, the potential approver goes directly to
wording of the document.
After adding the document, they are defined
approvers are automatically notified by e-mail about the insertion of a new one
document for approval/rejection. Click on the document name listed
in the body of the email sent, the potential approver goes directly to
wording of the document.
When writing a new document, it is possible to check whether the information is available to dis/approve a document to users with the right to approve it document:
Approval or rejection of a document
If the approver is assigned rights to approve a certain document, you need to click on the given document in the overview of embedded documents. This table will then expand with detailed information about the insert document for approval:
 At its bottom, the approver can
click the "Approve" button or the "Reject" button, thereby
approves/rejects the document, or can add a note by clicking
on the "Add note" button.
At its bottom, the approver can
click the "Approve" button or the "Reject" button, thereby
approves/rejects the document, or can add a note by clicking
on the "Add note" button.
If a 2-round approval system is set up, then after approval in the first round, approval information is sent to second round approvers wheels (for example, to higher supervisors), who can subsequently document approve or reject.


If the application is not approved by the specified deadline, the application will automatically will refuse. This feature can be turned off in the module settings:
If necessary, it is possible to enable the document so that the relevant users agree/disagree with the document even after its approval/rejection - allows the opinion of all involved to be obtained, even though it will approved/rejected:
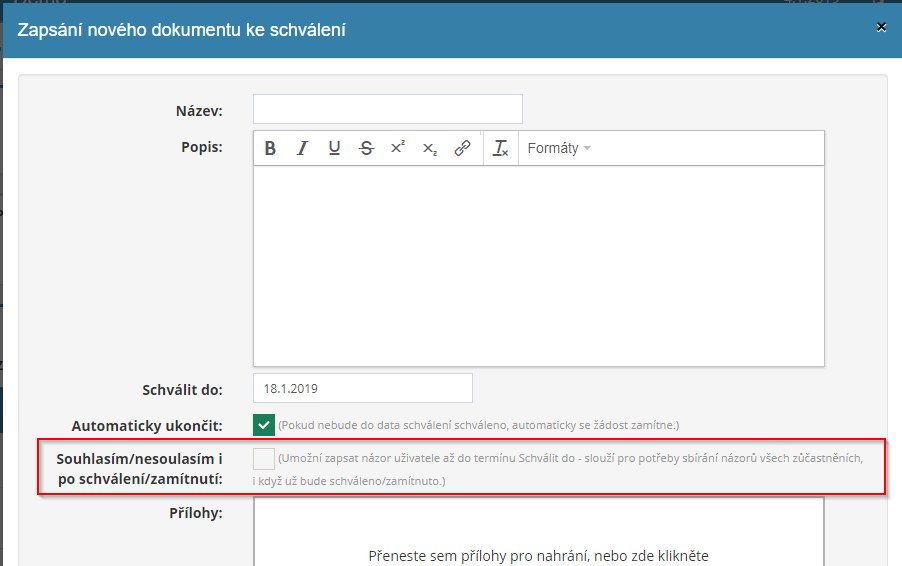
Display columns
For each entered document, it is possible to define it more closely specification, by completing the data in the following columns: name, description, status, inserted, inserted, approve to, signed/rejected, etc.
 User can choose which columns
in the document overview, he wants to have the one displayed at that moment, by clicking
on the "Show Columns" button. Subsequently, a table will appear in which you
the user clicks on the given column name to turn off the display of that column.
If the user subsequently wants to display the column back, it is necessary again
click on the column name.
User can choose which columns
in the document overview, he wants to have the one displayed at that moment, by clicking
on the "Show Columns" button. Subsequently, a table will appear in which you
the user clicks on the given column name to turn off the display of that column.
If the user subsequently wants to display the column back, it is necessary again
click on the column name.
Here, for example, the display of the Attachments column is disabled.
Detail document
 You can view the document detail
a user who has been granted rights to do so by the application administrator, viz
by clicking on the eye icon that is displayed at the end of each line u
of the given document. Clicking on this icon will display details about
given document.
You can view the document detail
a user who has been granted rights to do so by the application administrator, viz
by clicking on the eye icon that is displayed at the end of each line u
of the given document. Clicking on this icon will display details about
given document.
Here, the approver can add any comments to approved/rejected document.
Deleting a document
Only the user authorized to do so by the administrator can delete the document application assigned rights. To delete a document, use the cross icon, which is listed in the document overview at the end of each line document.
Export and print overview of documents
An overview of the inserted documents can either be printed by clicking on the "Print" button, or download to an Excel spreadsheet - by clicking on "Export to Excel" button. Export to Excel is only functional if you have the application running in the Chrome web browser.
Warehouse management module
The warehouse management module is designed for complete warehouse management - creation of individual items, receipts, payments, reservations, inventory.
It must first be defined in the settings of the Warehouse management module individual groups of warehouses and general parameters of warehouses - types of warehouses cards, groups of cards, form of serial numbers, etc.
The module enables clear tracking of individual warehouse movements warehouse items and effective price management of individual items.
The module is connected to the products module (allows transfer/synchronization of data with this module) and with the CRM and orders modules (as part of issuing receipts and disbursements and reservations).
On the price tab, you can effectively manage the price of a given item - shopping, procurement, sales - and set individual discounts.
Warehouse management module settings
Access to the order received module is granted to the user by the application administrator in the Settings section, Inventory Management tab.
 First you need in the module settings
create a specific warehouse group and assign relevant users to it
access rights.
First you need in the module settings
create a specific warehouse group and assign relevant users to it
access rights.
Access rights to the warehouse management module
Within the Order Received module, users can from the application administrator obtain the following rights for a specific group of orders: no access – sees the state of the warehouse – sees, can put in and out of stock – sees, can stack, unstack and create new cards - sees, edits, creates and can delete everything.
Warehouse items
A new item in the warehouse can be added using the "Create" button stock item” in the Items section. A table will then appear in which you need to fill in the necessary information - e.g. codes, names, item numbers, but also price documents (purchase price, acquisition price, selling price - incl. the possibility of its automatic calculation) or discounts and others.
Products can also be transferred to the given warehouse from the Products module using "Transfer/sync" buttons to glass house".
Individual cards can then be displayed in the detail of the stock item with item data - basic data, prices, stock movements, serial numbers, notes/changes.
Receipts
A new receipt can be created using the "Create receipt" button in the Receipts section. Subsequently, a table will appear for entering data about received goods:

Discounts
A new dispenser can be created using the "Create dispenser" button in the Disbursements section. Subsequently, a table will appear for entering data about issued goods:

A delivery note can be issued, for example, for the sale of an item, its transfer to another warehouse or a gift.
It is then possible to make an invoice issued directly from the issued invoice:

Reservation
The Reservations section displays reservations for products registered in warehouse management, which are needed for specific implementation orders.
This is only informational information, the reservation is made on its own in the order module - it is possible to add the necessary products for a specific order for the implementation of the order, or make their reservation for the job in question.
Inventories
Within the inventory section, the number of units in stock can then be displayed individual warehouse items:

SMS module
The sms module is used to quickly inform employees (e.g. about a change deadline, reminder of an important task or event, meeting meeting) via sms messages.
If necessary, a user who has access to this from an application administrator can assigned rights, send to one or more employees who are managed within the application as users, an sms message, which is convenient for example with a larger number of message recipients moving outside the workplace.
There is no number of users to whom it is possible to send an SMS message at once limited or corresponds to the number of users who use within the company eIntranet application. Message length is limited to 140 characters.
Recipients will see "SMS from intranet" before the text of the message.
SMS module settings
Access to the sms module with specific access rights is assigned by the user application manager in the Settings section, Sms tab.
Access rights to the sms module
The following access rights can be set within the sms module: none access or send sms.
Specifying message recipients
After clicking on the sms module, users will appear at the top of the screen, to which an SMS message can be sent. To include a user in recipients sms just tick the check-box in front of his name. As a sms recipient it is possible to tag any number of users in the message.
Only users with a valid mobile phone number from the Czech Republic are displayed.

Sending messages by position or office
The administrator has the option to set Position a for individual eIntranet users Office by default in Settings->Users - these values are possible be used in the SMS module, when you can simply send an SMS message, for example to everyone with the position of consultant or everyone from the Brno office.
If we move the mouse cursor over the given name in the SMS module positions/offices, we will see the members of the given group (SMS is always sent only to users with a valid mobile phone number from the Czech Republic).
Enter the text of the message
The text of the message is entered by a user who has been assigned rights by the application administrator to send sms messages, to the window displayed on the initial page of the module. The message can contain a maximum of 140 characters.

Recipients will see "SMS from intranet" before the text of the message.
Sending a message
The message is sent after clicking the "Send" button located below window for completing the text of the SMS message.
Module files
The files module represents an in-house space for storing various types of files, i.e. they serve as storage for documents, audio recordings, videos, images and more.
Uploaded files can be sorted in and out of folders as needed search by name and file type.
If the user has been granted the rights to do so, he can create folders in which individual files will be included.
Module settings files
Access to the module specifies files with specific access rights application manager users in the Settings section, Files tab.
Files module access rights
The following access rights can be set within the files module: does not have access - read - read, write - read, write, delete a restore from recycle bin.
File Upload
The user uploads a new file by clicking the Upload file icon
 , by dragging the selected file or
selected files.
, by dragging the selected file or
selected files.
Creating a new file
Creating a simple text file is also possible within the module
files. After clicking on the icon  the user enters the name of the file and then adds the content, or text
file.
the user enters the name of the file and then adds the content, or text
file.
Adding a new folder
The user creates a new folder by clicking on the New folder icon
 . It is then possible to store more in it
files by relevance.
. It is then possible to store more in it
files by relevance.
Construction module
The building module is used to plan the occupation of individual buildings by the necessary people resources, both human and technical – tools, vehicles, machinery.
A user with relevant rights first creates a specific construction contract and assigns relevant resources to it - available human resources are loaded to it from the employees module (ideally according to the defined job position), available tools from the asset registration module and available machines or vehicles from the module vehicle registration.
Every worker to be assigned to a construction site must be registered within the application. After being assigned to the construction site, it is possible for the worker in question have an information e-mail/sms sent about the assignment to the construction site, or change.
Within the module, it is possible to display various breakdowns by people, of tools, machines and vehicles, in individual months or a year. Further it is possible to display an overview table in which the user can see deployment of workers and vehicles and which facilitates transport planning workers to the construction site.
It is possible to search by term or name in all parts of the module (e.g. job position, type of tool or vehicle).
Building module settings
Access to the module is assigned by tasks with specific access rights app admin users in the Settings section, Builds tab.
In the module settings, the application administrator further defines the types of notes for buildings – e.g. notification, deadline, task or change in the project.
It is also possible to define user positions in the module settings, which are to be loaded into structures.

Access rights to the build module
The following access rights can be set within the construction module: no access - read where I am assigned - read all - read all and write – read all, write and delete.
Foundation of construction
A new building is created by a user with relevant rights in the Buildings section by clicking the "Add" button. A table will then appear in which will add basic information about the building:

After creating a building and clicking on its detail (the eye icon), it will be displayed possibility of more detailed construction planning:

Human resources for construction
Available human resources are displayed after clicking the "Add" button in the building detail in the People section or by clicking on the Resources - People section. Individual persons are loaded from the employees module, or from the section Settings, Users tab - important for easier occupation of buildings listing the job positions of individual users.
The person occupying the building can filter the available users according to by date and by job position:

It is possible to assign human resources to the construction site in larger numbers, namely by clicking the "Add in bulk" button. First you need to check check-box for individual workers that I want to assign to the construction site, a then click the "Add in bulk" button:

Subsequently, a table will be expanded in which the user fills in the date when they will be given users assigned to the building, and can also choose how they will be users added to the building are informed of this fact:

In the event of a term mismatch (assignment of the selected user to another construction on the required date) system of the entering user on this will automatically alert you to the problem.
Tools needed for construction
The available construction tools are displayed when the button is clicked
"Add" in the build detail in the Tools section or by clicking into the section
Resources - tools. Individual tools are loaded from the log module
asset (here it is necessary to define my own asset type "Construction
tools"): 
Whoever occupies the building with technical resources can take the available tools filter by term and by instrument type:

Tools can be assigned to a building in larger numbers by clicking on the "Add in bulk" button. First, it is necessary to tick the check-box u of the individual tools I want to assign to the build and then click on "Add Bulk" button.
Subsequently, a table expands in which the user fills in the date when plans to assign the given tools to the construction:

In the event of a term mismatch (assignment of the selected instrument to another construction on the required date) system of the entering user on this will automatically alert you to the problem.
Resources - vehicles/machines
Available construction vehicles/machines are displayed after clicking the button "Add" in the build detail in the Vehicles/Machines section or by clicking to Resources - Vehicles/Machines section. Individual vehicles/machine tools se they load from the vehicle registration module.

Whoever occupies the building with technical resources can take the available tools filter by date and by type of vehicle/machine:

Vehicles/machines can be assigned to the construction site in larger numbers, namely by clicking the "Add in bulk" button. First you need to check check-box for individual vehicles/machines that I want to assign to the construction site, and then click the "Add in bulk" button.
Subsequently, a table expands in which the user fills in the date when plans to assign the given vehicles/machines to the construction site:

In case of time mismatch (assignment of selected vehicle/machine) to another building in the required term) system of the entering user on will automatically flag this issue.
Buildings
In the Buildings section, the user not only creates new buildings, but also has the option different display of registered buildings - you can view all buildings or just completed constructions or planned constructions:

Schedules
In the schedules section, it is possible to view the deployment of people, tools and machines or vehicles, within individual months or annually display:

Within schedules, it is possible to display only deployed workers, tools, machines or vehicles or all that are within the module available.
Overview
The overview section shows the deployment of individual workers and vehicles. The overview shows not only the deployment of individual workers buildings and vehicles planned for the given building, but also individual residences workers. This facilitates the planning of efficient individual transportation workers to the construction site.
Vehicle driver information is retrieved from the driver record module.

Employee training module
The employee training module is used to assign employees to relevant training, but also to clearly record the training that employees have graduate or have already graduated.
The given employee/application user is informed about the assignment to training via e-mail. At the same time, the application sends a warning about approaching with the end of the period during which the employee must complete the training, even on the expiry of the deadline when the training should have been completed, both for himself employees as well as their superiors.
The system allows for different ways of completing the training:
-
familiarization with the text, when at the end the employee confirms that he is familiar with the text introduced
-
completion of the training will be confirmed by the employee directly by entering the date
-
completion of the training will be confirmed by the superior
-
the employee must successfully pass the test
When listing the training, it is possible to enter the repetition of the training - e.g. after a year the training is automatically re-listed for employees.
Within the module, there is a filter to search for training according to different criteria – e.g. by user name, date, title.
The employee training module in combination with the tests module contributes significantly to create and set up an effective internal training system employees in companies.
Employee training module settings
Access to the employee training module with specific access rights entered by the application administrator user in the Settings section, Training tab employees.
Access rights to the Employee Training module
The following can be set up within the Employee Training module access rights: no access – display and fulfillment of your – display all - view, schedule and approve training.

Rights are ordered from lowest to highest, each higher right to the right it contains all lower rights on the left.
Entering a new type of training
A new type of training can be added by clicking the "Add Training" button.
 Next, a table will expand in which
you need to fill in the basic information about the training:
Next, a table will expand in which
you need to fill in the basic information about the training:
-
 Whether training is active
 -
His description
-
Text of email when assigned to training - default, custom (empty), custom with test, custom without text
-
Training completion date
-
Automatic notification of users (sms/e-mail):
-
assignment to training
-
before the end of the training period
-
after the expiration of the training period
-
setting of automatic training repetition – e.g. after a year – training is then automatically created again after the relevant time period
 In the Completed/Entered column there is then
see the figure of how many employees have been given training and how much
of which the training has already been completed:
In the Completed/Entered column there is then
see the figure of how many employees have been given training and how much
of which the training has already been completed:
Possible types of training
After creating a training type, the training will appear in the overview table on to the initial page of the module - then you need to click on the details of the training (one more):

The following types of training can be entered under training:
-
Text to be read - a text is inserted into the appropriate window, with which the employee has to familiarize himself with - the program automatically monitors that the employee allowed the text to be displayed until the end; then it is only possible confirm that he/she has read the whole
-
 Documents to read - possible
directly insert the entire files (in pdf format) with which you are dealing
trained to acquaint; these files are automatically converted to text
for employees (employees will appear as text) at the end of which
it is necessary to click "I have read the whole thing" for each one; suddenly it is
it is possible to insert up to 10 files with a total maximum size of 60 MB.
Documents to read - possible
directly insert the entire files (in pdf format) with which you are dealing
trained to acquaint; these files are automatically converted to text
for employees (employees will appear as text) at the end of which
it is necessary to click "I have read the whole thing" for each one; suddenly it is
it is possible to insert up to 10 files with a total maximum size of 60 MB. -
Test to take - in the tests module you need to create a test according to needs and set it to allow only "Employee training – To users assigned to training", followed by the button "Add test to training" to select the test to be for the given training connected; the user is subsequently informed that he is assigned to training with the test. If you pass the test, it will appear for that training, whether the user fulfilled it (if he fulfilled the criteria specified in the test) or did not fulfill; the test results are then displayed for the training here:

It is possible to combine the mentioned methods of completing the training - i.e. it is possible insert, for example, documents with which the user should first become familiar, and then continue with the test, which must be met according to the given criteria in order to marked the assigned training as completed.
Assignment of employees to training
Employees who have training are also assigned in the training detail complete:

The user is informed about the assignment of an employee to training via e-mail.
 When assigning an employee to training
it is also necessary to define how it will be confirmed that the employee
completed the training; the options are as follows:
When assigning an employee to training
it is also necessary to define how it will be confirmed that the employee
completed the training; the options are as follows:
Rescheduling the training completion date
The deadline for users to complete the assigned training can be changed using this check-box:

Deleting training
In the Manage Training section, the user with the highest access rights in the module after clicking on the cross icon the following deletion options:
-
Deleting training without assigned training - the selected training is deleted only in the Training Management section)
-
Deleting training including assigned Uncompleted training - d deletes the training in the Manage Training section and deletes the training at the same time users who have been assigned it but have not yet completed it
-
Delete all training - the training will be deleted in the Manage training section and at the same time for all users where the training is entered - regardless of whether the user has completed it or not

Overview of employee training
In this section you will find an overview of the staff and the training they have to complete or have already completed:

In this section, it is possible to search for employee training according to various criteria – name of training, name of employee or employees, dates (assignment, completion of training):

An overview of the employees and the training they have listed, or already have graduated, it is possible to export to Excel.
Trainings listed for a specific employee
 Training that has a specific listed
employee, the user will find in the My training section:
Training that has a specific listed
employee, the user will find in the My training section:
The user gets to the new training via the "Fill" button, if necessary you can view the training you have already completed using “View filling'.
 It's about new assigned trainings
the employee is also informed using the numerical data in the blue circle u
module name:
It's about new assigned trainings
the employee is also informed using the numerical data in the blue circle u
module name:
At the same time, the application draws attention to the training that the employee must undergo graduate in the near future.
When confirming completion of the training, it is possible to insert attachments - e.g. certificates, confirmation of completion of training, diplomas:

Module tests
The tests module allows you to create online tests with different test types questions as needed by the test author. Test results are generated automatically and it is possible to display them sorted in clear tables.
The tests module can be used especially within the framework of the company education system or, in case of need, ascertaining the knowledge of other collaborators entities (customers, clients, patients, etc.).
Prepared tests can be available to intranet users (all users or only selected ones) or assisted tests are possible make the generated link available to anyone the test administrator sends it to given link.
For tests, it is possible to set a time limit for completing them and also a date, from when to when the tests will be available for completion, allowing for example completing the selected task only in the time required by the test administrator.
Different types of test questions can be used in the test with different types of answers - e.g. text answer, number answer, choose 1 correct option, choose more than one correct option, choose from pictures or completion of the required.
During the actual implementation of the test, it is possible to choose whether there will be questions in the test sort randomly or whether only a certain number of test questions are selected. Furthermore, it is possible to set whether the testee is asked after entering his answer will show which answer was correct.
For the test, it is also possible to specify whether it will be displayed to the test taker at the end of the test information about passing/failing the test (the test administrator will set also the minimum number of points to pass the test) and whether he can take the tested test more than once.
The prepared test can be linked to the training listed in the Training module employees.
Test module settings
Access to the module tests with specific access rights app admin users in the Settings section, Tests tab.
Access rights to the tests module
The following access rights can be set within the tests module: none access to test management - display the results of all tests - create new tests and view results.
Creating a new test
A new test can only be created by a user (test administrator) who is authorized to do so granted rights, in the Test Management section, by clicking the button "Create new test":

 Next, a table will expand in which
the test administrator adds or selects the following data:
Next, a table will expand in which
the test administrator adds or selects the following data:
-
Name of the test
-
Date when the test can be completed (from-to)
-
To whom the test will be accessible (all or selected eIntranet users or to anyone who receives the generated link, or the user assigned to training - for more information, see the Employee training module)
-
Time limit for completing the test (if not necessary, fill in 0)
-
Time limit for completing individual test questions (if not for example, 0 will be filled)
-
Option to randomize questions
-
Possibility to choose a random number of questions for the test
-
Option to display correct answers
-
The possibility of taking the test multiple times
-
Option to display information about whether the testee passed the test or not
-
The minimum number of points required to pass the test
-
Logo – allows you to upload an image of the company logo or your own logo test (only 1 image)
-
Opening text – displayed to users when starting the test (for example instructions for completing the test)
-
Text at the end - e.g. thank you for participating in the test
Identification of the testee
In case the test is also sent outside of the app user, it is possible fill in the optional fields related to data on the testee as necessary (e.g. center, personal number, etc.):

Adding a new question
A new question is inserted by the test administrator by clicking the "Edit questions" button, which is located in the initial view of the test overview in the Administration section surveys. After clicking the "Add another question" button located in the upper right corner of the screen, a table will appear in which the user defines a new question - completes its wording and selects the type of answer to question.

Possible answer types are:
-
text response – allows any type of text response
-
numerical answer
-
choosing 1 of the given options - chooses from the offered answer variants tested 1 option
-
selection of several options from the specified options - from the offered options answer, the test taker can choose 1 or more correct answers
-
selection of one image from the given ones - the testee marks one variant image
-
completing words/letters
-
selection of several options from those specified with a limitation of the number of selections to max. number of correct ones
When creating test questions, it is necessary to pay attention to the exact definition of the question and verify the clarity of the answers to the created question - if, for example, it is the correct answer to the question is Jan Novák, the system in the case of an answer only Novák evaluates the answer as wrong. So it is necessary to the question specify that the correct answer is first and last name only.
Furthermore, it is possible to set that points are counted for each partial
correct answer: 
Sorting of questions
The order of created questions can be variably edited, using arrows next to the question number. Click on the arrow the question always moves by 1 place.

Editing or deleting a question
To edit or delete a question, you need to go to the Actions column, which is located there at the end of the line for each question in the question overview, click on the icon pencil (if you need to edit the question) or cross (to delete questions) and perform the necessary action.

Test preview
A preview of the created test with the option to fill in the answers for each one
questions can be viewed by the test administrator by clicking the button
, which is located in the Action On column
at the end of the line for each test in the Manage Tests section.
Editing or deleting a test
Editing the test (or initial information about the test; if it needs to be edited questions in the test, you need to use the "Edit questions" button - see above) is possible with the help of the pencil icon located in the Actions column at the end of the line for each test in the test overview in the Test Management section. To to delete the test, use the cross icon, which is located there.
Test results
The test results will be displayed by the test administrator in the Test Results section, viz by clicking on the columns icon.


A table will then appear in which the test administrator can see who and when he passed the test, how many questions did he complete, how long did it take him, how many scored and whether he passed the test.

In case the test administrator wants to know the specific answers of the test taker, they must click on the eye icon located at the end of the line. Will appear a table where the test administrator will see each question with answers tested. In case of deleting the tested test (and enabling a new one passing the test) is used by the cross icon.
Test results can also be displayed by individual questions:

And export to .pdf:
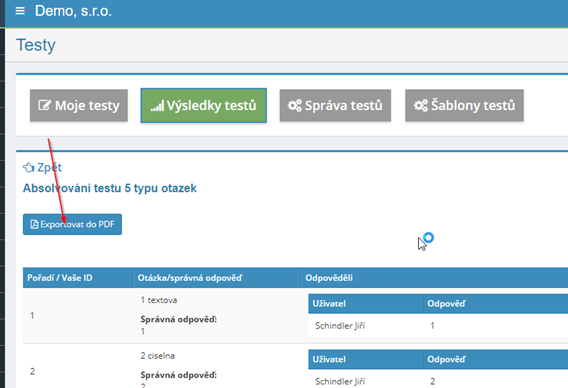
My tests
In the My Tests section, the user can see the tests that have been assigned to them and which he is to attend.

Test templates
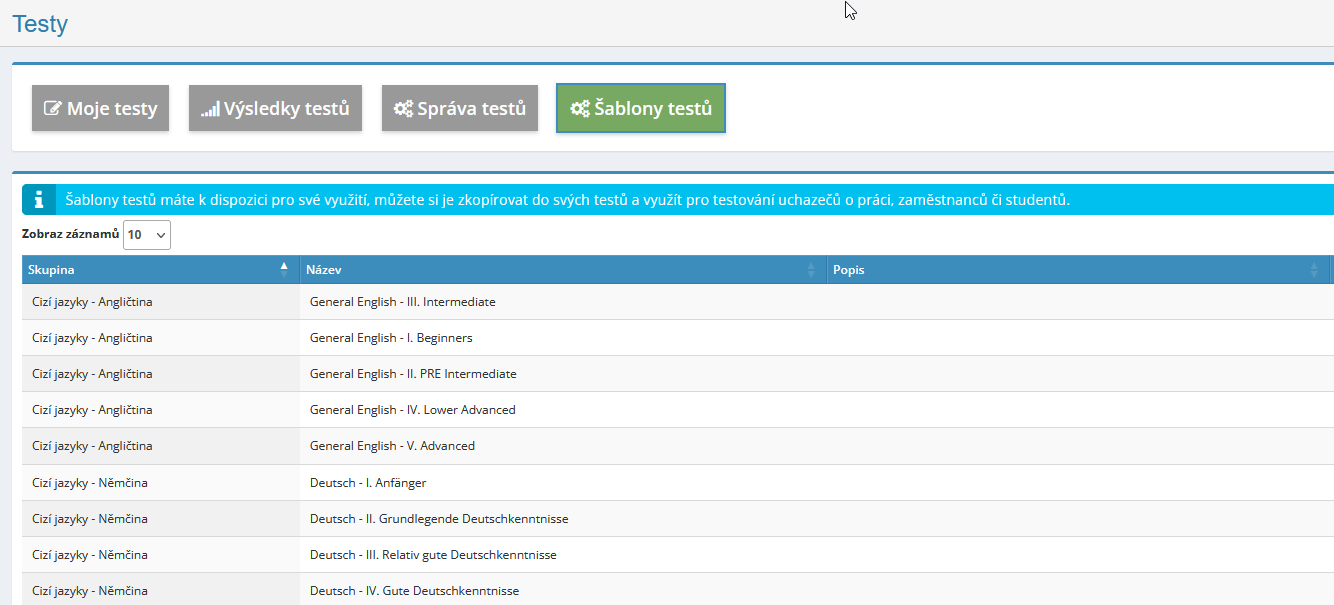 There are several presets in this section
tests (language, work with PC) which can be freely used for
testing your employees:
There are several presets in this section
tests (language, work with PC) which can be freely used for
testing your employees:
Tasks module
The tasks module serves to clearly guide and assign tasks to employees and external collaborators, or to all users who have access to the module granted access rights. History is clearly kept within the module assignment and task processing.
The rights for individual users are simply defined by the application administrator, and then it is already possible to assign the necessary tasks to them.
 Trackable within the module
history about the solution of the given task and monitor the progress of its fulfillment. Tasks
record including all notes, statuses and changes made to them and attachments
added to them. They are about each change in the task and the progress of its solution
all assigned solvers and the contracting authority are automatically informed.
Trackable within the module
history about the solution of the given task and monitor the progress of its fulfillment. Tasks
record including all notes, statuses and changes made to them and attachments
added to them. They are about each change in the task and the progress of its solution
all assigned solvers and the contracting authority are automatically informed.
Tasks module settings
Access to the module is assigned by tasks with specific access rights application manager users in the Settings section, Tasks tab.
In this section, the application administrator will also set other parameters for operation module tasks according to the needs of the company:
Tasks module access rights
The following access rights can be set within the tests module: does not have access - read own and be tasked - read all and be tasked - read everything and enter new tasks - read, edit and delete everything.
Task statuses used by users
In the Settings section, Tasks tab, the application manager will also select relevant task states (ie the stage the task is currently in) which will be used by the company (selected statuses can be changed as needed - subtract/add).
The states that can be entered are listed in the table:

Overview of assigned tasks
Tasks entered within the module can only be seen by the relevant user right. An overview of the tasks is displayed on the module's home page. For everyone the task always shows who and when the task was entered, in what state it is, how much notes were added, etc.
Entering a new task
Only the user authorized to do so by the administrator can enter a new task application assigned rights by clicking the "Add task" button in the top-right corner. Subsequently, a table appears in which the client the task will be supplemented with the name of the task, the deadline by which the task should be solved, the main one solver, possibly other solvers, task approver, task status, its description, possibly supplemented by appendices.

Optional fields can be completed
Within the module settings, it is possible to add optional options for entering tasks field according to user needs. Optional fields are added by the user with the relevant rights in the module settings - e.g. fills in an optional field "number of pieces in stock":

Subsequently, the assigner of the task can add how many pieces when defining the task of products in stock must be produced:
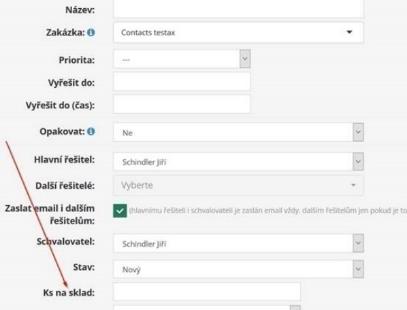
Assign a priority to the task being entered
In the Settings section, Tasks tab, the application administrator can check check-box to enable/disable the possibility of entering priority for individual tasks.
There are also preset levels of priority. The grades entered are the highest – high – medium – low – lowest. However, the administrator can name the priorities modify applications as needed, it is also possible to reduce the number used degrees - e.g. if no text is filled in for values 4 and 5 field, only level 1-3 priorities will be displayed.

Subsequently, the user who has assigned rights for entering tasks can at writing a new task to set its priority.

The assigned tasks can then be sorted according to a specific priority.

Possibility of mass assignment of the task
This function is useful when assigning the same type of task to multiple users with the subsequent request for confirmation of completion of the task from each solver separately – the assigner of the task assigns 1 task for several solvers, then automatically creates a task for each solver separately.
Entering mass tasks is possible using the "Add task" button in bulk" - the table for entering the task will then be expanded.
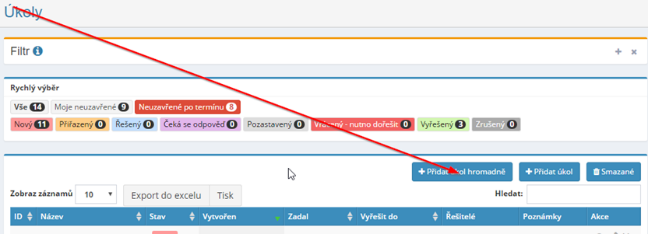
The possibility of repeatedly entering the same type of task
 In case re-entry is required
of the same type of task, it is necessary to select "Repeat" when entering a new task
– Yes and then select "Repeat every" and choose which days to have
repeat the task (the task can be repeated every day of the week, every working day
day, every other day of the week or just 1 per week, etc.).
In case re-entry is required
of the same type of task, it is necessary to select "Repeat" when entering a new task
– Yes and then select "Repeat every" and choose which days to have
repeat the task (the task can be repeated every day of the week, every working day
day, every other day of the week or just 1 per week, etc.).
A new task is then automatically created (and the information is sent by e-mail to all relevant users) in the early hours of the morning every day.
It is also possible to enter a quarterly, half-yearly or annual repetition of the task:

A filter is used for the list of recurring tasks, after which they are activated see only recurring tasks:

If a task needs to be resubmitted, it needs to be deleted the last task that was created.
Repetition can also be entered to remind you of the task completion date – e.g. repetition with completion by the 10th of the month - every 11: will be a task repeat with a due date of the 10th of the following month:
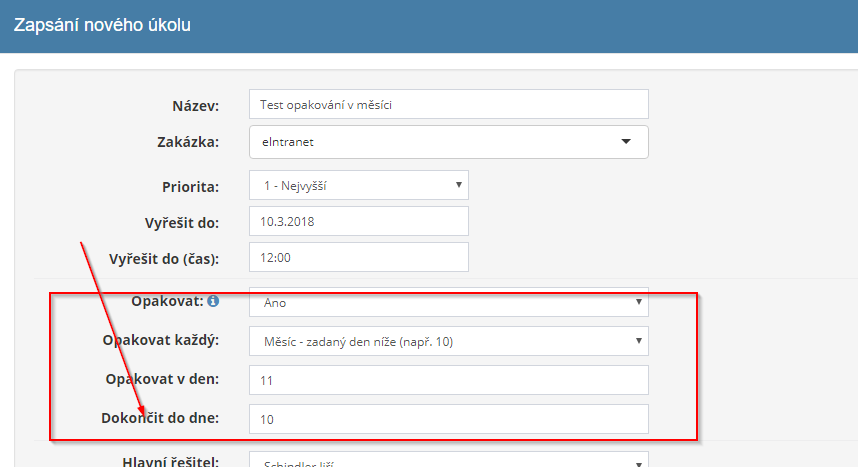
Option to set task reminder
As part of entering a task, it is possible to set a reminder to complete it of the created task - the submitter adds how the reminder should be sent (in the form of e-mail or sms), to whom (main researcher, other researchers, everyone solvers, all solvers + approver) and when.

Task record detail
 Detail of the task record by the user
displayed after clicking on the eye icon that appears in the task overview
on the start page of the module.
Detail of the task record by the user
displayed after clicking on the eye icon that appears in the task overview
on the start page of the module.
Within the task record detail, a user with relevant rights can display or even complete the procedure for completing the given task.
Editing the task
Editing an inserted task is possible using the pencil icon, which is always present at the end of the line for each part of the record.

If any changes are made, a record is made of them in the Notes section.
In the settings of the tasks module, it is possible to check that the created the task could only be edited by its originator:

In the module settings, it is possible to check that the task that is in the state solved, could no longer edit. And further it is possible to set to only the assignor of this task could transfer the task to the "Solved" status:

Informing about creation, modification, solution of the task
They are relevant about the creation of a new task or every change in the task eIntranet users informed via information e-mail:

The body of the e-mail also includes a direct link to the details task.
Information about tasks is also sent via SMS.
Delete task, attachments
Only the user authorized to do so by the administrator can delete assigned tasks application assigned rights. To delete a task, use the cross icon, which is placed at the end of the lines for each inserted task in the task overview at module's home page.
If necessary, files attached to the task can be deleted - delete attachments can again only be done by the user with the highest rights in the tasks or the task giver. A note about the deletion of attachments is entered in the notes:
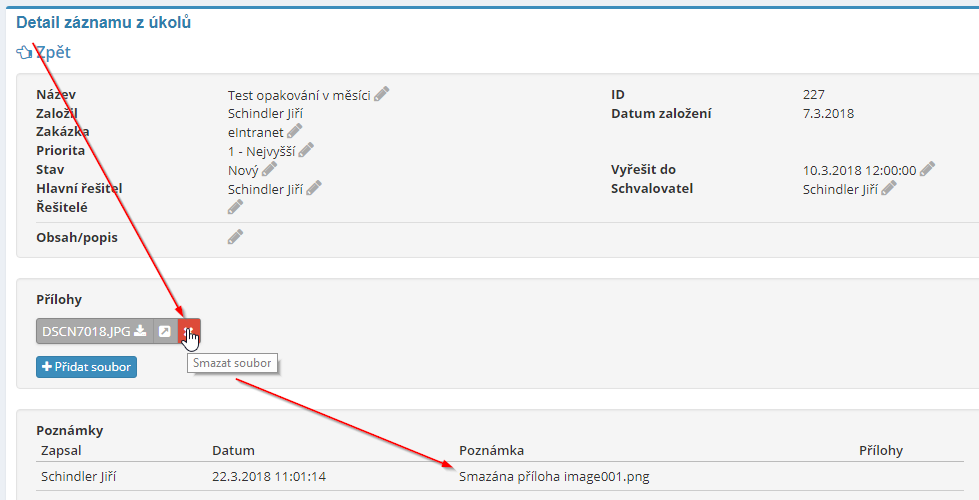
The module also allows mass deletion of selected tasks - first you need to use the filter to select the tasks to delete and then click on "Bulk Delete" button:

Task search
Task search can be entered by clicking the "View" button at the top of the screen on the module's home page. As part of the search it is possible to specify a search for all inserted tasks or only unclosed ones tasks related to the user who wants to search.

It is also possible to search by entering a filter that can be set on the bottom bar in the task overview, to view tasks by the state in which it is currently located, or according to the client.

More advanced task search
The "filter" function allows you to specify specific search criteria - it is possible to search, for example, in the name of the task; according to a certain period when was the task established (last month, 3 months...); who assigned the task; who had solve the task.

It is also possible to search by task status, with the possibility of entering more than one statuses of tasks at once - e.g. New, Assigned and Solved at the same time.
Searching for deleted tasks
If necessary, a user who has the rights set to do so can
find deleted tasks by clicking the "Deleted" button. By clicking
on the icon it is possible to leave the deleted tasks
restore.
Reporting work on individual tasks
If necessary, it is possible to set up the connection of the module tasks to the module reports of work - this option must be activated in the module settings tasks:

You can then enable/hide the display of names in the work report overview tasks for which the work was reported:

Task names are also exported to Excel:

Work reports module
The report of work module enables the recording of work performed according to individual hours worked. With the help of this module it is possible continuously monitor and evaluate individual contracts and projects, simply invoice the work performed and obtain clear documents for wages.
The application enables the display of various types of reports as needed - monthly overview, overview by orders, overview by employees.
Thanks to the management of timesheets, managers have employees, but also payroll and others relevant workers, an overview of how many hours the employee worked for per day, per week, per month, per balancing period, how much of it was accounted for overtime work, possibly night work, etc.
Worksheet module settings
Enters access to the timesheets module with specific access rights application administrator users in the Settings section, Worksheets tab.
Access rights to the Worksheets module
The following access options can be set within the timesheet module rights: does not have access - write and read only his work - write and read yours and selected people - write yours and read all - write a read all - write, read, delete and restore everything.
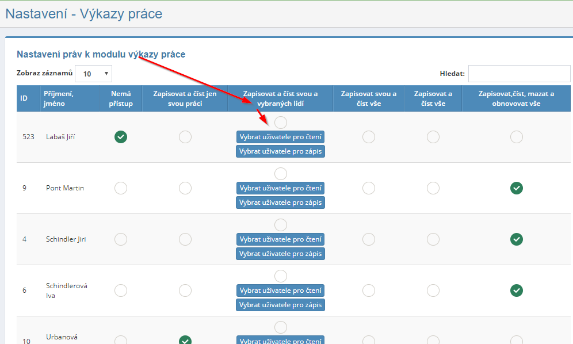
It is also possible to set user access rights individually projects or orders in which they participate.
Set up work reports as needed
Within the Settings, Worksheets module, it is possible to set the form and operation of work reports as needed.
On the one hand, it is possible to use the General settings section and on the other hand, the Optional section pole:

Under the general settings, it is possible to set rules for necessity filling out work reports by the user, entering the name of the job, choosing a company or branches from CRM:

Furthermore, it is possible to link work reporting with assigned tasks, entering names of orders only by the administrator, enable printing of the statement to the form, adding the company logo to the job report.
Other setting options are:

Additional data can then be added to the timesheets in the Optional Fields section according to need:

Options for displaying work reports
Within the timesheet module, it is possible to view the timesheet of a certain employee for the selected calendar year, overview of work done work by individual months or individual orders and an overview work performed by individual employees and calendar months.
The job reports section is mainly used to enter new job reports and to search for work reports according to the required filters. Monthly section the overview is intended for obtaining an overall overview of the work done for selected month. In the section Overview of orders, it is possible to download documents for invoicing of individual orders. Section Overview by employees then serves primarily for the preparation of documents for the payment of wages.
They are also displayed in the Job Overview and Employee Overview section total sums of hours worked, funds spent on transport, possibly for additional costs.

Adding a statement of work
Only the user authorized to do so by the administrator can enter a new timesheet application assigned rights by clicking the button "Write work" on the right side of the screen. Subsequently, a table appears in which the user fill in your name, date and number of hours worked, title orders, description of activities, possibly transport costs and other costs a relevant attachments.

Optional fields in the job report
Optional fields can be added in the module settings to allow add data to work reports according to company needs.

Searching for job reports
You can search for work reports by clicking on the "View" button statements of work' at the top of the screen on the module's home page. Within search, it is possible to enter a search by employee name, calendar year, month or contract on which the employee works or has worked.

Worksheets can be searched by multiple titles if needed jobs at once - this option must first be enabled in the settings module:

And subsequently, it is possible to check multiple job names in the filter at once and view the relevant work statements for them (you must have read access not just your work reports):

If it is necessary to display all work reports, it is possible to select the field "without orders':

Searching for deleted job reports
If necessary, a user who has the rights set to do so can
find deleted work reports by clicking on the "Deleted" button.
By clicking on the icon can be deleted
have the statements renewed.
Detail of the statement of work
The user can view the details of the timesheet record after clicking on the icon eye that appears in the job report overview on the home page module.
Within the job listing detail, a user with relevant rights can view or even supplement and delete the selected work report.

Editing and deleting data in the work report
Only the user can edit or delete data on work reports who has been granted rights to do so by the application administrator. To edit the embedded the report is served by the pencil icon, the cross icon is used to delete the report. Both icons are placed at the end of the lines for each inserted statement in the statement of work overview on the module's home page.
Deadline for completing the statement of work
In Settings, tab of work reports, it is possible to set the number of days until users must fill out the work sheet. If it doesn't happen, it's possible to have a notification sent to the given user via SMS or email.
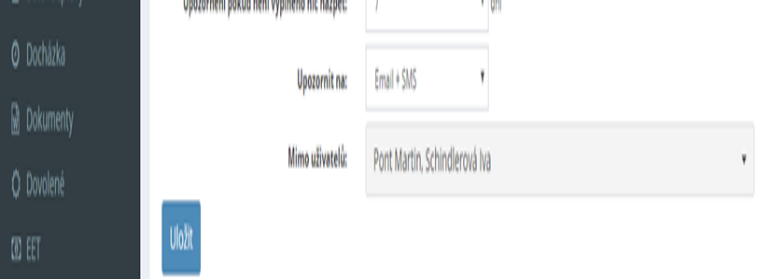
It is possible to set the sending of the reminder so that it is sent only to days that he has filled in the attendance module (only for the days he was at work).
Linking timesheets with CRM modules, tasks and HelpDesk
In the module settings, it is possible to enable the entry of companies (and branches) from CRM and it is also possible to enable work reporting for tasks:

 The statement of work module is linked i
with the HelpDesk module - only displayed if a job sheet is entered
z HelpDesku:
The statement of work module is linked i
with the HelpDesk module - only displayed if a job sheet is entered
z HelpDesku:
Job report statistics
Clear statistics can be displayed in the work report module reported work in the required periods, by individual employees and orders:
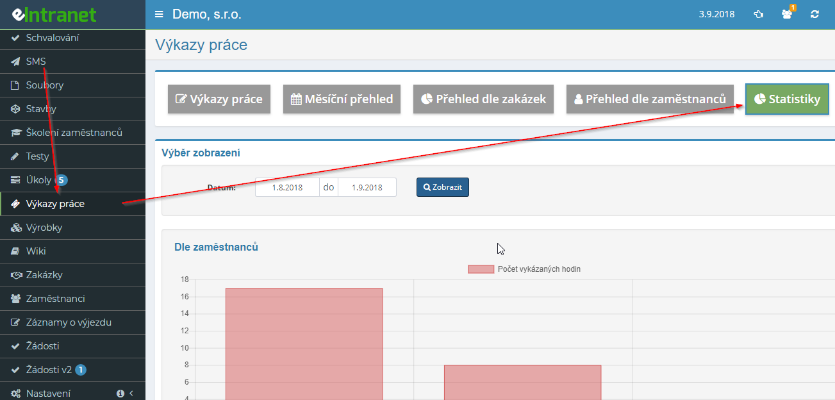
To view statistics, the user must have a higher type of access right - at least "write down and read your work and that of selected people".
Export and print to Excel
It is possible to either print out the individual reports of the work, namely by clicking the "Print" button, or download to an Excel spreadsheet - by clicking the "Export to Excel" button. Export to Excel is functional, only if you have the app running in the Chrome web browser.
Payroll module
The payslip module serves as a unified storage of payslips employees.
Tapes can be uploaded to the module individually or in bulk. In case of insertion new tapes it is possible to send an information e-mail to the employee that he has inserted new pay slip.
Different access rights can then be assigned to the module in the module settings (from the ability to see only your pay slips to the ability to see everyone's payslips).
Payroll module settings
Grants access to the payroll module with specific access rights app admin users in the Settings section, Payslips tab.
Payroll module access rights
Within the Payroll module, the application administrator grants access to users into individual folders. The following can be set in the module access rights: no access – display of own – display of all – show all + add – show all + add + delete
Adding payslips
A user with relevant access rights can enter a new payroll tape using the "Add" button:

Payslips can also be added en masse using the "Add" button in bulk":

It is also possible to check whether the information about the newly inserted payslip will be displayed should send to the given employee by e-mail:

Export to Excel
An overview of inserted payslips can be downloaded into an Excel spreadsheet - by clicking the "Export to Excel" button. Export to Excel is functional, only if you have the app running in the Chrome web browser.
Products module
The products module enables complete management of electronic documentation to the products. This is a clear online repository of information about individual company products or sets of products.
As part of the clear record of products, it is possible to register preset ones basic data and, on the one hand, optional fields can be completed according to the company's needs.
In the module, it is possible to generate QR codes and print labels for labeling products, price monitoring (control of purchase and sale price) and transfer products to the selected warehouse in warehouse management.
Products can also be imported into the module in bulk from the Money S5 program.
Registered products can be searched according to various criteria - e.g. composition, type
Products module settings
Access to the product module is given by specific access rights app admin users in the Settings section, Products tab.
In the module settings, the form of conversion of the purchase price to procurement and the possibility of automatic conversion of the purchase price into CZK.
Furthermore, the synchronization scheme with the warehouse module is detailed here economy:

Here you can also define your own optional fields for registration for products and types of work, or its cost, in the production of products.
Access rights to the products module
Within the products module, the application administrator can enter users the following access rights: read - read, write - read, write, deletion and recovery. In addition, users can be assigned the additional right "Transfer products to warehouse management" (square check-box).
Entering a new product
A new product is entered by the user by clicking the "Add product" button. Subsequently, he fills in the displayed table with the main data about the product - his name, number, type (simple/assembly of products/complete product/material), prices, units, production documentation, photo of the product atd.:

Mass modification of products
 With the "Bulk Edit" button you can
perform bulk edits on registered products - they are available for bulk edit
items that can be bulk edited are offered.
With the "Bulk Edit" button you can
perform bulk edits on registered products - they are available for bulk edit
items that can be bulk edited are offered.
Checking the check-boxes selects the items to be edited, their new values (some basic and some optional can be bulk edited from the rule items) and products to be modified:

Price control
After clicking on the "Check prices" button, a list of products will be displayed, u of which the purchase price is higher than the selling price:
After clicking on the "Print QR codes" button, a table will appear in which it prepares a list of products for which they are to be, using a selection from the list printed labels with QR codes (label printing is ready for A4 sheet with label size 52.5x25.4 mm):

Import of products
Products can be imported into the application in bulk (button "Import products") from the Money S5 program. Import is possible products without composition or including composition:

Search in the products module
For a quick search, use the "Search" field above the list of registered users products. For a more detailed search, there is a filter that can be entered different search criteria:

Export and print to Excel
An overview of registered products can either be printed by clicking on the "Print" button, or download to an Excel spreadsheet - by clicking on "Export to Excel" button. Export to Excel is functional, only if you have the application running in the Chrome web browser.
Wiki module
The wiki module provides an organized space for posting various company materials – guidelines, instructions, methodologies, work procedures, professional articles, etc.
The structure of the module is created by the application manager in settings according to needs users. Access rights can be assigned to users according to created structures - i.e. into the individual components of the module is possible assign different access rights to users.
The advantage of the module is the easy search for the necessary information according to of defined keywords – when inserting a new document by the user directly defines the keywords by which the document will be traceable. Embedded posts can include links, images or videos.
Wiki module settings
Access to the wiki module with specific access rights is assigned by the user application manager in the Settings section, Wiki tab.
Wiki module access rights
Within the wiki module, the application administrator grants users access to individual components. The following access codes can be set in the module rights: read - read and write - read, write, move, delete, restore - read, write, move, delete, restore, create and delete subfolders.

Defining the module structure
Individual folders and subfolders of the wiki module are created by the application administrator in the module settings. It then assigns to the created folders/subfolders user access rights. Only an administrator can create master folders application, subfolders can also be added by the user assigned to it rights.
Folders can be defined at multiple levels and rights can be assigned to each level separately. Main, the highest level is 1.

If necessary, the settings of the created folder can be copied, edited (pencil icon) or delete (cross icon).
Adding a new folder
The application manager will add the new folder by clicking the “Add folder" or "Add subtype/subfolder" in the module settings.

New folders can also be added by a user with the relevant rights in itself module, after clicking the "Create Folder" button:

Adding a document in a folder
A new document is added to the folder/subfolder by a user with appropriate rights after clicking on the "+New document" button:

Subsequently, a table expands in which the user fills in the details to the new document - title and tags, i.e. short descriptive words document (according to these words, the document will be searchable at search), content. It is also possible to choose the color, size and font fonts and background color that will be used for the published post.
Then the document itself is uploaded:

Embedded posts can include a link, image or video.
Generating a direct link to a published article
If necessary, it is possible to generate a direct link to the published one article/document, you can generate the link by clicking on the arrow icon:
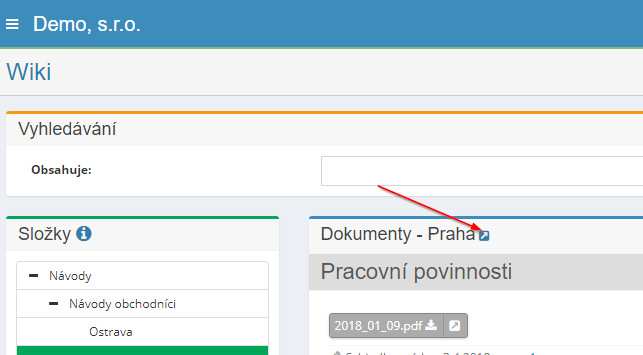
A direct link will then be generated for you:

Deleting a folder/document
Only a user with the appropriate permission can delete a folder, namely by clicking the "Delete folder" button:

Deleted folders are then still archived in the folder for 14 days "Deleted".
You can delete a document from the folder by clicking the cross icon directly under a specific document:

Print embedded documents
The embedded information in the wiki module can be printed using the icon printers:

Ability to create multiple wiki sections
In the wiki module settings, it is possible to create additional wiki sections as needed:

Search within a module
The entered documents can be searched by entering a keyword in the for field Search:

Changing the order of folders and documents
It is possible to check the custom settings option in the module settings order of folders in the wiki (by default they are sorted alphabetically):

Subsequently, the folder order can be defined in the settings:

Sorting documents according to users' needs is also possible - first it is necessary enable this option in the selected folder:

The specific document is then placed using these arrows:

WSDL Module
The external application service WSDL (SOAP) module supports the following services: eIAccess.wsdl - to redirect and access the user from another application without login required.
Additional information is then provided in the WSDL module settings.
Order module
The order module enables efficient management of company orders - makes it easier keeping track of deadlines, checking assigned tasks and completed work. It is in the module it is possible to clearly record any changes that are made as part of the implementation orders have occurred, and monitor the progress of order implementation.
In the module settings, it is possible to enter optional fields according to the needs of users - items that will be registered with orders (e.g. number, name, date assignment, priority, company name). Furthermore, it is possible to specify in more detail, how exactly the priority of orders will be defined, what types of notes will be possible to write down for orders or in what form the numbers will be recorded orders.
It is possible to create and assign individual tasks directly to the written job for relevant workers (linking to the tasks module). Further it is possible to the order, write down the relevant activity performed on the order, i.e. fill out reports of work (link to the report of work module).
The main costs related to the execution of the order can be recorded in the "Costs" section.
It is possible to search in registered orders, according to various criteria - e.g. if it is a current order or the name or number of the order.
Within the module, it is possible to print detailed information about each order or export or print an overview of orders.
Job module settings
Enters access to the job module with specific access rights app admin users in the Settings section, Tasks tab.
Access rights to the job module
Within the job module, the application administrator can assign users the following access rights: does not have access - read where it is listed - read where it is listed, edit yours and enter new ones - read all and edit all - read, edit and delete all.
Setting optional fields for orders
In the Settings section, Tasks tab, the application administrator further chooses:
- Items used in orders

- Default hourly rate - it is then set by default in the section Contract costs

- Priorities for orders

- Order numbers

- Types of notes

- Optional fields (the field type is selected from a predefined menu and is possible to select only certain users to whom the given field will be display, and define whether the field will be required to be filled in)

Entering a new order
A new job can be entered by clicking the "Add job" button. Subsequently, a table expands in which the user fills in the basic information information about the order, adds a description of the order and attachments.
Some order information fields are optional and set in the Settings section of the job module - see the Optional Settings chapter fields in orders.

Order detail
The job detail is displayed after clicking on the eye icon in the job overview. Within the detail of the order, it will be displayed, or it is possible to modify or add:
-
Basic data about the order – the selected data that will be recorded is can be adjusted according to company needs in the module settings
-
Description of the order
-
Attachments to the order - project documentation, drawings, etc.
-
Notes – i.e. who and when and what added/changed – type of note is possible set in module settings

It is possible to choose whether the recorded note will be accessible to all authorized persons employees or whether it will be visible only to the author of the note.
-
Tasks - the created task can be broken down directly and assigned to the relevant ones tasks related to the order to employees
-
Work reports – employees can report related activities here with the fulfillment of the order
-
Products - in connection with the fulfillment of the order in production, it is possible here make a reservation for the necessary products that are in any of the warehouses in warehouse management

 If the user has a module in their settings
contract assigned the add-on right "Access to contract costs"
in the details of the order, the costs section is then displayed to him:
If the user has a module in their settings
contract assigned the add-on right "Access to contract costs"
in the details of the order, the costs section is then displayed to him:
In this section, they see documents processed within the related application with the given order - work reports, received invoices, warehouse issues.
Print job
A specific order can be printed or deleted:

Closing orders
In order settings, it is possible to enable the option "Close order + right for users". Subsequently, it is necessary for a specific user in the settings of access rights, additionally confirm the "Conclude orders" option.
The selected user is then shown the "Close" option:

The conclusion of the order by the user is recorded in the Notes section. Closed jobs are shown in red and framed in the job overview the Filter section can also be searched based on whether there has already been an order closed:

Once an order is closed, it is not possible to write a record in the frame for that order module of reports of work.
Search in the job module
The "Search" field can be used for a quick search in the order module. It is also possible to search according to the specified criteria via Filter:

Here it is possible to search, for example, by order status (active/inactive), name, date, customer, number.
Export and print to Excel
You can either print an overview of the entered orders by clicking on the "Print" button, or download to an Excel spreadsheet - by clicking on "Export to Excel" button. Export to Excel is functional, only if you have the application running in the Chrome web browser.
It is also possible to export an overview of orders with a single currency (in case records of orders with different types of currency) – before exporting to Excel, it is necessary click on the button "Converted to CZK" and they will then be exported orders in CZK, while the exported file also includes the current exchange rate currency conversion.
Employees module
This module is used to clearly share selected contacts and others identification data about application users from the given company, i.e own employees. Information about the employee which administrator the application adds to the Users section as application users (this section is only available to application administrators), are also available in the module employees (this module is public, i.e. available to all users applications from that company).
Within this module it is possible to store information such as name, surname, e-mail, telephone, office number, position, personal number, center, organizational unit; you can also see who is from the given company appointed as the administrator of the application and to whom the ordinary user can contact in the event of the need to modify rights, etc. It is possible to access information about the employee also insert a photo of the employee, which is advantageous for e.g. larger companies number of employees or for new employees (better orientation in company structure).
It is also possible to record data according to the specific needs of the company - the administrator the application defines the data that will be within the corporate intranet registered, and choose whether the selected data will be available to everyone company employees or only for selected users.
Within the Employees module, it is only possible to view an overview of employees or export their list to Excel or print it. All editing data and deleting/adding an employee or supplementing data categories, which will be recorded by the company, can only be done by the administrator of the application in the section Settings, Users tab.
 Staff module settings
Access to the module is granted by employees with specific access rights application manager users in the Settings section, Employees tab, respectively Settings, Users tab.
In this section, optional fields for recording data on employees according to company needs - e.g. bank account number, date birth etc.
Access rights to the staff module
The following access rights can be obtained within the module:
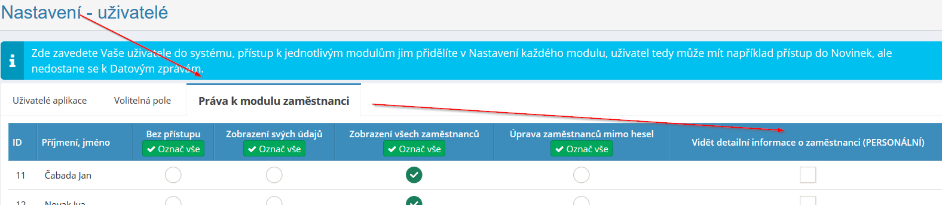
More detailed information about employees can only be made available to some employees, which enables the recording of even more sensitive information.
It is possible to enable the option for users to manage in the module settings your data by checking the "Edit information about yourself" option. The user can then click on their name in the employees module and edit your details and photos.
Adding a new employee
Only the application administrator can enter a new employee in the Settings section, Users tab by clicking the "Add User" button at the top parts of the screen. Subsequently, a table will appear in which the administrator will complete employee data, such as name, title, e-mail, phone, etc.

Inserting a photo of an employee
After entering the employee data, in the user overview (Settings section, Users tab) the Edit photo option appears for the given employee. After clicking this button opens the possibility of inserting and editing employee photo.
Entering additional data for records
If the company wants to record additional data that is not in the basic one module settings, the application administrator can add them in the Settings section, Users tab.
The administrator of the application will add the name of the data that the company will register, and subsequently chooses whether the given data will be displayed to all users or only to selected employees (e.g. "sensitive" data, such as is date of birth, residential address, bank or health account number the employee's insurance company).
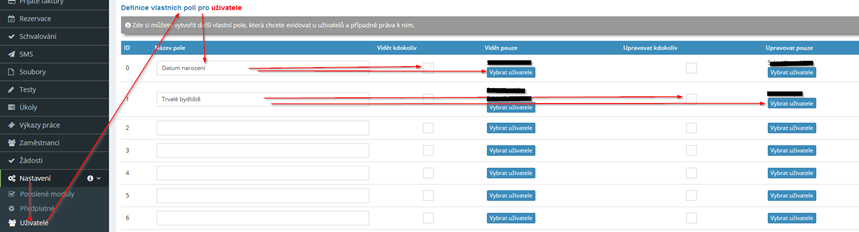
Editing and deletion of employee data
 Edit or delete data u
employees can primarily the administrator of the application. To edit the data of
employee, the pencil icon is used to delete the employee (all data)
cross icon. Both icons are located at the end of each row
employees in the employee overview on the module's home page.
Edit or delete data u
employees can primarily the administrator of the application. To edit the data of
employee, the pencil icon is used to delete the employee (all data)
cross icon. Both icons are located at the end of each row
employees in the employee overview on the module's home page.
Another option is to allow users to edit their own profile eIntranetu.
First, you must enable the employee option in the module settings "Edit information about yourself":
Then the user can click on his name:
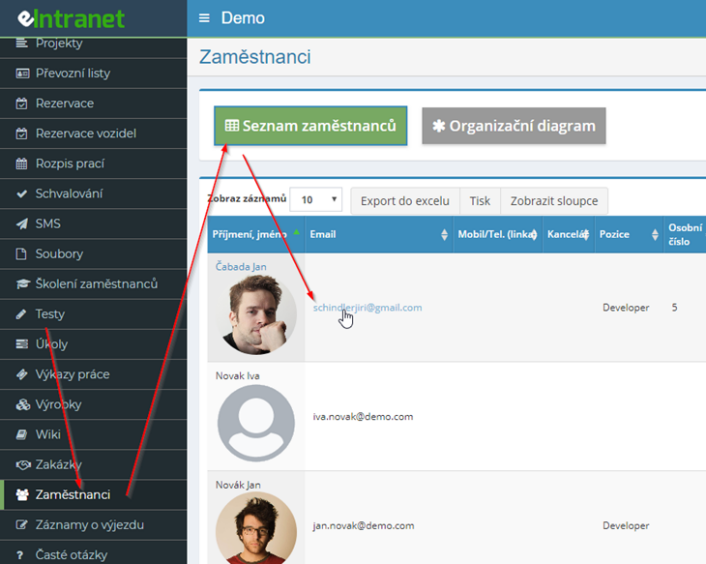
And edit information about yourself:
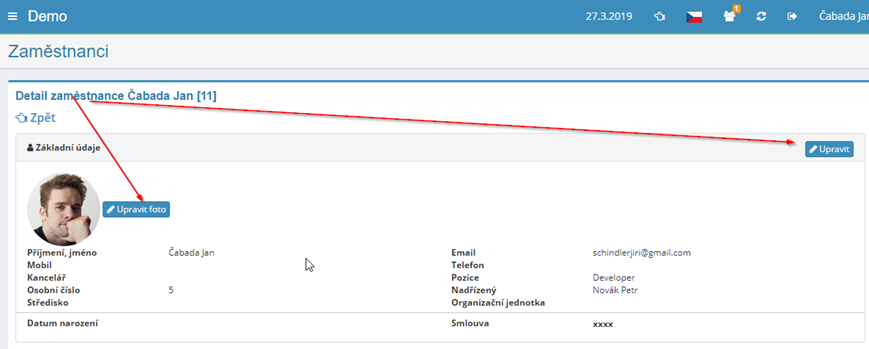
Searching and sorting data
It is ready in case you need to find certain information or a contact the option to write the information you are looking for in the box called Search, which se located at the top right of the screen.
Data in individual columns can be sorted in ascending or descending order
using the  icon located at
of each column name.
icon located at
of each column name.
View of the organizational structure
In the employees module, it is also possible to display the organizational ones user structure:

The condition for displaying the correct organizational structure is in Settings, Users tab, enter the nearest one for individual users supervisor:

The org chart can be hidden if needed:
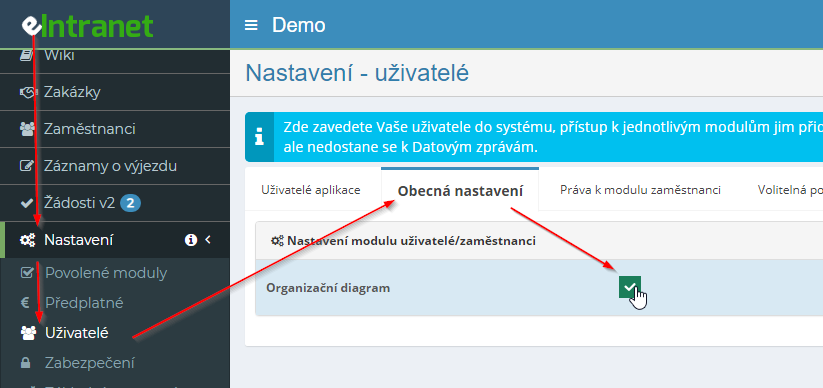
If you need to display multiple separate organization charts (v employees from several companies are registered within the given eIntranet) it is necessary to fill in the employee data according to "company" (this you enable the option in the module settings) - then it can be displayed organizational charts for individual companies:

Export and print to Excel
Individual overviews of work reports (including totals) are possible either print by clicking the "Print" button or download to tables in Excel - by clicking the "Export to Excel" button. Export to Excel only works if you have the application running in the web browser Chrome browser.
Exit records module
The exit records module is intended for healthcare organizations. It is about electronic form for filling out the record of the departure of the medical crew to the patient.
Within the form it is possible to fill in all the important information about to the patient, including the recording of his pulse.
Setting the exit records module
Access to the exit records module is allowed by the application administrator in the section Settings, Exit Records tab.
Application administrator, or can supplement this module here preset text that will be displayed on each form departure record.
Access rights to the exit records module
Within the request module, the application administrator can assign users the following access rights: read - read, add new - read, add, edit - read, add, edit, delete.

Creation of exit record
A new record is created by the user by clicking the "Add record" button. He then fills in the data in the defined form - on the one hand, data on crew, or data about the given trip, and detailed information about the patient and his state of health:
Export and print to Excel
You can either print out an overview of the exit records, namely by clicking the "Print" button, or download to an Excel table - by clicking the "Export to Excel" button. Export to Excel is functional, only if you have the app running in the Chrome web browser.
Request module_v2
This module is used to create different types of submission forms applications and setting up their approval process in electronic form according to the specific needs of the company.
The company can thus create forms for submitting requests for education, compensatory leave, finances, work tools, etc., a then set up their approval process according to your own needs - one or more rounds of approving the application (the number of rounds of approval is not limited, minimum number of rounds is 1).
It is possible to approve the application either only with the help of yes-no or by filling it out approval form. The request can also be returned to the submitter to fill in.
The app administrator can specify the approvers of individual rounds by name or enter the position of users who can approve the request, if applicable it is possible to list selected specific people and to define positions users.
A record is written of each step taken with the request, making it always traceable complete recording history.
Requests entered into the system are clearly sorted and so is the user in individual sections (according to automatically assigned rights - applicants they always see only their requests, approvers see all requests of the relevant type) can see all requests, requests pending on completion/addition, applications pending approval, approved applications and rejected applications.
Request module settings
Access to the request module is enabled by the application administrator in the Settings section, Requests tab. In this section, the application manager creates individual forms for specific types of requests and see here an overview of already created ones forms, which after clicking on the selected request type can in the case needs to be adjusted.
Request module access rights
Within the request module, rights are set automatically for each type of users - applicants always see only their applications, approvers do all requests of the relevant type.
Creating a request
A new request type is created by the application manager in the Settings tab Requests by clicking the "Add Type" button.

Subsequently, a table will be expanded in which the name of the request must be filled in, possibly provide a brief description of it.

The specific form of the request is defined by the application administrator after clicking on relevant request in the request overview.

After clicking on the name of a specific type of request, options for defining the specific form of the form and setting its process approval. First you need to "Add a form" and add to it approvals - button "Add approvals" - number of approvals required set according to the number of approval rounds the application should have.

1 - Form
At this stage, the application manager defines a specific in the module settings the form of the form, which the applicant then fills in within the application module.
The number of fields that the form will have is not limited. Application manager completes the name of the field, the type of response relevant to the given field (text, date, check-box, file, eIntranet user), whether there will be a response required (i.e. whether the response is mandatory for the successful submission of the application) and whether the field will be displayed in the overview table with information about individual requests, which is located on the module's front page requests.

Subsequently, in this section, the application administrator sets who can make the request fill in (by adding specific names of applicants or user positions) and who can approve it (if the approver is not added, the request automatically passes to the next round as approved).

In the last step, he defines the general settings of the form.

2 - Approval
The number of approval levels is set by the application administrator according to the company's needs. Approval can only be set to Approve - Return - Reject or fields may be added to be completed as part of the approval form.

The application administrator will then add users who have permissions approve and defines general settings such as whether to enable following:
-
Allow undo to refill
-
He can select another user (1 or more) from the next round, which the request will be forwarded
-
After the decision (approval), send the information to the next round by e-mail (to applicants or approvers depending on which round follows)
-
After the decision (approval), send an e-mail to the previous approvers (v previous rounds)
-
After the decision (rejection), send an e-mail to the previous approvers (v previous rounds)
-
After the decision (return), send an e-mail to the previous approvers (v previous rounds)
-
After the decision (approval), send the information to the applicant by e-mail
-
After the decision (rejection), send the information to the applicant by e-mail
-
After the decision (return), send the information to the applicant by e-mail
Deleting individual parts of the application
If necessary, individual parts of the application can be removed using the cross icon located here:
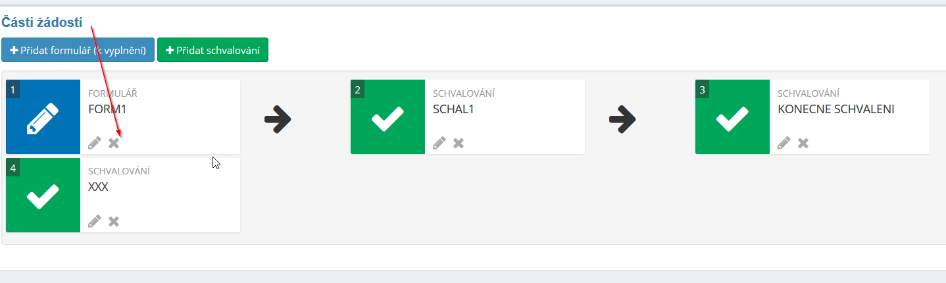
Sample implementation of an electronic request for the purchase of equipment by CZK 5,000 without VAT
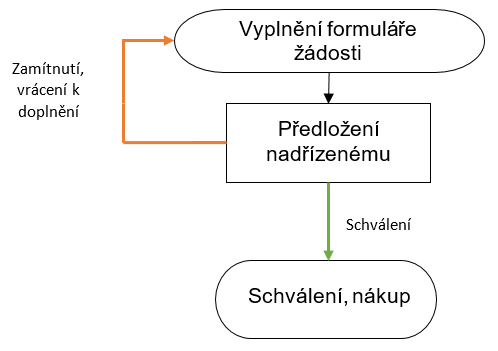
Sample implementation of an electronic request for the purchase of equipment above CZK 5,000 without VAT
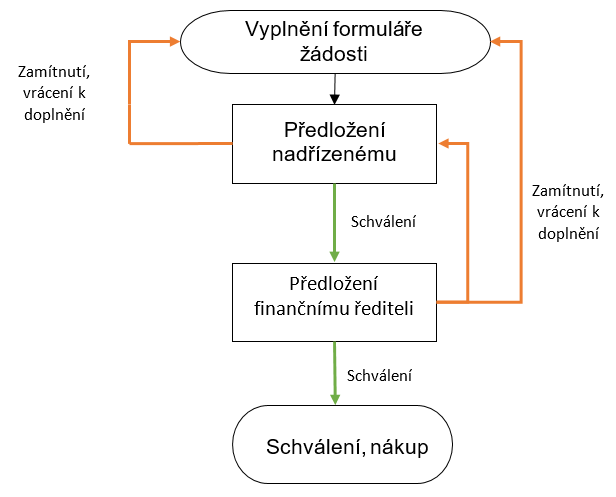
Submission of application
The applicant submits a new application by clicking the "Add application" button and then fills out the form that was defined by the application administrator in settings.

According to the setting of the approval process, or of the number of approval rounds is after the initial submission, the application is forwarded to the relevant persons, i.e. approvers or applicants, for approval or to complete the required ones information.
Copying requests
If a similar request is submitted repeatedly within the same type request, it is possible to copy an already created request for further use:

Approve/Reject/Return Request for Supplement
A user who is authorized to approve submitted requests can request approve, reject or return the application to the submitter for additions. To the submitters of the application, or to the approvers of the application in the previous ones rounds, it will lose the approval process result if set by application admin in module settings, email message.

Overview of submitted requests
Submitted applications can be filtered according to individual sections: All - Awaiting completion/addition – Awaiting approval – Approved – Rejected.

Modifications in the settings of created requests
In case of modification of application submission or approval forms or adding wheels will delete the inserted data and therefore delete already approved applications.
Therefore, if such a change needs to be made, it is the best course of action create a new version of the request and cancel the original version of the request user access rights, or cancel the option for applicants to fill out requests. With such a procedure, previously approved applications will remain archived, e.g. for follow-up inspection.