Guide for eIntranet Application Administrators
The main function of the eIntranet application manager is to register the company to application and subsequently making available individual modules according to the company needs, entering users and assigning access data to the application and setting rights for users to work with specific modules application.
When registering for the application, the administrator will also suggest a URL name to access application – usually in the form https://COMPANYNAME.eIntranet.net/ .
Registration to the application
Registration for the application takes place on the website https://www.eintranet.net/cs/registrace .
In this section, the future user fills in the following information:

Only a user with an ID can register. For execution successful registration, it is necessary to confirm consent with the General Trade conditions.
Application subscription
The first 14 days of using the app are free. Subsequently, it is necessary to choose variant of the tariff for using the application – basic – normal – extra a in the Settings section, Subscription tab, generate a payment prompt. The current price list and application service tariffs are available at https://www.eintranet.net/cenik-intranetu/.
You can choose from a 3-month, 6-month or one-year subscription length.
14 days before the subscription expires is displayed in the box application notification of the end of the validity of the prepaid period and is sent automatic payment request for subscription payment - to application administrator and to the billing email (if entered).
 The challenge is generated according to the current count
users, relevant tariff and for a period of 6 months. In case that
The number needs to be adjusted in the automatic payment request
of users, subscription length or tariff, must be generated
new challenge in account settings as needed.
The challenge is generated according to the current count
users, relevant tariff and for a period of 6 months. In case that
The number needs to be adjusted in the automatic payment request
of users, subscription length or tariff, must be generated
new challenge in account settings as needed.
If during the prepaid period the number of prepaids is used up license and you need to add additional users to the application, you need to si generate a payment request for and after the payment of other users additional users can be added upon payment.
When generating the prompt, you need to enter the type of extension and the number of users, by how much should the subscription be increased – e.g. if I have 10 users and I want to expand to 13, I will generate a call to pay for the 3rd user.
Next, in the Subscription section, Company/Billing details are set up - these the data is then generated, for example, on tax documents for the subscription. Invoice for the subscription is automatically sent to the e-mail of the person who generated it request for payment/ is the administrator of the application and it is possible to have it sent to other emails that are listed in the Billing Emails field.
If you are a VAT payer, you must have the "VAT payer" information checked - it especially affects companies using the application abroad - a call for the subscription is then generated exclusive of VAT and is calculated to deduct the tax subscriber.
In this section it is also possible to set for which state they will be displayed calendars across the application (e.g. in the holiday module, booking) - if any Czech Republic is set, Czech nationals will appear in the calendar holidays. Attention - if you need to have individual settings for everyone user (e.g. in the attendance module, travel orders), it is necessary also set the "Work performance status" for each user (it is by default Czech Republic, but if the user will show attendance in Slovakia, it is necessary set him to Slovakia)
Basic application settings
In the Settings section, the Basic Settings tab, a user with administrative rights will set:
- default application language:

Subsequently, each user chooses the language in which the application will be available display:

The basic menu of the application and some selected modules are currently translated - e.g. documents.
-
graphic display: logo, colored background under the company name, custom image on the login page
-
display of the initial screen (after logging into the application) - options displaying news in the application and information from the vacation module
-
settings – menu: determination of the main administrator of the application, if it is determined multiple administrators (the user that will be visible to others to users as an application administrator - the administrator is displayed by default first in the alphabet) and the appearance of the left menu for users (whether they will also show users modules that are within the company made available to someone, but the given user does not have access to them)
-
editor type (only for users with prepaid extra tariff)
Making individual modules available
After registering in the application, it is necessary to make available the modules that will be yours use the company, in the left menu, in the Settings section. After hers after clicking, the Enabled modules tab will appear. In this admin tab check the individual modules that the company will have available:

Any module can be enabled for use later, during the course using the application. Unused modules are, on the other hand, subsequently, in case needs, can be made inaccessible, while the data contained in them they will remain stored for future use.
Entering users and assigning access to the application
 Individual users are entered by the administrator
application in the Settings section, Users tab. After clicking the button
"Add user" will appear a table in which the administrator must complete
required data such as first name, last name, e-mail, telephone, etc.
Individual users are entered by the administrator
application in the Settings section, Users tab. After clicking the button
"Add user" will appear a table in which the administrator must complete
required data such as first name, last name, e-mail, telephone, etc.
If the admin checks the table “Send an email with access to a new user", an email is sent to the new user, which is generated automatically and which contains the access passwords of the given user to application.
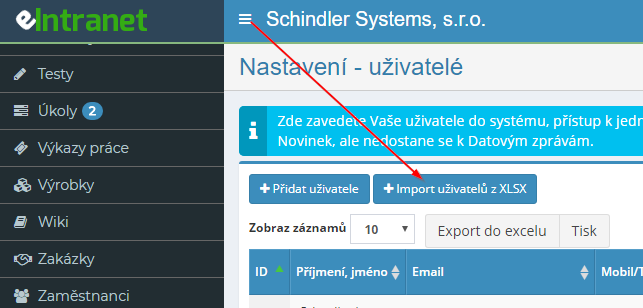
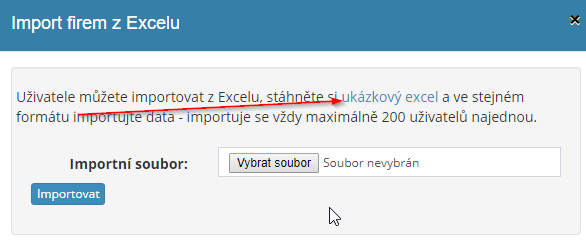
It is also possible to register users in the application in bulk - user data it is necessary to prepare in an Excel file and then import them:
Another option is to have a link generated and sent to the future user for registration to the application by the user himself. In Settings, tab Users can now click the button "Add user - the user will boot himself":

Subsequently, a table will appear in which the administrator of the application will fill in e-mail address of the new user:
 The user will then receive a link,
on which he fills in the necessary data in the application:
The user will then receive a link,
on which he fills in the necessary data in the application:

After filling in the necessary information, the user will come to the administrator of the application information that a new user is registered.
In this way, the new user enters all the required data into the application himself, the administrator will then only set access to individual modules according to needs.
The user who registered the company in the application, automatically acquires administrator rights. This right can when entering/editing assign other users to other users as well (generally we recommend fewer users with this right to avoid confusion in settings or operation of the application), either global law administrator – the user has access to the settings of all modules that are allowed, or may allow the use of other modules, etc., or administrator right for selected modules only (with this right he can in the given module to assign rights to other users, or set parameters for the module to work):
Setting rights in individual application modules
Within each module, the user can obtain different rights for work with the module. These rights are set by the application administrator in the Settings section, in a tab with the name of a specific module - eg directory; within this module, it is possible to check the following rights: does not have access - read - read, write - read, write, delete and restore from the recycle bin.
 When assigning rights, it is generally true that
a higher type of assigned right automatically includes lower rights as well.
Therefore, if the user does not have access, he will not be able to access the module.
With read permission, the user can only view the data in the module
contained, but cannot change them in any way. If he is allowed to read a
write, can view the data and can also change it, but not
lubricate. Deletion is only allowed within the read, write, delete and
restore from recycle bin.
When assigning rights, it is generally true that
a higher type of assigned right automatically includes lower rights as well.
Therefore, if the user does not have access, he will not be able to access the module.
With read permission, the user can only view the data in the module
contained, but cannot change them in any way. If he is allowed to read a
write, can view the data and can also change it, but not
lubricate. Deletion is only allowed within the read, write, delete and
restore from recycle bin.
 If desired by the user
modules that it does not have access to in the left menu at all
were not displayed, it will be set here:
If desired by the user
modules that it does not have access to in the left menu at all
were not displayed, it will be set here:
A certain type of rights can be set by the application administrator en masse for everyone users or only for selected employees.
For some modules - e.g. bulletin board, calendars, documents - it does not set application manager access to the entire module, but only to its individual ones subgroups, folders (relevant for the given user).
In some modules, rights can be assigned even through user positions - e.g. if I specify in the news module that users with the position "lecturer" can read and write news, so all users with this position (i.e future arrivals) will automatically have this right and there is no need for it assign by name.
If there is a right in the rights setting that the assignment rests on by ticking the square check-box, this is the right to superstructure - i.e. the user has, for example, the standard right to read (round check-box), but is it is possible to supplement it with an export option:

A specific description of each type of right is provided in the description of each modules (see below).
Restriction of access to the intranet according to IP addresses and countries
 In Settings, Security section, it is possible
enter the selected IP addresses and according to the countries from which the users will be
intranet access to the application.
In Settings, Security section, it is possible
enter the selected IP addresses and according to the countries from which the users will be
intranet access to the application.
This feature allows the app administrator to restrict access if necessary to the corporate intranet only from corporate offices or only in certain ones countries.
Denial of intranet access/user termination
In the event of an employee's departure, or the need to block his access to the application, it is possible to use the "Active" checkbox in the section "Add/Edit User":
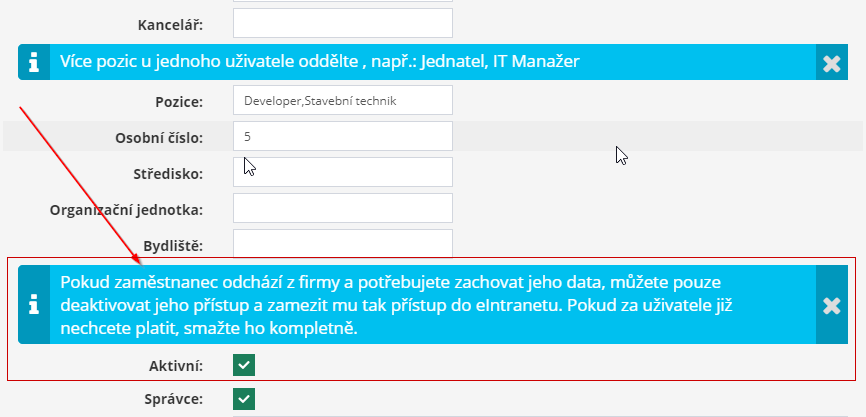
If this check-box is unchecked (the field remains unchecked), the will prevent access to the given user to the application, but all their data remain preserved (so it is still counted among users who they use data space, and a subscription has to be paid for it).
If you no longer want to pay a subscription for it, it must be removed user from the application completely (recommended before download/back up all relevant documents registered for the given person users within the eIntranet).
 It is possible that even after deleting the user
from the application, the user's name will be displayed (e.g. in lists for
approval in the attendance, leave, travel orders module). In such
in this case, the list needs to be updated - click on the "Select" button
user' and then 'Save' again - even if they are not in the list
no changes made. This updates the list.
It is possible that even after deleting the user
from the application, the user's name will be displayed (e.g. in lists for
approval in the attendance, leave, travel orders module). In such
in this case, the list needs to be updated - click on the "Select" button
user' and then 'Save' again - even if they are not in the list
no changes made. This updates the list.
Another option is to replace the existing user with another - that will be it original user overwritten to new back data to original user will be displayed under the name of the new employee; For this reason we recommend downloading the original user's documentation for the archive to yourself, before overwriting his account, and note how long the account was under by the original user.
FAQs from users in individual modules
The most frequently occurring user questions for individual modules (menu application) and the answers to them can be found under the question mark icon on the right top corner of the screen. E.g. the most frequently asked questions by users in the module attendance can be found here:

Modifications of the application according to the needs of users
The eIntranet.net application programming team is capable if needed also implement customized application modifications (in the case of the reality of the processing and request logic). These adjustments are paid for separately and always are taking into account whether the request is usable for other users as well application.
For such a request, please contact us at info@eintranet.net.